HMAS Cootamundra
HMAS
Cootamundra
 |
| Class |
Bathurst Class |
|---|---|
| Type |
Australian Minesweeper |
| Pennant |
J316, M186 |
| Builder |
Poole & Steel Ltd, Sydney |
| Laid Down |
26 February 1942 |
| Launched |
3 December 1942 |
| Launched by |
Lady Davidson, wife of the General Manager, Bank of New South Wales |
| Commissioned |
30 April 1943 |
| Decommissioned |
8 June 1959 |
| Dimensions & Displacement | |
| Displacement | 650 tons |
| Length | 186 feet 2 inches |
| Beam | 31 feet |
| Draught | 8 feet 3 inches |
| Performance | |
| Speed | 15 1/2 knots |
| Propulsion | |
| Machinery | Triple expansion, 2 shafts |
| Horsepower | 2000 |
| Armament | |
| Guns |
|
| Awards | |
| Battle Honours | |
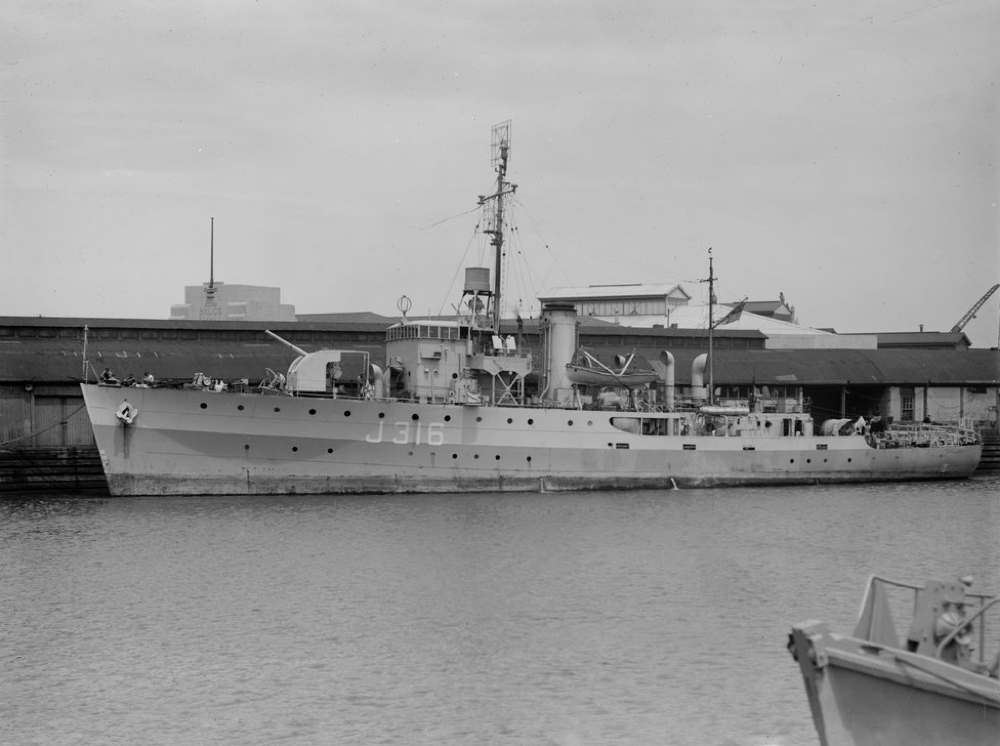
HMAS Cootamundra was one of sixty Australian Minesweepers (commonly known as corvettes) built during World War II in Australian shipyards as part of the Commonwealth Government's wartime shipbuilding programme. Twenty were built on Admiralty order but manned and commissioned by the Royal Australian Navy. Thirty six (including Cootamundra) were built for the Royal Australian Navy and four for the Royal Indian Navy.
HMAS Cootamundra was laid down at Poole & Steel Ltd, Sydney, NSW on 26 February 1942. She was launched on 3 December 1942 by Lady Davidson, wife of the General Manager, Bank of New South Wales and was the first RAN warship to carry the name of the town in the South West Slopes region of New South Wales.
Cootamundra commissioned at Sydney on 30 April 1943 under the command of Lieutenant George A Johns RANR(S).

View of HMAS Cootamundra from the forecastle.
Following a period of trials and working up in the Sydney area, Cootamundra began her wartime career at the close of May 1943, operating as an escort vessel to convoys on the Australian east coast. Japanese submarines were active in these waters, five merchant ships having been sunk in April, and two during May, including the hospital ship AHS Centaur.
On 15 June 1943 Cootamundra proceeded to sea in company with of her sister ships Warrnambool, Kalgoorlie, Bundaberg and Deloraine to escort a Brisbane bound convoy of thirteen ships. En route off Smoky Cape, New South Wales, the convoy was attacked by Japanese submarines of the 3rd Squadron then operating in Australian waters. Two ships were torpedoed; the Portmar, an United States Army Transport (5551 tons) and a United States Navy Landing Ship Tank, LST 469. The Portmar sank in ten minutes with the loss of two lives, but LST 469, though suffering heavy casualties (26 were killed and many wounded), remained afloat and was later towed to port.
On 6 July 1943 Cootamundra reached Thursday Island and from there proceeded to Darwin as escort to the merchant ship Aroor. Arriving on 17 July, she began a period protecting the shipping proceeding between that Darwin and Thursday Island. It proved in the main uneventful though arduous duty in the tropical conditions.
On 6 August 1943 Cootamundra was escorting SS Macumba to Darwin when two Japanese aircraft attacked at low level and in spite of anti-aircraft fire from both ships, scored a direct hit on Macumba's engine room. Attempts to tow the damaged vessel failed and when later the same day it became obvious that Macumba was about to founder, the survivors were taken aboard Cootamundra.

Ship's company of HMAS Cootamundra undertaking haircuts at sea.

Aerial views of HMAS Cootamundra alongside.
In April 1944 Cootamundra proceeded to Sydney for refit having steamed more than 20,000 miles on escort duty in northern Australian waters and some 28,000 miles since commissioning.
The refit was completed on 31 May. On 3 June Cootamundra proceeded to Darwin where for a brief period she resumed the role of escort vessel. On 28 June she sailed from Darwin escorting SS River Clarence, her last duty as a vessel attached to the Darwin Command. On 1 July, at Thursday Island, she transferred to the administrative and operational control of the Naval Officer-in-Charge, New Guinea. On 5 July she arrived at Milne Bay to begin duty in the forward areas which lasted until the end of hostilities. On 16 July 1944 she sailed from Langemak in company with HMA Ships Rockhampton and Bunbury, escorting her first New Guinea convoy of the war. It was bound for the newly won base at Hollandia.

Left: Engine room artificers working on a main engine bearing. (AWM 109338) Centre: An electrician checking gear in the main control room. (AWM 109337) Right: Naval ratings cleaning internal boiler fittings. (AWM 109339)
Convoy escort duty continued through August, and at Aitape on 7 August, her crew witnessed their first bombing of Japanese positions ashore. During the month she visited Mios Woendi, Noemfoor and the recently captured islands of Biak and Wakde.
On 6 September Cootamundra and HMAS Gladstone relieved two American frigates as anti-submarine patrol vessels in the Sansapor area, a duty which kept both ships occupied until the close of the month.
In October 1944 Cootamundra spent a period boiler cleaning at Madang. Mid-month she proceeded to Biak where she spent a few days patrolling the approaches. On 25 October she sailed from Biak escorting two ships to Morotai and on arrival assumed anti-submarine patrol. On 31 October, being relieved on patrol by HMAS Strahan, she was lying in the inner anchorage when five enemy aircraft attacked shipping and shore installations. Cootamundra added her quota to the anti-aircraft (500 rounds were expended) and one aircraft was shot down. She was hit once by machine gun fire from the enemy planes, but suffered only superficial damage and no casualties.
HMAS Cootamundra, circa 1944.
In November she returned briefly to Australia after escort duty during the first half of the month. Ten days were spent at Cairns and on 3 December she returned to New Guinea where she resumed escort and patrol duty. Christmas Day 1944 found Cootamundra at sea escorting a convoy en route for Morotai. On 30 December, in company of two American Torpedo Boats, she carried out her first bombardment of the war when she shelled Japanese positions on Galela Bay, Northern Halmahera.
In 1945, with the successful landings in the Philippines completed, the tempo of operations in the New Guinea area slowed down. Nevertheless the flow of shipping had to be protected against possible submarine or air attack. Thus Cootamundra was kept busy on escort duty. She steamed on average 2800 miles per month in New Guinea waters from January 1945 to the close of hostilities in August. On VJ Day (15 August 1945) she had steamed 74,609 miles on operational war service.

One hundred and sixty four ex-prisoners of war of the Japanese, survivors of Gull Force, 2/21st Infantry Battalion and attached troops, were evacuated from Ambon in the Ceram Sea and brought to Morotai by RAN corvettes for hospitalisation at 1st Australian prisoner of war reception group camp. Left: Private BJ White being assisted down the gangway of HMAS Cootamundra. (AWM 115782). Centre: The camp interpreter of the Ambon POW camp, Ike Ouchi, was also brought back to Morotai. He is shown disembarking Cootamundra. (AWM 115777). Left: Ike Ouchi standing with member of the 1st Australian Armoured Division Provost Company shortly after disembarking from HMAS Cootamundra. (AWM 115780)
On 8 September 1945, in company with HMA Ships Glenelg, Junee and Latrobe, she proceeded to Ambon and embarked Australian, American and Dutch prisoners of war and one Japanese prisoner for passage to Morotai. Later the same month she transported occupation troops to Ambon and took part in the surrender ceremony. On 26 September 1945, with her paying off pennant flying, she sailed from Morotai towing HMAS Leilani en route for Melbourne where she paid off into Reserve on 26 November 1945, having steamed 81,181.2 miles.

Some of HMAS Cootamundra's crew members opening their mail from home.

HMAS Cootamundra in her post war role as a training ship.
Cootamundra recommissioned at Williamstown on 12 December 1951 under the command of Lieutenant Commander Cecil J Cochran RAN. In the post war period she operated chiefly as a training ship in Australian waters. She visited New Zealand in 1954, and in 1957 spent a period in northern waters operating as the supervising vessel to the Japanese Pearling Fleet. In her post war commission she steamed 105,805.6 miles.

HMAS Cootamundra leaving Sydney with trainees embarked.

Interested onlookers watch on as Cootamundra berths alongside during a training cruise.
Cootamundra finally paid off on 8 June 1959. Declared for disposal on 27 September 1961, she was sold to Banks Bros & Street on 28 March 1962.

Note: This video is hosted on YouTube. Department of Defence users will not be able to view this video on the Defence Protected Network.
This cine film has been placed online as part of the Sea Power Centre - Australia's ongoing archival digitisation program.
Further reading
- 'Notable Service to the Empire: Australian Corvettes and the British Pacific Fleet, 1944-45' by Hugh Campbell published by Naval Historical Society of Australia Inc, Garden Island, 1995.
- 'The Corvettes: Forgotten Ships of the Royal Australian Navy' by Iris Nesdale Published by the author, October, 1982.
- 'Corvettes - Little Ships for Big Men' by Frank B Walker published by Kingfisher Press, NSW, 1996.
- 'The Australian Centenary History of Defence Volume III, The Royal Australian Navy' edited by David Stevens, Oxford University Press, South Melbourne, Victoria, Australia, 2001.

