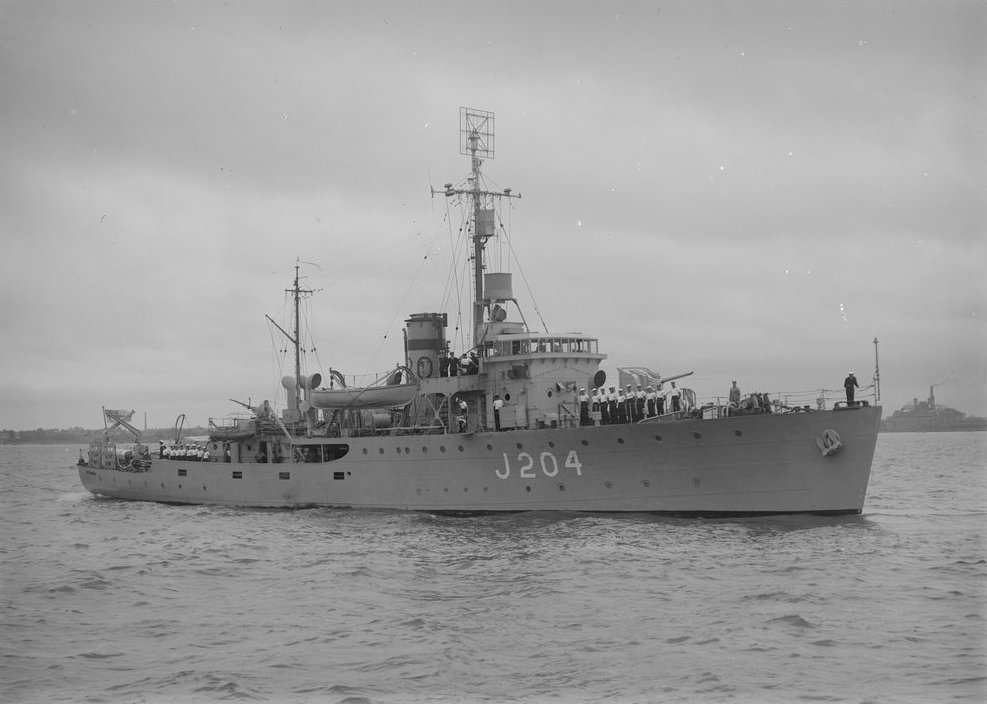
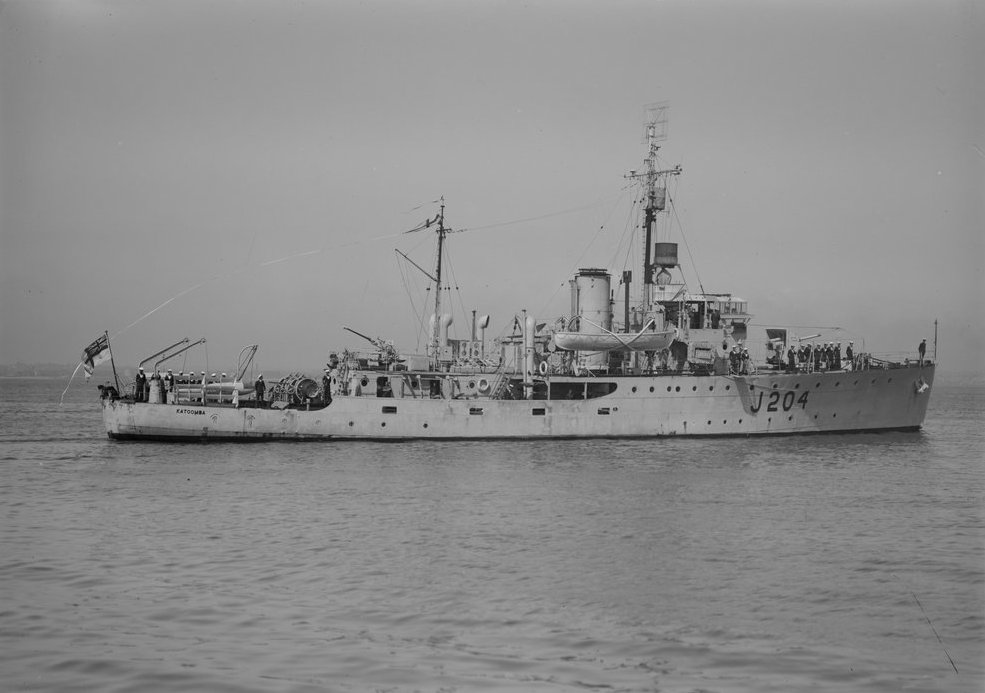
HMAS Katoomba
HMAS
Katoomba
 |
| Class |
Bathurst Class |
|---|---|
| Type |
Australian Minesweeper |
| Pennant |
J204 |
| Builder |
Poole & Steel Ltd, Sydney |
| Laid Down |
9 September 1940 |
| Launched |
16 April 1941 |
| Launched by |
Mrs Lloyd, Deputy Mayoress of Katoomba |
| Commissioned |
17 December 1941 |
| Decommissioned |
2 August 1948 |
| Dimensions & Displacement | |
| Displacement | 650 tons |
| Length | 186 feet |
| Beam | 31 feet |
| Draught | 8 feet 6 inches |
| Performance | |
| Speed | 15 knots |
| Complement | |
| Crew | 85 |
| Propulsion | |
| Machinery | Triple expansion, 2 shafts |
| Horsepower | 1750 |
| Armament | |
| Guns |
|
| Other Armament |
|
| Awards | |
| Battle Honours | |
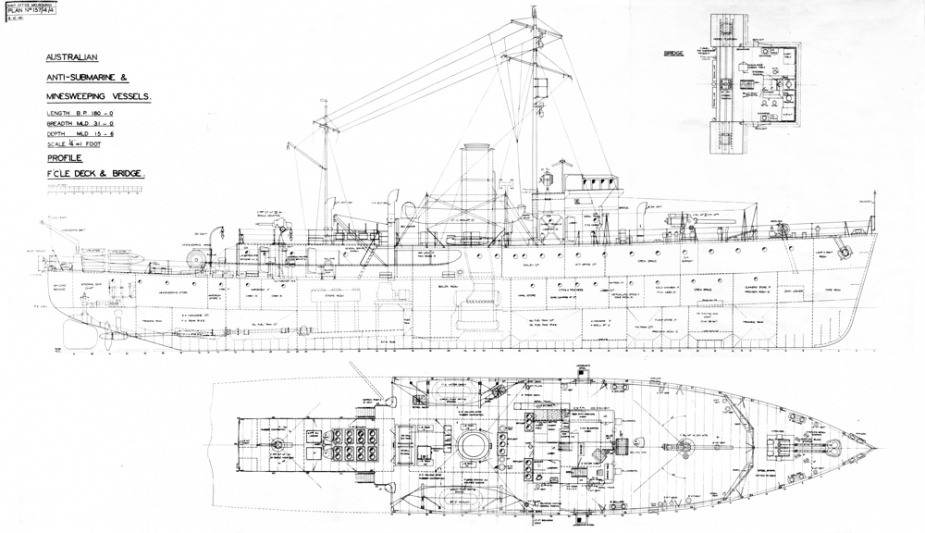
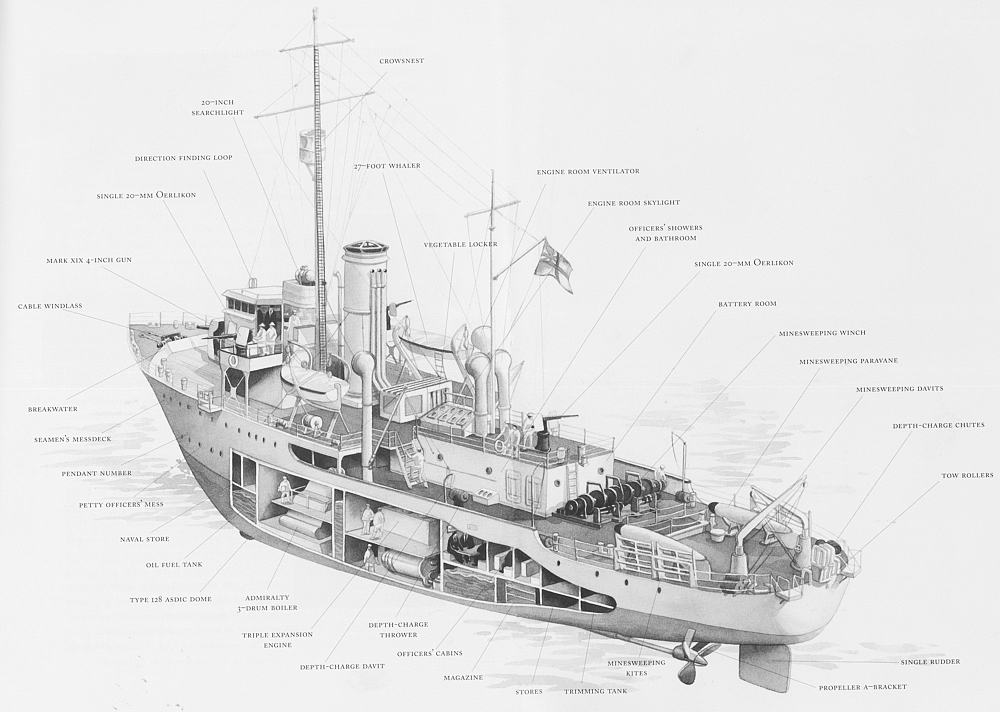
HMAS Katoomba was one of sixty Australian Minesweepers (commonly known as corvettes) built during World War II in Australian shipyards as part of the Commonwealth Government's wartime shipbuilding programme. Twenty were built on Admiralty order but manned and commissioned by the Royal Australian Navy. Thirty six (including Katoomba) were built for the Royal Australian Navy and four for the Royal Indian Navy.
HMAS Katoomba was laid down at Poole & Steel Ltd, Sydney, on 9 September 1940. She was launched by Mrs Lloyd, the Deputy Mayoress of Katoomba on 16 April 1941 before commissioning on 17 December 1941 under the command of Commander Alan P Cousin RANR(S). Katoomba was the first RAN ship to carry the name of the Blue Mountains township, situated some 110 kms west of Sydney.
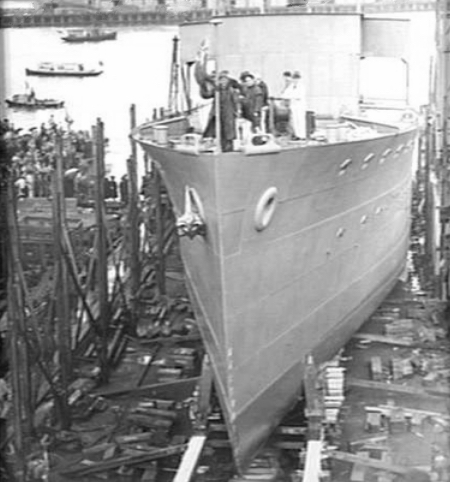
HMAS Katoomba on the launching cradle at the yards of Poole & Steel Ltd shortly before being launched on 16 April 1941.
The ship began her active wartime career in the Darwin area where she arrived on 19 January 1942. At that time Japanese submarines were suspected of being in the area, a suspicion which proved well founded, for at noon on 20 January Katoomba's sister ship, HMAS Deloraine, then at sea off Darwin, received a signal ‘proceed forthwith to position 12°08' south, 130°10' east, for submarine sighted 06:30 today Tuesday'. At 14½ knots Deloraine proceeded as ordered.
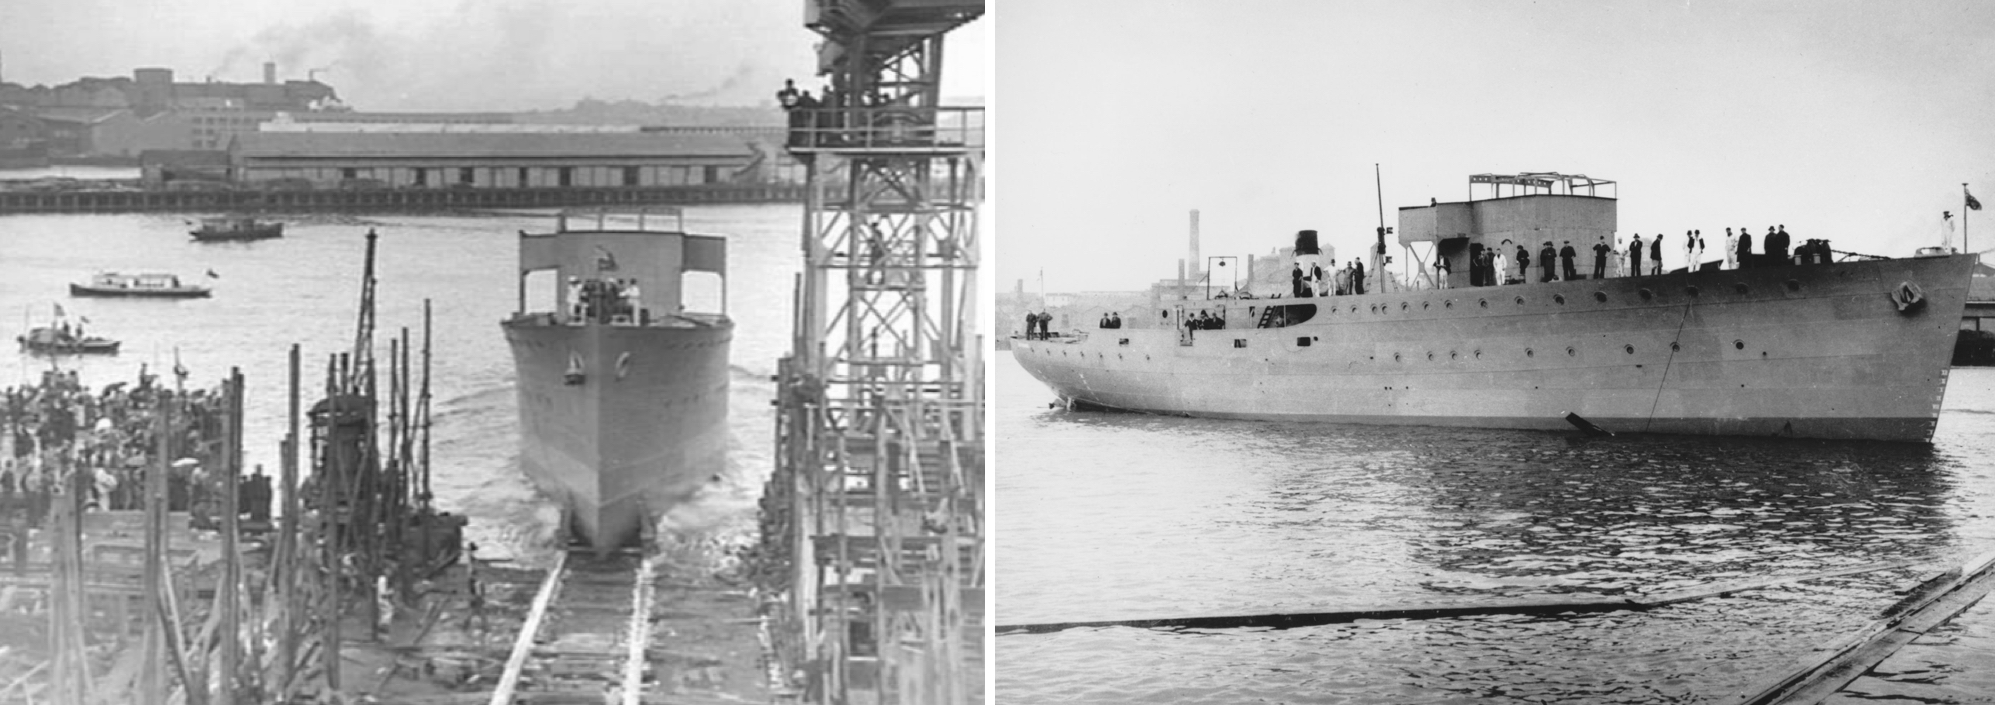
HMAS Katoomba takes to the water for the first time prior to fitting out and later undertaking acceptance trials.

Earlier the same day a Japanese submarine had been detected and attacked by the United States destroyer USS Edsall, but it was not known if she had succeeded in inflicting damage. It was hoped that Deloraine would regain contact on the given course. At 1:35pm a torpedo was seen approaching, the ship swung sharply and it passed ten feet astern.
Immediately a good echo contact was obtained and within a matter of minutes the ship dropped a pattern of six depth charges. Large patches of oil and great air bubbles burst to the surface. The attack continued and after Deloraine had expended all her charges she was joined by Katoomba and another sister ship, HMAS Lithgow, before departing to reload with depth charges from the auxiliary vessel HMAS Vigilant.
Rejoining Katoomba in the early hours of the following morning, Deloraine obtained a second contact and dropped a further series of charges over the position.
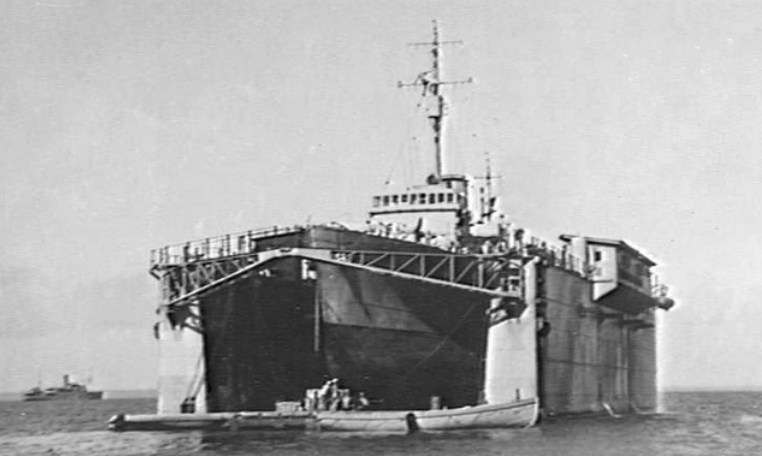
Katoomba secured in floating dock AD1001 in Darwin Harbour following the collision with the US tanker Pecos.
A post war investigation of Japanese records showed that the first attack had been successful, and Deloraine, Katoomba, Lithgow and Edsall were officially credited with destroying the Japanese submarine I-124. A vessel of 1142 tons, she was one of only four minelaying submarines in the Imperial Japanese Navy and loaded forty two mines and twelve torpedoes. I-124 was the first enemy submarine sunk in Australian waters. On 28 June 1977, the Minister for Administrative Services signed a declaration under the Historic Shipwrecks Act 1976 that the remains of I-124 are an historic shipwreck.
At approximately 02:00 on the morning of 22 January 1942, Katoomba was involved in a collision with the US tanker Pecos just outside Darwin Harbour. Holed on the port side and taking water, she was in danger of sinking. She was subsequently secured alongside her sister ship HMAS Lithgow and towed into Darwin Harbour where she was immediately taken into the floating dry dock (AD1001) during the afternoon of 23 January.


Katoomba’s Commanding Officer wisely decided not to de-ammunition, as was usually the case when docking for repairs, and on 19 February, when the first of the Japanese air raids on Darwin began, Katoomba’s ship’s company manned their weapons putting up a spirited defence. The corvette was showered with debris when the merchant vessel Neptuna exploded and survived a near miss when a bomb released from an attacking enemy aircraft narrowly missed the ship and the dry dock in which she was held fast. Nineteen ships were either sunk, put out of action or damaged in the raid. Remarkably, Katoomba and AD1001 escaped serious damage.
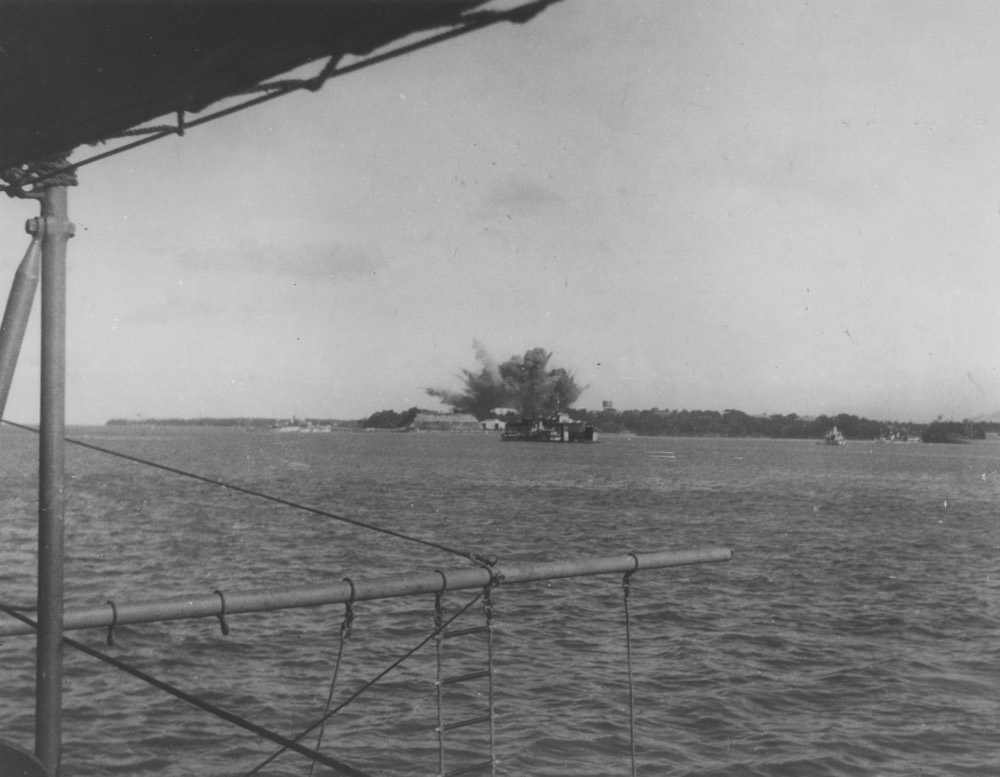
The air raid on Darwin 19 February 1942. HMAS Katoomba can be seen in the floating dock AD1001 with one of the first bombs dropped striking the Darwin Post Office in the background.
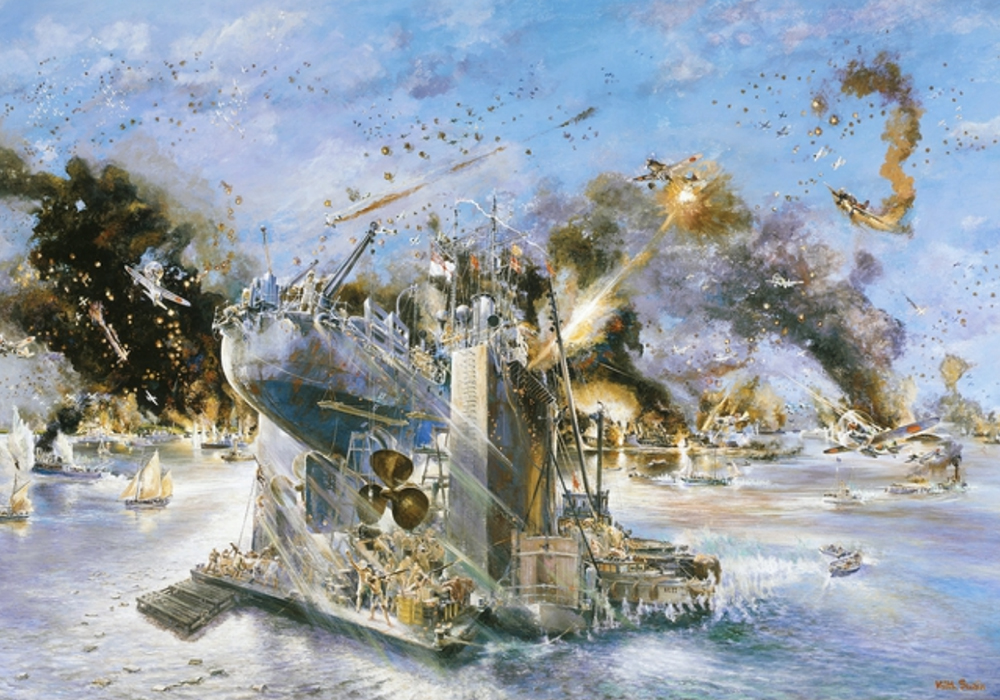
In 1975 former RAN rating Keith Swain, himself a corvette sailor, painted a depiction of Katoomba under aerial attack on 19 February 1942. It was accessioned into the collection of the Australian War Memorial the same year. (AWM ART 28075)
On 28 June 1942 Katoomba began a period of escort duty to New Guinea, shepherding convoys between Townsville and Port Moresby, Milne Bay and Oro Bay. For the next two years the ship was in almost constant service, departing Queensland ports for the forward areas on 31 occasions, interspersed with anti-submarine patrols in New Guinea waters.

Enemy Aircraft attack report from 28 November 1942, when HMAS Katoomba and HMAS Ballarat were attacked by 10 Japanese dive bombers.
Twice in this period she was attacked by Japanese aircraft. On 28 November 1942, off Buna in company with her sister ship HMAS Ballarat, she was fortunate to escape serious damage when ten dive bombers made a determined assault on the two ships. Again in January 1943, six aircraft attacked Katoomba and her convoy, the Dutch ship Van Heutz. Katoomba suffered only superficial damage but the freighter received a direct hit which killed one man and seriously wounded three.
On 14 August 1942 Katoomba went to the assistance of the American submarine USS S-39, which was ashore on Rossel Island Reef. Reaching the scene the following day an attempt was made to refloat the submarine but it unsuccessful. Despite very rough seas Katoomba was able to sail for Townsville on 16 August with all of S-39's crew of four officers and forty three enlisted men safely embarked. The submarine's Commanding Officer had burnt out the boat internally, destroying everything possible and flooded all compartments.
At the end of February 1944, Katoomba escorted her last mainland to Milne Bay convoy, and after a period on anti-submarine patrol in Grafton Passage, she proceeded to Sydney for refit.
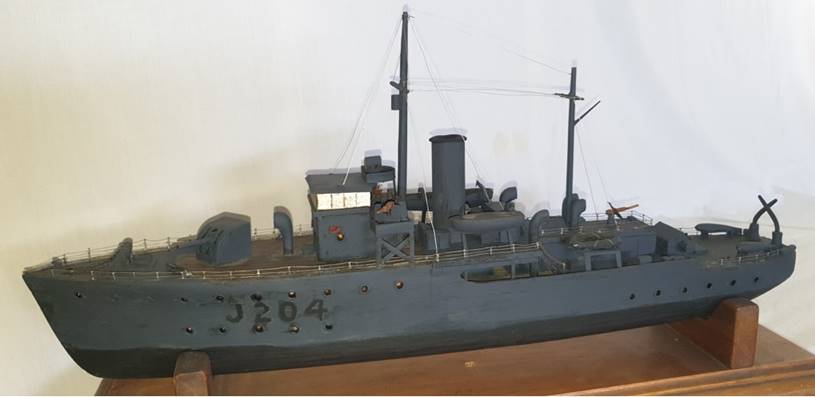
The pride and affection held for HMAS Katoomba by her ship's company can be seen in this model, built by a founding member of the HMAS Katoomba Association, John (Jack) Aldred, from materials held onboard while serving in WWII. Able Seaman Aldred served most of his wartime naval career as an oerlikon gunner aboard Katoomba. (John Aldred collection)
Returning to New Guinea waters in the first week of May 1944, she began four months duty in the forward areas with anti-submarine patrols in the Solomon Sea. In September she returned to mainland for three weeks leave and maintenance.
Returning to the operational area in the first week of October 1944, Katoomba spent a further five months in New Guinea waters, based on Mios Woendi and mainly patrolling and escorting in the Morotai, Biak and Sansapor areas. On patrol in Kaoe Bay in the Halmaheras on 15 October, Katoomba shelled two Japanese barges drawn up on the beach.
Katoomba sailed on 5 March 1945 from Madang for Townsville, ending her wartime service in New Guinea waters. She had steamed over 100,000 on operational duty.
On the last day of March 1945, Katoomba proceeded to Fremantle and spent the next three months based at that port, before departing for Darwin in July. She was present at the surrender of the Japanese forces on Timor in September 1945.
In the post war period, Katoomba became a unit of the 20th Minesweeping Flotilla and operated in New Guinea, New Britain and the Solomons. In October 1946, at Sydney, the ship began preparations to pay off, but in January 1947 she rejoined the 20th Minesweeping Flotilla, spending the following twelve months in sweeping operations off the Queensland coast.
HMAS Katoomba decommissioned on 2 August 1948 and was later sold to be broken up.
Katoomba berthed at Fremantle on 16 January 1948, bringing her seagoing career to an end. She paid off at Fremantle on 2 August 1948, having steamed 152,804 miles. On 2 May 1957 Katoomba was sold to Hong Kong Rolling Mills Ltd to be broken up.
Further reading
- 'The Corvettes: Forgotten Ships of the Royal Australian Navy' by Iris Nesdale - published by the author, October, 1982.
- 'Corvettes - Little Ships for Big Men' by Frank B Walker - published by Kingfisher Press, NSW, 1996.
- 'The Australian Centenary History of Defence Volume III, The Royal Australian Navy', edited by David Stevens, Oxford University Press, South Melbourne, Victoria, Australia, 2001.