HMAS Perth (I)
HMAS
Perth
(I)
 |
| Class |
Modified Leander Class |
|---|---|
| Type |
Light Cruiser |
| Pennant |
D29 |
| Builder |
Portsmouth Naval Dockyard, England |
| Laid Down |
26 June 1933 |
| Launched |
26 July 1934 |
| Launched by |
Marchioness of Titchfield |
| Commissioned |
29 June 1939 |
| Decommissioned |
1 March 1942 |
| Fate |
Lost in action on 1 March 1942 |
| Dimensions & Displacement | |
| Displacement | 6830 tons |
| Length | 555 feet |
| Beam | 56 feet 8 inches |
| Draught | 15 feet 8 inches |
| Performance | |
| Speed | 32.5 knots |
| Propulsion | |
| Machinery | 4 Parsons geared turbines |
| Horsepower | 72,000 |
| Armament | |
| Guns |
|
| Torpedoes | 8 x 21-inch torpedo tubes |
| Other Aircraft | Walrus amphibian (of 9 Squadron, RAAF) |
| Awards | |
| Battle Honours | |
HMS Amphion was the first of three modified Leander Class cruisers built by the Royal Navy that were later transferred to the Royal Australian Navy. Amphion was ordered on 1 December 1932 and work began on her construction on 26 June 1933. She was launched by the Marchioness of Titchfield on 26 July 1934 and commissioned at Portsmouth on 15 June 1936. The engine and boiler rooms in the modified Leander Class were spaced alternately instead of the boiler rooms being grouped amidships. Notable differences to the Leander Class were the presence of two funnels as opposed to one truncated funnel amidships.

The Marchioness of Titchfield launches HMS Amphion on 26 July 1934.
After trials she left Portsmouth on 18 July to join the 6th Cruiser Squadron with two Hawker Osprey aircraft embarked.
The cruiser arrived at Simonstown, South Africa on 3 October 1936 and spent the next two years as Flagship on the Africa station, based on the Cape of Good Hope and cruising as far north as Dakar on the west coast and Beira on the east. Her mid-commission refit was undertaken at Simonstown in the late autumn of 1937.
Amphion departed Simonstown early in October 1938 and arrived at Spithead on 14 December, proceeding to Portsmouth the following day to pay off for a refit. Her Commanding Officer throughout the commission had been Captain RL Burnett, OBE, RN
The refit at Portsmouth Dockyard involved, among other modifications, the addition of a 'heavy' catapult to accommodate a Seagull V amphibion and the installation of modern twin 4-inch anti-aircraft mountings in place of the original old single guns.
Following agreement between the British and Australian Governments for the purchase or Amphion for the RAN it was decided to transfer the ship in 1939. Subsequently the cruiser HMAS Adelaide (I) paid off and her crew, who were to man the new addition to the RAN, left Australia for the United Kingdom on 15 May 1939 in SS Autolycus.
On 29 June 1939 Captain Harold B Farncomb MVO, RAN joined Amphion and preparations were immediately put in place to effect her transfer to the RAN. This subsequently took place in a naming ceremony held on the quarterdeck when Princess Marina, the Duchess of Kent, officially renamed the cruiser HMAS Perth.
A highlight of the short period of peacetime service the ship was to enjoy under the Australian flag was a visit to New York to represent Australia at the World's Fair. Perth’s stay at New York lasted from 4 to 16 August 1939.

The Duchess of Kent officially renames ‘Amphion’ HMAS Perth, 10 July 1939.
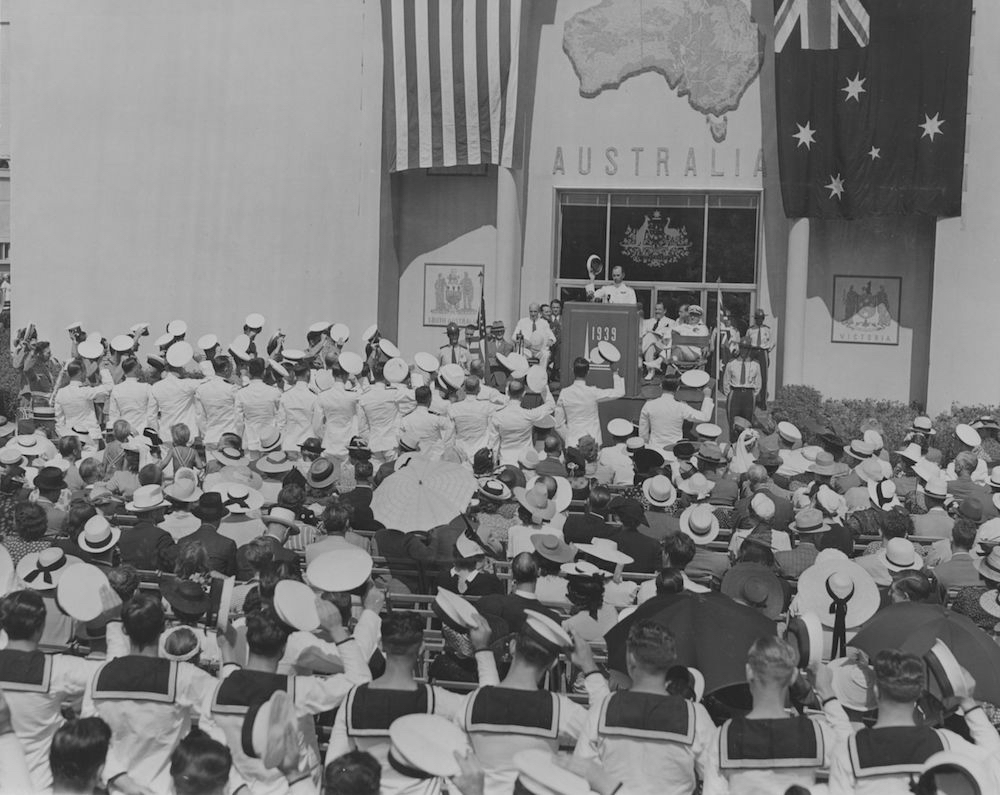
Captain Farncomb leads his men in 'three cheers' on the occasion of Australia Day at the 1939 New York World's Fair.
Before the outbreak of war, it had been intended that Perth would be sailed to Australia before the end of 1939. When war appeared imminent at the end of August the ship was in the West Indies. Pending the arrival of RN ships, she was ordered to protect oil tankers operating between Trinidad and Venezuela. For the next two and a half months Perth carried out escort and patrol duties in the West Indies and Western Atlantic.

HMAS Perth in Culbra Cut Panama Canal 29 November 1939.
Late in November 1939 the ship passed through the Panama Canal and proceeded to Cocos Island with orders to fuel the Royal Canadian Navy destroyers Ottawa and Restigouche. At the end of the month Perth returned to the Atlantic and proceeded for Kingston, Jamaica. Escort and patrol duties continued until early March 1940. The ship again passed through the Canal on 2 March 1940 and sailed for Sydney the following day. She secured alongside at Garden Island on 31 March.
HMAS Perth arriving in Port Jackson, Sydney for the first time.

Left: A pleasure craft carrying well-wishers escorts Perth into Sydney Harbour. Right: Perth secures alongside her berth at Garden Island, 31 March 1940.
Most of April was taken up by a refit followed by engine trials. On 5 May 1940, Perth escorted the troopship Queen Mary which was joining Convoy US 3, the third convoy of Australian troops going to the Middle East. After briefly escorting the convoy in company with HMAS Australia (II), Perth returned to Sydney. Patrols and practice firings on the Australian east coast followed. On 6 June 1940 at Garden Island, Captain Sir Phillip Bowyer-Smyth, RN assumed command from Captain Farncomb. Although Bowyer-Smyth was a Royal Navy officer he had been born at Moss Vale, NSW and had prior service on exchange with the RAN; he was to become a highly respected Commanding Officer due to his professionalism and courteous dealings with all ranks. The following day the flag of the Rear Admiral Commanding the Australian Squadron (RACAS), Rear Admiral John Gregory Crace, was struck in HMAS Canberra (I) and hoisted in Perth, which became the Flagship of the Squadron for almost six months.
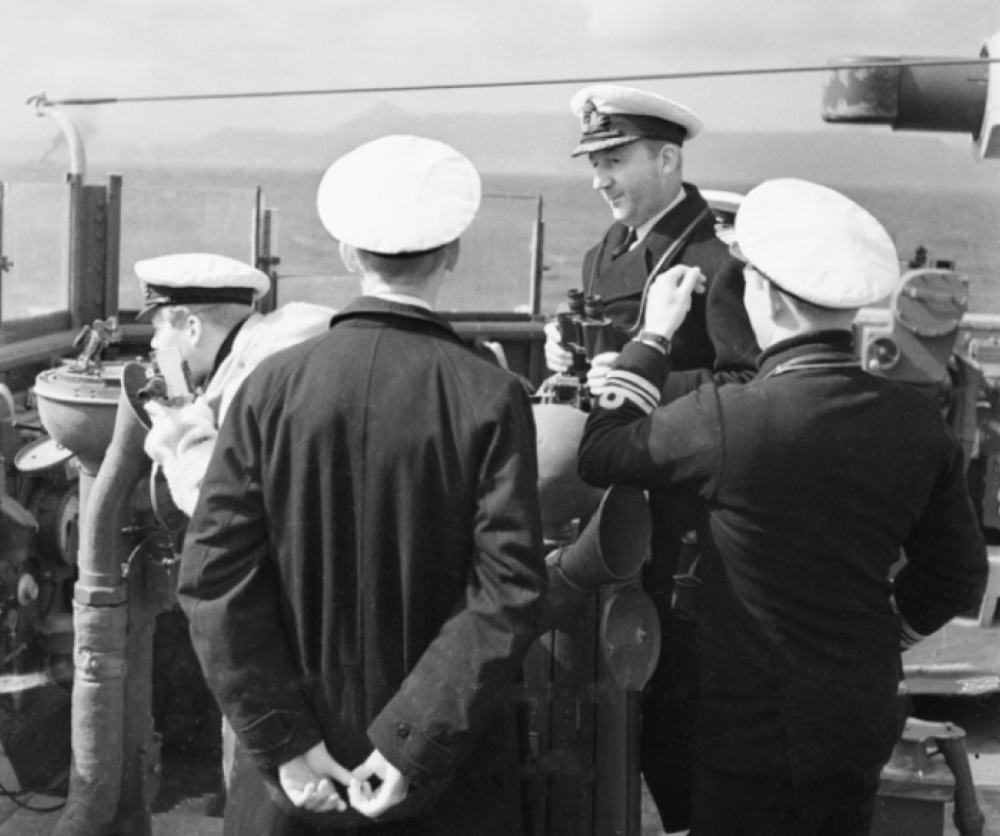
Captain Sir Philip Bowyer-Smyth, RN, with members of his bridge team on Perth's compass platform. (AWM006605)
Until the end of November 1940 Perth was engaged in patrols and escort work around Australia. On 27 November, at Fremantle, RACAS transferred his flag from Perth to Canberra I). On 28 November Perth left Fremantle as an escort for the seventh Middle East convoy, US 7. At different times ships of the Royal Australian Navy, Royal Navy and Royal Indian Navy were in company as escorts during the voyage. Aden was reached on 12 December and the ship's Walrus aircraft was landed to work from shore. Two days later the ship left Convoy US 7 to assume duty as escort to a southbound convoy.
On 16 December Perth arrived at Aden where she re-embarked her aircraft the following morning and then proceeded to take over as escort of a northbound convoy. The cruiser and the vessels under her charge (some having detached and gone ahead) arrived at Suez on 23 December.
The ship proceeded through the Suez Canal and after a short stay at Alexandria she took up duty in the Mediterranean as a unit of the 7th Cruiser Squadron (Perth and RN ships). During a visit to Suda Bay, Crete, on 1 January 1941, Perth’s aircraft was landed and subsequently employed as courier and on other base duties.

Signalmen 'Slim' Roper and Joe Harris keeping a visual lookout in Alexandria Harbour, Egypt, 1941.
The month of January was occupied mainly with patrols and also included transport of troops to Crete and Malta. While in port at Malta, Perth was strained by a near miss in an air raid. In February the ship's work was again principally patrolling. From 9 to 20 February Perth was in dock at Alexandria for partial repair of the damage sustained at Malta the previous month.
In the first half of March the ship took part in the reinforcement of forces in Greece by taking two trips with troops from Alexandria to Piraeus. She resumed patrol duties on 19 March. During the night of 28-29 March, Perth played a minor role in the Battle of Matapan, in which the Italian Navy lost three cruisers and two destroyers against the British losses of five Fleet Air Arm aircraft.
Patrol work was resumed after the Battle of Matapan and continued into April. Late in the month Perth participated in the evacuation of troops from Greece to Crete. On 28 April 1941, Perth's aircraft was shot down off Suda Bay, but its crew of three was rescued by destroyer.
Patrols and convoy escort duties occupied the ship during May. Since being damaged at Malta, Perth had several times escaped damage in attacks by German aircraft, but on 22 May enemy aircraft succeeded in damaging the ship by a near miss.
During a stay at Alexandria from 24 to 28 May urgent repairs were carried out. On 28 May, Perth sailed for Crete to assist in the evacuation, being attacked en route by a German aircraft but fortunately escaping damage.
During the return from Crete with 1188 passengers aboard Perth, the convoy was attacked five times and on 30 May the ship was hit by a bomb in a boiler room. Two cooks, two sailors and nine passengers were killed and the boiler room was put out of action. The ship was later badly shaken by several very near misses. Alexandria was reached on 31 May and Perth remained there until 25 June undergoing repairs.

Throughout operations off Greece and Crete, Perth routinely came under aerial attack. Long hours were spent closed up at action stations and during lulls in the action her captain snatched precious sleep in a deck chair on the compass platform. (AWM P01915.007)
Late in June, Perth was engaged in operations off Syria against Vichy French forces. These included bombardments of shore positions and patrol work. On 15 July the ship, which was to be relieved by HMAS Hobart (I), proceeded to Alexandria for return to Australia. She sailed from Alexandria for Australia on 18 July calling at Aden, Colombo and Fremantle en route. Her arrival in Fremantle on 6 August 1941 saw the ship feted by Western Australians whose capital she was named for. Twenty eight days leave was granted to the western Australians who comprised Perth’s ship’s company before she continued her voyage across the the Great Australian Bight bound for Sydney.

HMAS Perth's ship's company in Fremantle, 6 August 1941.
On 12 August 1941, Perth arrived at Sydney and the following day moved to Cockatoo Dockyard for an extensive refit. Acting Commander Charles R Reid RAN, assumed command on 1 September 1941 and was relieved by Captain Hector ML Waller DSO*, RAN, on 24 October 1941. After completion of her refit on 22 November Perth was engaged in exercises from 24 to 30 November and then sailed for Auckland. She carried out patrols, escort duties, exercises and manoeuvres during December 1941 and January 1942, visiting New Caledonia and New Guinea.

USS Houston in Sydney, circa 1938.

HMAS Perth (I)'s calendar for 1942.
On 14 February 1942, Perth sailed for Java. She arrived on 24 February at Batavia (Tanjong Priok), where she was attacked by Japanese aircraft during that day and the next, without sustaining damage. Perth sailed on 25 February for Surabaja in company with four Royal Navy ships. On 26 February the ship departed Surabaja in company with the Dutch cruisers De Ruyter and Java, the cruisers USS Houston and HMS Exeter, two Dutch destroyers, four US destroyers and HM Ships Jupiter, Electra and Encounter and proceeded along the north coast or Madura Island.
During the night of 27-28 February a fourteen ship ABDA (American, British, Dutch and Australian) force engaged Japanese naval forces in the disastrous Battle of the Java Sea. Five Allied ships were lost during that action and Perth and USS Houston were lucky to survive.
HMAS Perth and USS Houston arrived at Tanjong Priok on 28 February after the day and night actions off Surabaja. Fuel stocks in the port were almost exhausted and Perth could only receive 50% of full stowage. Preparations were being made to destroy all warehouses and harbour installations, so the opportunity was taken to embark any stores that might prove useful.
Orders were subsequently received to sail in company with Houston and the Dutch destroyer Evertson through Sunda Strait to Tjilatjap. Perth and Houston cast off at 1900 hours making a signal at the same time to Evertson to precede them out of harbour. Not having received clearance to sail, she was told to obtain the necessary orders and follow as soon as possible. The harbour entrance was soon passed and a course set for Sunda Strait. Houston was stationed five cables astern of Perth.

USS Houston photographed in Darwin Harbour in early 1942, with an attendant US destroyer astern.
Shortly after sailing, Perth received air intelligence of an enemy force stated to consist of ten transports escorted by two cruisers and three destroyers sighted at 16:00, 28 February, 50 nm north east of Batavia proceeding on an easterly course. According to Lieutenant John Harper, RN, Perth's Navigation Officer, Captain Waller considered that the Japanese would make a landing east of Batavia during the night of 28 February/1 March and that the invasion convoy escort would not be likely to interfere with the passage of Perth and Houston through the Sunda Strait.

HMAS Perth wearing her distinctive disruptive camouflage paint scheme.
The two cruisers followed a course as close as possible to the Java coast with Perth leading. Babi Island was sighted on the starboard beam 1.5 miles distant at 22:45. At that time the Japanese Western Invasion Convoy (General Imamura) had already entered Bantam Bay escorted by the cruisers Natori and Yura and destroyers Harukaze, Hatakaze, Asakaze, Fubuki, Murakumo, Shirayuki and Shirakumo. Close cover to seaward was provided by the 2nd Division of the Japanese 7th Cruiser Squadron (Admiral Kurita) consisting of heavy cruisers Mogami and Mikuma screened by the destroyer Shikinami. Distant cover was provided by the 1st Division of the 7th Squadron, Suzuya and Kumano, several destroyers and aircraft carrier Ryujo.
From available records it appears that Perth was first sighted by Fubuki which was on patrol north-east of Bantam Bay some time before the Japanese were sighted by the Allied cruisers. At 23:06 a lookout in Perth sighted a vessel about five miles off St Nicholas Point. When challenged she proved to be a Japanese destroyer, believed to be the Harukaze, and was immediately engaged by both ships. Shortly afterwards, other destroyers were sighted to the north and the armament split so as to engage more than one target.
Perth received her first hit at 23:26, her second at 23:32 and a third at 23:50. Shortly afterwards Lieutenant Peter Hancox, RAN reported that ammunition was reduced to a few 6-inch practice shells and some star shells. At that juncture Captain Waller decided to attempt to force a passage through Sunda Strait. He ordered full speed and altered course for Toppers Island. Perth had barely steadied on course when she was struck on the starboard side by a torpedo at 00:05. A few minutes later Perth received a second torpedo hit on the starboard side and Captain Waller gave the order to abandon ship. Perth sank at approximately 00:25 having received two further torpedo hits, one on her starboard side, the other on the port.

Original signal requesting Perth to report her position. She had already been sunk in the Battle of Sunda Strait.
During the action a large number of enemy destroyers attacked from all directions, and, due to the large number of enemy ships attacking, it was impossible to engage all targets at once and some were eventually able to close to a very short range. The Japanese warships were protecting an invasion convoy of approximately 50 ships which effected a landing in Banten Bay, Java. According to Japanese reports 85 torpedoes were expended by Japanese ships during the action.
USS Houston was still fighting although badly on fire. She was hit by torpedoes and sank shortly afterwards rather closer inshore. Fire from Perth and Houston destroyed the Japanese transport Sakura Maru (7170 tons) and three other transports including the headquarters ship Ryujo Maru.
Most of Perth's crew abandoned ship between the second and third torpedoes, but it is doubtful if any of the boats were successfully launched. Many Carley rafts and wooden life rafts were launched. During the abandon ship operation Perth was under fire from several destroyers at close range and many hits were scored and casualties caused. Many were killed or wounded in the water by the explosion of the last two torpedoes and by shells exploding in the water.
At the time of her loss Perth's ship's company totaled 681, comprising 671 naval personnel, six RAAF personnel (for operating and servicing the ships aircraft) and four civilian canteen staff. Her ships company numbers were slightly increased by a number of men who had been destined to join HMAS Hobart, on 24 February, but who were unable to be transferred to that ship due to an air raid on Tanjong Priok. 347 naval personnel (including Captain Waller), three RAAF personnel and three canteen staff did not survive the sinking. 328 men survived the sinking being 324 naval personnel, three RAAF personnel and one civilian canteen assistant; 17 year old Alfred Hawkins.
Note: This video is hosted on YouTube. Department of Defence users will not be able to view this video on the Defence Protected Network.
This cine film has been placed online as part of the Sea Power Centre - Australia's ongoing archival digitisation program.
Four naval personnel are then known to have died ashore, on Java, without having been taken prisoner. A further 106 men died in captivity (105 naval personnel and one RAAF airman). Four sailors were recovered from captivity in September 1944 when they were among prisoners of war rescued by a US submarine after the sinking of a Japanese cargo ship. After the end of hostilities another 214 men (211 naval, two RAAF and civilian canteen assistant Hawkins) were recovered from Japanese Prisoner of War camps and repatriated to Australia.

Left: Captain HML Waller, DSO & Bar, RAN who was lost in Perth during the Battle of the Sunda Strait. Right: Able Seaman JE Ralston, Egypt 1940.
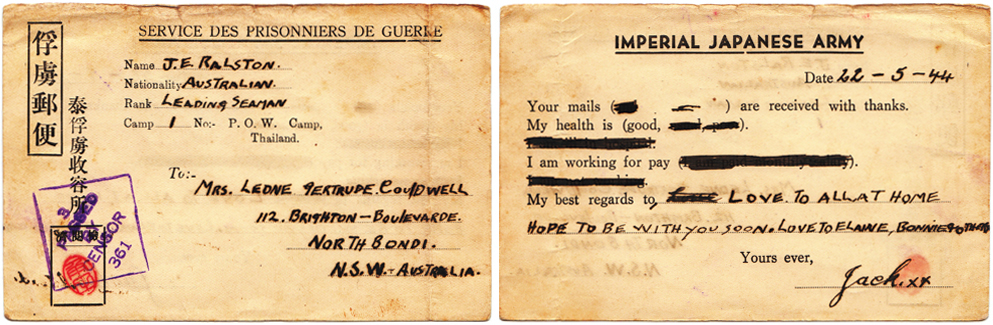
Leading Seaman JE (Jack) Ralston, a veteran gunner of the Mediterranean campaign in HMAS Sydney, transferred to Perth shortly before she joined the ABDA force. Although he escaped Sydney's loss in November 1941 he was to endure three years of captivity as a prisoner of war of the Imperial Japanese. Following the war's end he remained in the RAN attaining the rank of Chief Petty Officer. (Courtesy the Ralston Family)

Left: Survivor of HMAS Perth, Bandsman George Vanselow who recalled the night Perth and Houston were sunk in his poem entitled 'Memory' which appears below. Right: HMAS Perth survivors, Telegraphist William Price and Able Seaman Alan Elliot.
Memory
By Bandsman George Vanselow, RANIn Sunda Straits she fought her fight,
Gainst hopeless odds that fatal night,
Brave men gave all, so great their worth,
and glorified the 'Fighting Perth'.

Darwin, NT, circa 1945. A group of survivors of HMAS Perth arrive at Darwin on HMT Highland Chieftain. Pictured, left to right: Petty Officer (PO) Ernest Robinson of Sydney, NSW; Chief Petty Officer (CPO) Joseph Hughes of Sydney, NSW; Able Seaman (AB) Edmund Clark of WA; Stoker Alan Axton of Vic; PO Charles Thomson of WA; CPO Wilfred Barnes of Sydney, NSW; PO Edward Tyrrell of Vic; CPO Robert Bland of Sydney, NSW; AB Cyril Woodman of SA; AB Eric Hurst of WA; Stoker Clive Henry of Vic, and Stoker Herbert Mynard of Vic. (AWM 19407)
HMAS Perth’s ships’ bells
Perth retained the two original bells carried by the cruiser while commissioned in the Royal Navy as HMS Amphion. Both bells were engraved ‘HMAS PERTH 1939’ on the reverse side and thus they carried the names of both ships.

The ornate ship's bell, seen in the above image, was salvaged from the wreck of Perth some time in the 1960s-1970s and is now on display in the foyer of the Perth City Hall in Western Australia having been attained in the 1980s. The other Perth/Amphion bell was retrieved from Perth's wreck by an Indonesian diving team in 1974 and subsequently presented to the Australian Government by the Indonesian Government. It now forms part of a commemorative display in the World War II gallery at the Australian War Memorial in Canberra, ACT.

Left: The ornate Perth/Amphion bell as it was recovered before being conserved and presented to the city of Perth. Centre: The Perth/Amphion bell presented to the Australian War Memorial in Canberra. Right: the brass binnacle cover retrieved by diver David Burchell in 1967.

On the 75th anniversary of Perth's loss her bell was placed in the forecourt of the Australian War Memorial where it formed the centrepiece of a commemorative ceremony. There, for the first time in many years, it was rung to honour those who perished in her during and following the Battle of Sunda Strait.
A warship's bell is something that all onboard are familiar with. In days gone by they were the 'heart-beat' of a ship's routine, marking the passing of watches and other important ceremonies such as the raising of morning colours when in port or at anchor. Every member of a ship's company is familiar with its ring and as such these bells are important artefacts which, long after a ship is lost in action or decommissioned, form a 'touchstone' for former shipmates and relatives of those who served, fought and died in them. We are fortunate to have both of Perth's bells in safe custody as a visible reminder of the crew's courage and sacrifice.
John Perryman
Director Strategic & Historical Studies
Sea Power Centre - Australia
Naval History Section
Remembering HMAS Perth (I)

HMAS Perth's ship's company is commemorated on Panel 6 in the cloisters of the Australian War Memorial, Canberra. Right: 2016, Commander Andrew Schroder, RAN, the then Assistant Naval Attache in Washington with Mr John Schwarz, President of the USS Houston Survivors and next generations Association in Arlington Cemetery, Virginia. HMAS Perth is the only foreign warship commemorated in the grounds of Arlington.

Above: A plaque commemorating HMA Ships Perth (I) and (II) in the grounds of the Australian War Memorial, Canberra, Australia.

Further reading
- ‘A Cook's Tour: HMAS Perth’s Mediterranean War 1941’ by Roy Norris - published by The Naval Historical Society of Australia Inc, Garden Island, 2005.
- ‘HMAS Perth: The Story of the 6-inch Cruiser: 1936-1942’ by Alan Payne - published by The Naval Historical Society of Australia, Garden Island, 1978.
- ‘The Australian Cruiser Perth: 1939-1942’ by Ian Pfennigwerth - published by Rosenberg Publishing, Dural, 2007.
- ‘Ship of Courage: The Epic Story of HMAS Perth and Her Crew’ by Brendan Whiting - published by Allen & Unwin, St Leonards, 1994.
