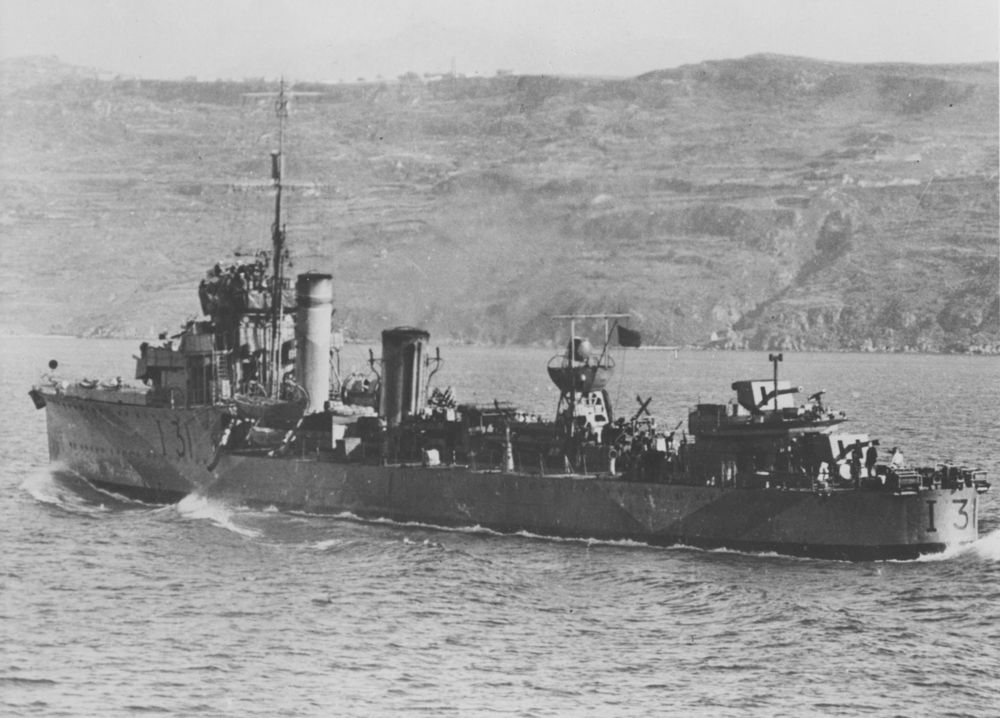
HMAS Voyager (I)
HMAS
Voyager
(I)
 |
| Class |
V and W Class |
|---|---|
| Type |
Destroyer |
| Pennant |
D31 |
| Builder |
Alexander Stephens and Sons, Glasgow, Scotland |
| Laid Down |
7 May 1917 |
| Launched |
8 May 1918 |
| Commissioned |
11 October 1933 |
| Decommissioned |
23 September 1942 |
| Fate |
Ran aground on 23 September 1942 |
| Dimensions & Displacement | |
| Displacement |
|
| Length | 312 feet 1 inch |
| Beam | 29 feet 6 inches |
| Draught | 12 feet 6 inches |
| Performance | |
| Speed | 34 knots |
| Complement | |
| Crew | 130 |
| Propulsion | |
| Machinery | Brown-Curtis turbines, twin screws |
| Horsepower | 27,000 |
| Armament | |
| Guns |
|
| Torpedoes | 3 x 21-inch torpedo tubes (triple mount) |
| Other Armament | 2 x 20mm Oerlikons |
| Awards | |
| Battle Honours | |
In 1933 the Admiralty agreed to loan the Flotilla Leader Stuart (I) and four V and W Class destroyers (Vampire (I), Vendetta (I), Voyager and Waterhen (I)) to the Royal Australian Navy as replacements for the S Class destroyers (Stalwart, Success, Swordsman, Tasmania and Tattoo) and the Flotilla Leader Anzac, then due for scrapping. Voyager and the other four ships commissioned in the Royal Australian Navy at Portsmouth on 11 October 1933 to form the Australian Destroyer Flotilla, later to become famous as the 'Scrap Iron Flotilla'. Voyager was commissioned under the command of Lieutenant Commander George Stewart RAN.
The Flotilla departed Chatham, under the command of Captain AC RN (in Stuart (I)), on 17 October 1933 and, proceeding via Suez, reached Singapore on 28 November, Darwin on 7 December and Sydney on 21 December 1933.
The next two years of Voyager's service followed the normal pattern of a Squadron destroyer in Australian waters. Training exercises, spring cruises, a run to New Zealand in March 1935 and long periods in Sydney Harbour sums up the routine for Voyager in the early 1930s.
On 14 April 1936 Voyager paid off into Reserve to be replaced by Waterhen (I) in the Flotilla. Two years in Reserve at Sydney ended on 26 April 1938 when Voyager recommissioned under the command of Lieutenant Commander James Morrow RAN. Following her recommissioning, Voyager spent most of the remainder of 1938 in Queensland and New South Wales waters.

HMAS Voyager (I) in Cairns.
In October 1938 she arrived in southern waters, reaching Melbourne at the close of the month and returning to Sydney on 10 November. February and March 1939 were spent in Tasmanian waters, followed by exercises in Victorian waters, finally returning to Sydney on 28 April. The months remaining before the outbreak of World War II were spent in Queensland and New South Wales waters.
On 14 October 1939 Stuart (I), Vendetta (I) and Waterhen (I) departed Sydney for Singapore, proceeding via Darwin and Lombok Strait. The same day ( Vampire (I) and Voyager departed Fremantle to join company at Singapore. The Flotilla was under the command of Commander HML Waller RAN (Commander (D)), in Stuart (I).

Left to right: Voyager (I), Stuart (I) and Vendetta (I) alongside.
It had been intended to base the destroyers at Singapore for a period of training but, while the Flotilla was still at sea, it was decided that after a brief stop at Singapore it should proceed to the Mediterranean. The two ships ex Fremantle arrived at Singapore on 21 October 1939 where they were joined on the 29th by Stuart (I), Waterhen ;(I) and Vendetta (I).
The Flotilla sailed from Singapore on 13 November 1939 but split up en route and consequently the ships did not all reach Malta at the same time. Voyager arrived on 24 December 1939. From 2 January 1940 the Flotilla formed the 19th Destroyer Division for service with the Mediterranean Fleet.
At this period of the war, British and French naval supremacy in the Mediterranean called for only routine escort and patrol duties, interspersed with fleet exercises. Nevertheless, the Australian destroyers were kept busy with their routine of escort and patrol work, singly and in pairs, which took them from end to end of the Mediterranean.
Voyager commenced operational service in the Mediterranean escorting convoys from Malta to Marseilles convoys. She sailed from Malta on New Year's Day, 1940, bound for Marseilles. On 11 January 1940 she entered Alexandria Harbour for the first time in World War II, departing the following day escorting a Malta convoy.

Voyager's crew at pistol practice at the Ricasoli rifle range in Malta. (Courtesy of Mr Arthur Cooper)
In February and March the pattern was much the same and on 24 March Voyager's crew had their first glimpse of the 'Rock' when they entered Gibraltar to provide screen for the carriers HMS Ark Royal and HMS Glorious en route to Alexandria.
Voyager commenced a refit at Malta on 5 April, spending the remainder of the month in dry dock. Escort duties recommenced on 3 May when she sailed for Alexandria in company with Vendetta (I) and Waterhen (I), escorting HMS Resource to Alexandria. The period of 5 to 20 May saw Voyager almost constantly at sea, on escort patrols and fleet manoeuvres with brief spells in Alexandria. On 20 May she joined the escort of the French warships Tourville and Boulogne en route for Bizerts. May closed with the destroyer back in Alexandria.
On 27 May the 19th Destroyer Division (Stuart (I), Vampire (I), Voyager, Vendetta (I) and Waterhen (I)) and the 20th Destroyer Division (HM Ships Dainty, Diamond, Decoy and Defender) combined to form the 10th Destroyer Flotilla under the command of Commander Waller.
The entry of Italy into the war on 10 June 1940 and the collapse of French resistance on the 22 June completely changed the naval situation in the Mediterranean. Formerly, all coastlines were either Allied or neutral, and the Anglo-French fleets were in undisputed command of the seas. Now all coasts except those of Egypt, Palestine and Cyprus in the east, Malta in the centre, and Gibraltar in the west were closed to the Royal Navy. Moreover, the Allies had lost the support of the French fleet, which had provided seven capital ships and nineteen cruisers, and had acquired a new enemy in Italy with her menacing naval potential. Her fleet boasted five battleships, 25 cruisers, 90 destroyers and nearly 100 submarines. It spelt the beginning of a long and bitter struggle for control of the Mediterranean, first against the Italian fleet and Air Force (neither of which proved the menace expected) and later against the much more formidable German Luftwaffe whose dive bombers took grievous toll of British warships before they were finally driven from the skies.
For more than a year the 'Scrap Iron Flotilla' took part in the struggle for possession of the ancient sea route linking east and west.
The Italian submarine fleet represented a formidable threat and it was as a counter weapon that Voyager's initial role against the Italians took shape. On 13 June 1940, off Alexandria, Voyager contacted and attacked a submarine with two patterns of depth charges. The submarine immediately surfaced and Voyager opened fire forcing it to submerge. More depth charges were dropped, but the submarine, in spite of prolonged attack, escaped. On 17 June in company with Vampire (I) off Alexandria, a second contact was made but a series of attacks again failed to destroy the enemy.
Anti-submarine patrols continued through the hot Mediterranean June days. At sea off Crete on the evening of 27 June and in company with several destroyers of the 10th Destroyer Flotilla, the submarine Liuzzi was sighted on the surface. She promptly dived but HM Ships Ilex, Dainty and Decoy soon gained contact and forced her to surface. After a brief exchange of fire between Dainty and Liuzzi the Italian surrendered. Voyager thereupon lowered her whaler and rescued thirteen survivors before the submarine was finally destroyed by gunfire.
Early in the morning of 29 June, at 0505, the anti-submarine group were maintaining patrol west of Crete when a submarine was sighted on the surface. She promptly dived and in spite of depth charge attacks by Voyager, Ilex and Defender, apparently escaped. An hour and a half later, the submarine Uebi Scebeli was sighted on the horizon. Dainty and Ilex closed, attacked and sank her after rescuing survivors. In the evening of the same day the destroyers returned to Alexandria where Voyager landed her prisoners.
On 30 June, the day that Voyager returned to Alexandria from her first brush with the enemy, Vice Admiral Sir James Somerville hoisted his flag in HMS Hood at Gibraltar in command of Force H, hastily constituted to bolster Mediterranean sea power to meet the new threat. It comprised HM Ships Hood, Resolution and Valiant, the aircraft carrier HMS Ark Royal, the cruiser HMS Arethusa and seven destroyers. After operating against the French fleet at Oran in the first days of July, Admiral Somerville was ordered to attack the west coast of Italy, either Sicily or Sardinia, to create a diversion during the movement of Mediterranean convoys covered by the fleet.
The Mediterranean Fleet sailed from Alexandria on 7 July to cover the Malta to Alexandria convoys and with it sailed three of the Australian destroyers; Stuart (I) screening the 7th Cruiser Squadron and Voyager and (Vampire (I) on the screen of the battle fleet and HMS Eagle. The following day, 8 July, the fleet was heavily attacked from the air and Voyager began to learn the value of violent evasion tactics. In spite of the enemy effort (some fifty bombs fell near HMS Warspite), only the cruiser Gloucester sustained a direct hit.
Early on 9 July reconnaissance reports indicated the presence of strong enemy forces including two battleships. At 1510, off the Calabrian coast, Admiral Cunningham's Flagship, Warspite, sighted six enemy 8-inch cruisers and a number of destroyers. Four minutes later Neptune sighted the main Italian battle fleet. At 1520 the Battle of Calabria began.
Voyager's role throughout the brief inconclusive engagement and the subsequent pursuit of the Italian fleet to within 25 miles of the Calabrian coast, was that of screening destroyer to the carrier Eagle. In the subsequent land based heavy air attacks Voyager continued to screen the carrier. She suffered no damage proving once more how ineffective high level bombing was against the small fast moving target. As Admiral Cunningham commented "high level bombing even on the scale experienced during these operations, yields few hits and is more alarming than dangerous".

HMAS Voyager (I), 17 July 1940.
The morning of 10 July saw Voyager detach from the fleet for Malta to escort an Alexandria bound convoy. However, there was no respite from the bombers, six heavy attacks developing before the ship entered Alexandria five days later. A brief spell at Alexandria ended on 25 July when she sailed escorting convoy bound for Port Said, then to Malta and back to Alexandria on the last day of July.
The first week of August 1940 was spent in Alexandria followed by the escort of a series of Port Said and Haifa convoys. On 30 August Voyager sailed on the screen of the battle fleet during the passage of Mediterranean reinforcements, HM Ships Valiant, Illustrious, Calcutta and Coventry. After an uneventful cruise, Voyager reached Malta on 2 September where she was under refit until the last day of the month when she proceeded on the screen of the fleet for Alexandria.
The first weeks of October followed the established pattern of convoy escort, screening the fleet, days in Alexandria Harbour and anti-submarine patrols. On 25 October Voyager joined the 1st Battle Squadron (Rear Admiral HB Rawlings) during operations covering the passage of AN5, a Port Said to Dardanelles convoy, including the screening of Eagle for the attack on Maltezana aerodrome, Stampalia. At sea on 28 October her crew were told of the invasion of Greece by Italian forces.

HMAS Voyager (I).
On 29 October Voyager sailed from Alexandria escorting a convoy for Suda Bay in Crete to establish an advanced fuelling base for the reinforcement of Greece. Arriving on 31 October Voyager, Vampire (I) and Waterhen (I) began anti-submarine patrols during net laying operations by HMS Protector. The following day Voyager joined the battle fleet for passage to Alexandria, adding her quota of fire in driving off a series of torpedo bomber attacks en route.
On 5 November she was at sea again escorting a Malta convoy, returning to Alexandria on 13 November to begin nine days of boiler cleaning. The escort of another Malta convoy began on 23 November, the passage being marked by the usual air attack. Three successive torpedo bomber attacks were driven off without damage to the convoy. At 08:00 on 26 November Voyager and convoy entered Malta Harbour. Eight hours later the Australian destroyer was once more at sea, escorting a convoy for Alexandria, where she arrived on 10 November.
December began with convoy to Piraeus in Greece, with Voyager returning to Alexandria 9 December. On this day the British Army under General Wavell began its offensive in the Western Desert. The immediate object of the operations ashore was the destruction of enemy forces contained in the Nibeiwa/Tummae area followed by a northward drive to Sidi Barrani on the coast, thus isolating Maktila Camp which represented the Italian Army's most advanced camp in Egypt. The naval role during the first stage of the operations was to provide harassing fire at Maktila and Sidi Barrani, and this was begun by the monitor Terror and the gunboats HMS Aphis and HMS Ladybird, supported by the destroyers HM Ships Jervis, Janus and Nubian during the night of 8/9 December.
On 10 December Voyager sailed from Alexandria screening the battle fleet (Barham, Valiant, York and Illustrious) for the bombardment of Bardia, but were prevented from shelling the Italian positions by low visibility. Bad weather also stopped a projected attack on El Adem airfield by aircraft from Illustrious. On 13 December the fleet returned to Alexandria.
On 14 December Voyager joined the Inshore Squadron screening Terror in the bombardment of Bardia for the following three days. One minor casualty occurred when Voyager was straddled by the Italian shore batteries. Ordered to return to Alexandria late on 17 December, Voyager there embarked half a company of British Commando troops, picked up more troops at Mersa Matruh and landed the entire group at Sollum, which fell to the British forces on 16 December.
During the remainder of December the work of the D10 destroyers (Vendetta (I), Voyager, Waterhen (I), (Vampire (I) (Captain D10), Diamond and Wryneck) supporting the campaign in the Western Desert was confined to patrol and escort duty. On 26 December Waterhen (I) captured the enemy schooner Tireremo Diritto trying to enter Bardia and on 29 December Voyager intercepted the schooner Zingarella engaged in transporting British prisoners of war from Bardia to Tobruk. Dainty also captured two schooners on the night of 21 December.
In January 1941 the Mediterranean Fleet continued operations in support of the Libyan offensive, Operation MC5. On 2 January naval support for the assault on Bardia began when Force W (Terror, Aphis and Ladybird) opened harassing fire in preparation for the Australian attack from the south. This was followed by sustained bombardment the following day from the 15-inch armament of Warspite, Valiant and Barham. Two days later Bardia fell, and with it some 25,000 prisoners fell into Allied hands.
Voyager and Dainty represented the 10th Destroyer Flotilla's participation. Voyager (Captain D10) sailed from Alexandria on New Year's Day 1941. On 2 January she supported Force W in the bombardment of Bardia. Afternoon attempts (45 bombs were aimed at Voyager and Terror) by the Italian Air Force to terminate the bombardment proved as unsuccessful as previous attempts to drive the Navy from the Libyan coast.
Early in the morning of 3 January Voyager joined the battle fleet screen off Sidi Barrani for the full scale bombardment of Bardia. In the ensuing shelling of the Italian positions the battleships engaged the northern sector while Voyager and Dainty engaged shore batteries on both sides of the harbour. On completion of the bombardment Voyager returned to Alexandria to escort a convoy for Sollum before beginning five days boiler cleaning at Alexandria. On 11 January Voyager joined the battle fleet for screening duties during large scale convoy operations.
A new note had sounded in the Mediterranean campaign with the advent of the Luftwaffe. On 10 January German aircraft made their first attacks against the Mediterranean Fleet and showing far greater skill and determination than their Italian allies succeeded in seriously damaging the carrier Illustrious with six direct hits. The following day, 11 January, dive bombers again attacked the fleet, sinking the cruiser Southampton and damaging Gloucester. Thus in two days the Germans caused more damage to the fleet than the Italians in six months of warfare.
Voyager returned to the Libyan coast on 15 January to take up intercept patrols and support to advancing British Forces while Force W (Terror, Gnat and Ladybird) continued to harass the enemy. With the fall of Tobruk on 22 January Voyager withdrew to Alexandria, returning five days later on 27 January to resume operations.
In February Voyager continued her Libyan patrols, operating mainly off Tobruk and Benghazi after the capture of the latter port on 6 February. For the forces at sea there was little respite. Air attack, the constant menace to the Inshore Squadron, accounted for the loss of Terror off Derna on 22 February and Dainty, of the 10th Flotilla, off Tobruk two days later. In March German intervention in Greece became an ominous probability and it was decided to reinforce the Greek Army to the limit of capacity. The decision imposed a further heavy commitment on the Mediterranean Fleet with the responsibility of the safe conduct of the convoys.
On 6 March Operation LUSTRE, the reinforcement of Greece, began and Voyager at sea on the screen of the battle fleet covering the first convoys played her small part along with her sister ships and HMAS Perth (I). The troop movements were a continuous operation with convoys at three day intervals from Alexandra with personnel in cruisers and material in merchant vessels. Perth (I) in two lifts transferred 1,221 troops. Voyager, besides operating on the screen of the fleet and on anti-submarine patrol, escorted two Piraeus bound and two Piraeus to Alexandria convoys. En route to Greece on 28 March torpedo bomber attacks failed to damage the convoy or escort, though one torpedo passed uncomfortably close along Voyager's port side.
Concurrently with the Greek operations the flow of supplies was maintained to the army in the Western Desert. In these operations during March Voyager assisted when she escorted a convoy to Tobruk, leaving Alexandria on 17 March.
April 1941 opened on the 6th with the German invasion of Greece in force. The Royal Navy in the Mediterranean was thus faced with the prospect of further heavy responsibilities. At the same time the Battle of Matapan had been fought and won, ending Italian attempts to intervene at sea with the fleet. As Admiral Cunningham commented "I am glad to think that we were able off Matapan to teach them a lesson which kept them out of the ring for the rest of the year".
Operation LUSTRE continued for the first three weeks of April in the face of mounting air attack by the Luftwaffe. There was only meagre fighter protection for the convoys in the vicinity of Crete and the Piraeus approaches. Thus in spite of the Navy's efforts losses increased. To 18 April twenty-five ships were lost, but only seven in convoy at sea. All but two were empty and south bound and 58,364 troops and their equipment had been safely landed on Greek soil without the loss of a single man.
In common with most of the escorting destroyers, Voyager suffered her share of attack from the air during this period. On 1 April she sailed from Piraeus escorting a convoy of nine ships southward. Attacked by German bombers the following day, two ships, Homefield and Coulourasxenos, were damaged beyond salvage. Voyager rescued the crews of both vessels.
In the Western Desert disaster struck the Allied campaign with the launching of the German counter offensive under Rommel at the beginning of April. Benghazi was lost on 3 April, Bardia on 12 April and by the following day the British Army found itself back on the Egyptian frontier. The Navy, heavily committed, gave what help it could. The Inshore Squadron including Vendetta (I), Waterhen (I) and Stuart (I) endeavoured to harass the enemy and the cruiser Gloucester bombarded Bardia twice. Special efforts were made to prevent men and materials crossing the Mediterranean to bolster the enemy potential.
Voyager's part in these Libyan harassing operations began on 19 April when she sailed from Alexandria as part of the escort of a force sent to raid Bardia. The troops landed from Glengyle succeeded in demolishing shore dumps and except for 67 men who had to be left behind, safely re-embarked for the return to Alexandria.
On 21 April, the Greek cause lost, it was decided to evacuate the British Forces. In anticipation preparations had been made to set in motion Operation DEMON, the evacuation of Greece. The problems were many and the conditions ashore in Greece chaotic. Excluding the cruiser Gloucester and four destroyers based at Malta, all the light forces of the Mediterranean Fleet were called in to assist.
The evacuation began during the night of 24/25 April 1941 and continued for five nights, with the further rescue of small groups for two more nights. Some 1300 troops were taken out before Operation DEMON began, followed by 16,000 from Raphtis and Nauplia and Raphina, 5750 from Megara, 4320 from Monemvasia and some 19,500 from various points on the coast. At Kalamata, where Perth (I), Phoebe and three destroyers were ordered to embark 8,000 troops, only 450 were rescued. A German column ahead of the main force entered the town, captured the Sea Transport Officer and his staff and so disorganised the evacuation arrangements. Perth (I)'s captain and senior officer was then some ten miles off the coast. Reluctantly he decided to order the force to withdraw. Later that night, however, four destroyers rescued 450 troops from the groups awaiting succour on the beaches to the south east of the town.
Voyager's part in the evacuation began on the morning of 24 April when she cleared Suda Bay in company with Calcutta, Stuart (I), Salvia and Hyacinth and the transports Glengyle, Glenearn and Ulster Prince. Air attack en route by German Junkers scored one hit on Glenearn. At sunset Phoebe joined the escort and Voyager and Hyacinth detached for Nauplia escorting Ulster Prince where they anchored in the evening, followed an hour later by Phoebe, Stuart (I) and the transport Glenearn.
Shortly before midnight 301 personnel embarked in Voyager, including 160 nursing sisters. Embarkation continued in other ships throughout the night. At 03:50 Glenearn, Phoebe, Stuart (I) and Hyacinth sailed for Suda, followed at 08:07 by Voyager (maintaining an anti-submarine patrol), Perth, Calcutta, Salvia and the transport Glengyle. All ships reached Suda undamaged. The Nauplia lift ended Voyager's part in the embarkation operations. For remainder of the period she was escorted convoys between Suda Bay and Alexandria.
The setback in Libya was not all on the debit side. In his withdrawal General Wavell decided to attempt to maintain a toehold on the coast. A strong garrison was accordingly established in Tobruk. Aided by the Navy, all the German efforts to dislodge the garrison proved unavailing, in spite of Goebbels' epithet of 'RATS'.
The supply of the beleaguered troops maintained under constant air attack resulted in the organisation of the 'Tobruk Ferry'. The cost at sea was heavy with HMAS Waterhen (I) being one of the victims. Nevertheless the Navy maintained a regular supply averaging 400 tons a day besides reinforcements and the evacuation of the wounded. On 5 May 1941 Voyager made her first contribution to the frustration of the investing German Army when she sailed from Alexandria with troops and ammunition and returned the following day carrying 250 troops.
Voyager now returned to the operations proceeding to the north. Greece was gone but Crete remained in British hands. On 9 May she reached Suda Bay to join Flamingo and Auckland as convoy escort to Alexandria, departing again on 18 May, escorting Glengyle which was carrying reinforcements.
HMAS Voyager off Suda Bay, Crete during the evacuation of the island in May, 1941.
On 23 May the fleet, then operating to prevent sea borne landings in Crete, was ordered to withdraw towards Alexandria after losing the cruisers Gloucester and Fiji and four destroyers, Juno, Greyhound, Kelly and Kashmir. On the previous day Voyager joined the screen of the 1st Battle Squadron after searching for survivors from Fiji.
On 27 May, on the eve of the evacuation, Voyager detached and entered Alexandria to begin operations to Tobruk. The 'Tobruk Ferry' occupied Voyager throughout June 1941. Five runs were made from Alexandria to Tobruk and return. Another five voyages were made from Mersa Matruh to Tobruk and return. On 29 June she reached Alexandria for docking, a weary ship trembling in every plate.

Memorial window, Garden Island Chapel.
Voyager's Mediterranean service was now drawing to a close. On 12 July she made one last run to Tobruk. She experienced engine trouble and limped into Alexandria the following day. It marked the end of eighteen months service under constant pressure.
On 24 July Voyager cleared Alexandria Harbour for the last time en route for Australia. She arrived in Sydney on 25 September 1941 after an absence of 751 days. She was placed in refit which was completed on 3 March 1942.
Following a period of post refit trials and exercises, Voyager commenced her first operational duty of the Pacific War on 19 April 1942 when she escorted HMT Queen Elizabeth on the east coast. Further coastal escort duties followed before post refit defects required her to dock in Sydney. This occupied most of May.
Voyager arrived in Fremantle on 6 June 1942 and was based there for a short period as an escort destroyer. On 25 August 1942 she arrived in Darwin, where many of her crew had their first acquaintance with hostile aircraft.
Voyager was based at Darwin in September. On 22 September she embarked 250 reinforcements for the Timor guerrilla forces and sailed for Betano Bay with the intention of landing the troops at last light and then withdrawing.
During disembarkation operations the following night, 23 September, Voyager ran aground on the beach in Betano Bay. At 12:45 the next day she was sighted by a Japanese reconnaissance bomber escorted by a fighter. Defiant to the end she shot down the bomber, but since the inevitable following attack was expected it was decided to abandon ship. The first of a series of bombing raids began mid afternoon, such that by the evening there was no alternative but to detonate demolition charges, thereby destroying the ship. On 25 September HMA Ships Kalgoorlie and Warrnambool (I) safely evacuated Voyager's ship's company.

HMAS Voyager (I) aground at Betano Bay.
On 4 November 1999, the RAN's Hydrographic Office Detached Survey Unit (HODSU) reestablished the location of the wreck of Voyager using a Klein side scan sonar while conducting a survey of Betano beach in support of INTERFET operations in East Timor. Little of the wreck remains and what does is exposed at low tide.
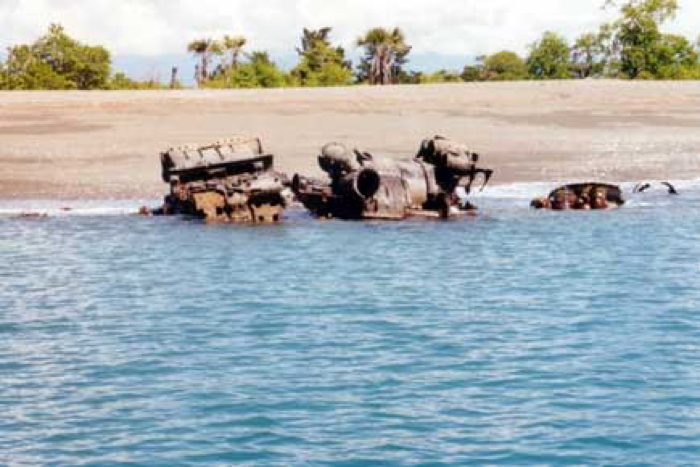
The remains of HMAS Voyager (I) at Betano Bay in late 1999.
Further reading
'Scrap Iron Destroyers: The Story of HMA Ships Stuart, Vampire, Vendetta, Voyager and Waterhen' by LJ Lind and A Payne - published by the Naval Historical Society of Australia, Garden Island, 1976.
