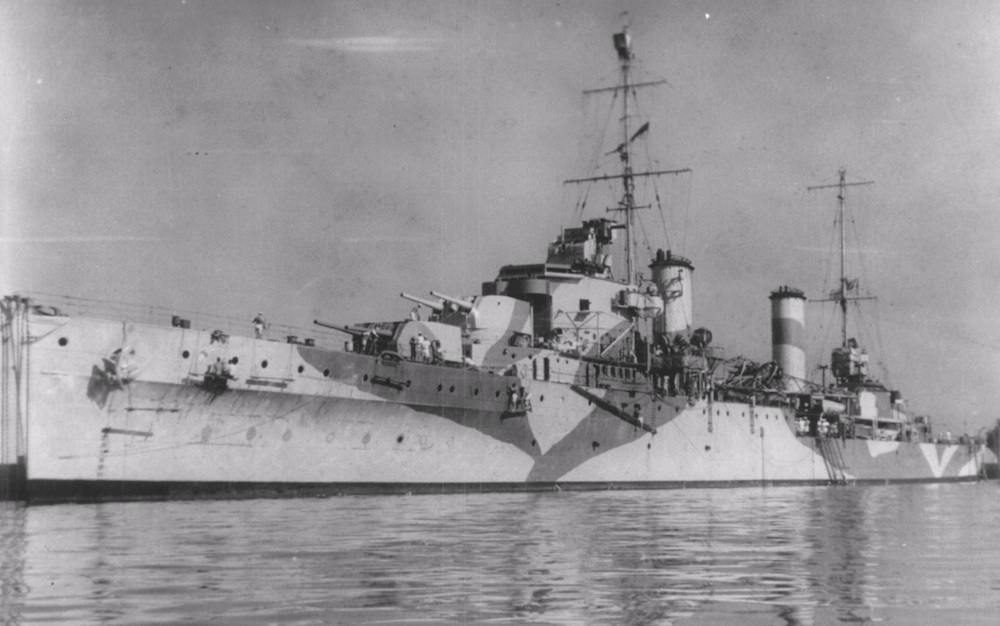
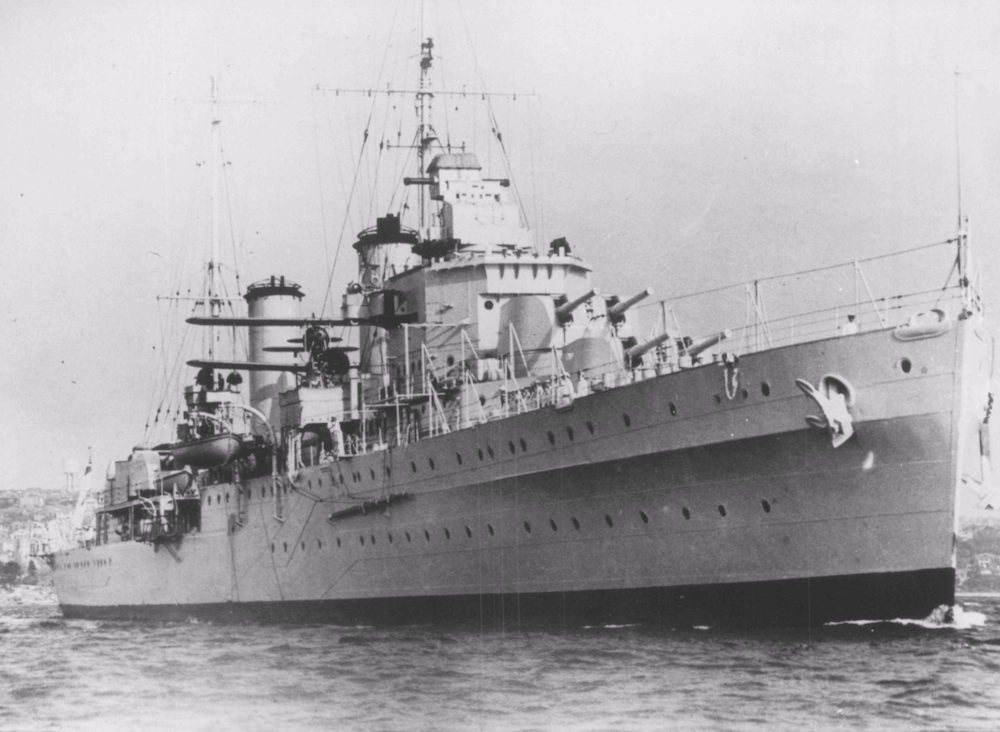
HMAS Hobart (I)
HMAS
Hobart
(I)
 |
| Class |
Modified Leander Class |
|---|---|
| Type |
Light Cruiser |
| Pennant |
D63 |
| Builder |
HM Dockyard, Devonport, England |
| Laid Down |
15 August 1934 |
| Launched |
9 October 1934 |
| Launched by |
Lady Florence, wife of Admiral Sir WHD Boyle |
| Commissioned |
28 September 1938 |
| Decommissioned |
20 December 1947 |
| Dimensions & Displacement | |
| Displacement | 7105 tons |
| Length | 562 feet 3 inches (overall) |
| Beam | 56 feet 8 inches |
| Draught | 15 feet 8 inches (mean) |
| Performance | |
| Speed | 32.5 knots |
| Propulsion | |
| Horsepower | 72,000 |
| Armament | |
| Guns |
|
| Torpedoes | 8 x 21-inch torpedo tubes (quadruple mounts) |
| Awards | |
| Battle Honours | |
HMS Apollo and her sister ships Phaeton and Amphion were modified Leander Class light cruisers.
Apollo commissioned on 13 January 1936 and served on the North American and West Indies Station from 1936 to 1938. At Devonport on 6 October 1938, she was due to transfer to the Royal Australian Navy as HMAS Hobart but, owing to the mobilisation of the British Fleet on 28 September 1938 during the Munich Crisis she commissioned on that date under the command of Captain RR Stewart RN. She was manned by the former crew of the seaplane carrier HMAS Albatross which had transferred to the Royal Navy in part payment for Apollo. The renaming ceremony was performed by Mrs Bruce, wife of the High Commissioner for Australia in London.
Hobart sailed from Portsmouth on 28 October, one month after commissioning, and arrived in Australia at the end of 1938 in time for Christmas. On arrival Captain Stewart was interviewed by the press, remarking:
Hobart has been a really happy ship. I have been greatly impressed by the men. They are better specimens physically than the average English sailor and they are very intelligent.
On 6 February 1939 Hobart sailed from Sydney for her first port visit to her namesake city, Hobart, the capital of Tasmania. She arrived on 17 February and four days later had the distinction of fulfilling the role as the flagship of the 101st Hobart Regatta.

HMAS Hobart (I) dressed overall in her capacity as Flagship of the Hobart Regatta.
The next six months were spent working up and exercising off the eastern seaboard and visiting several south Pacific nations. On 28 August Captain Stewart was relieved by Captain HH Howden, OBE, RAN.
On Sunday 3 September 1939, Australia found herself at war with Germany. Hobart was on patrol in Bass Strait when news of the war reached her and she was subsequently ordered to Port Melbourne. There she undertook a series of exercises in Port Phillip before proceeding to her home port of Sydney.
Between July and October 1939 HMAS Hobart (I) exercised in Australian waters and throughout the Pacific.
On 14 October 1939 Hobart sailed for service on the East Indies Station stopping en route at Darwin and Singapore where she arrived on 26 October. Two days later she sailed and rendezvoused with the Royal Navy cruiser HMS Birmingham to patrol the west coast of Sumatra and the Sunda Strait. During this period Hobart's Walrus amphibian aircraft was used extensively for aerial reconnaissance work before meeting with accident during a night landing. The damaged aircraft was recovered with great difficulty and Hobart returned to Singapore in company with Birmingham on 5 November.
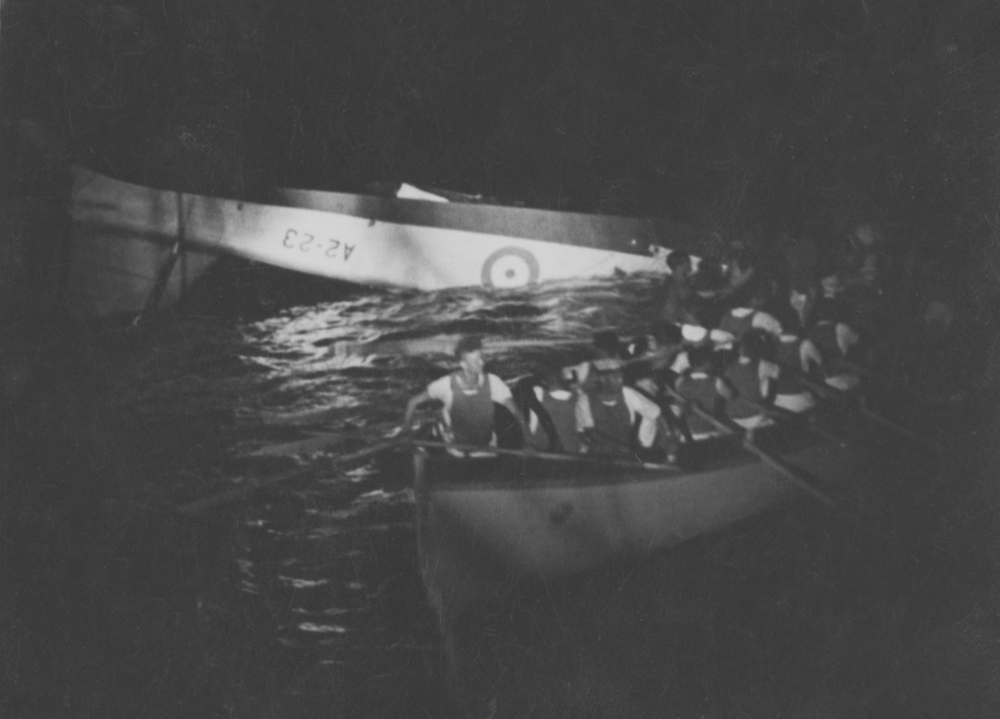
HMAS Hobart's ship's cutter recovering her downed aircraft.
The damaged RAAF Walrus (A2-23) was recovered with some difficulty in darkness.
On 8 November Hobart joined the aircraft carrier HMS Eagle and the destroyer HMS Wescott as part of the escort for a west bound convoy to Colombo. On 2 December 1939 Hobart escorted the troop ship Akbar from Bombay to waters of Aden where she arrived on 6 December. There she picked up the Ettrick for the return voyage to Bombay, however, en route one of Hobart's petty officers became seriously ill requiring an urgent operation. Consequently Hobart left Ettrick and proceeded to Bombay at full speed. Notwithstanding the mercy dash Petty Officer Barker died in hospital the day after arriving.
Hobart sailed from Bombay on 10 December to escort an important convoy to Aden remaining with it until 15 December at which time she shaped a course for Colombo with orders to escort a convoy of French colonial troops through the Malacca Strait. Sailing on 23 December she spent her first Christmas of the war at sea.
On Christmas Day a festive meal was provided and the messes were decorated. Captain Howden had thoughtfully bought 100 gallons of beer in Colombo to provide Christmas cheer for his crew - this was typical of him.
1940
The ensuing months were spent escorting troop convoys in the Bay of Bengal and the Arabian Sea during which time she variously visited Colombo, Bombay, Aden, Trincomalee and Chakdina.
HMAS Hobart (I) leaving harbour in her pre-war paint scheme.
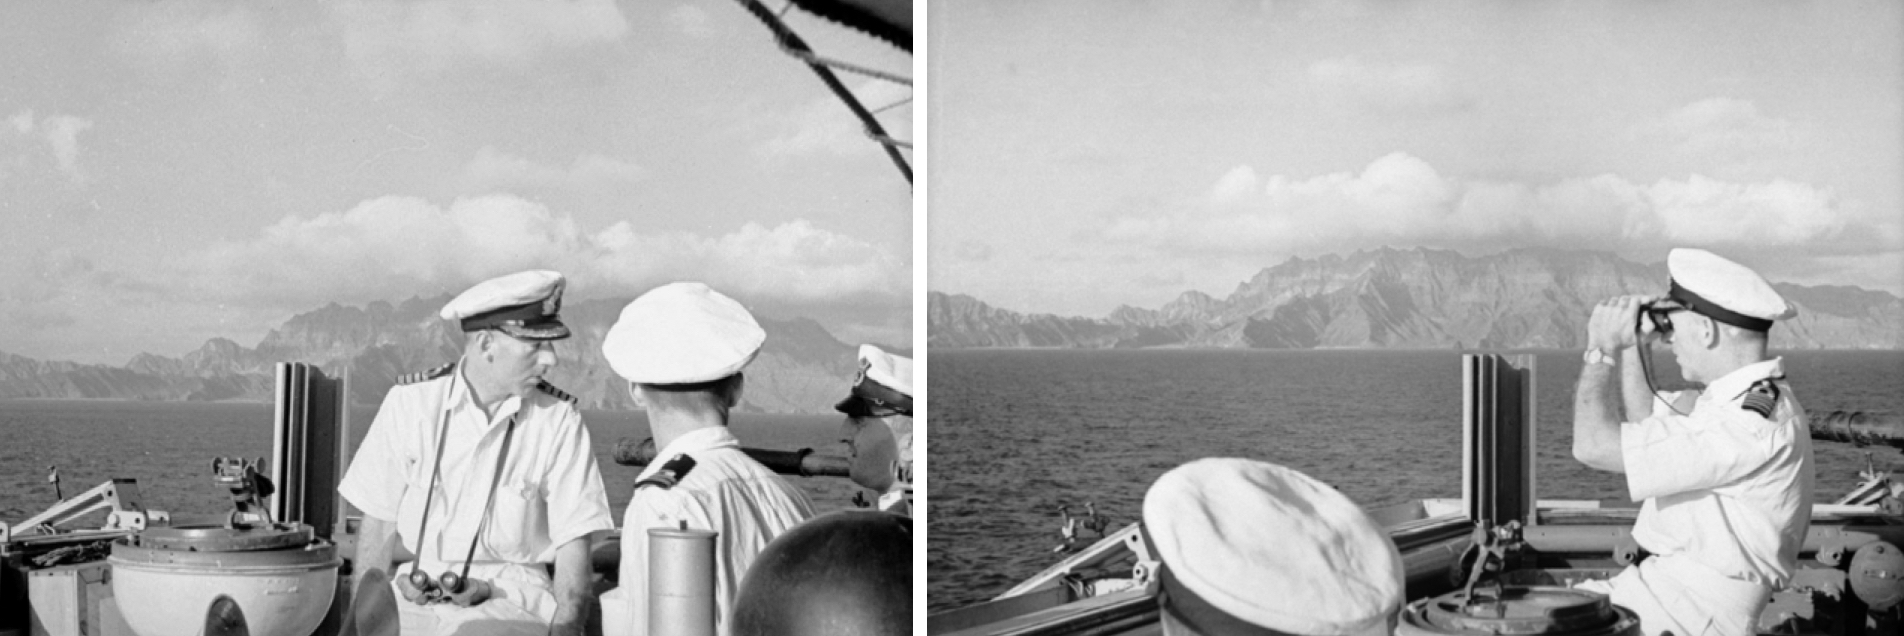
Captain Harry Howden, RAN on the compass platform prior to anchoring off Yemen. (AWM 0011/0018 & 0019)
During this period Hobart paid courtesy visits to the Kamaran Islands, Hodeida (Yemen) and Mocha in the Red Sea. The visit to Hodeida saw Hobart anchor outside the three mile limit as Yemen was a neutral country. A 21 gun salute was fired in honour of the Prince of Yemen, Prince Seif Allslam Al Hussein, who returned the honour with a visit to the ship and gifts of goats and eggs which were carried on board by his colorful bodyguard.
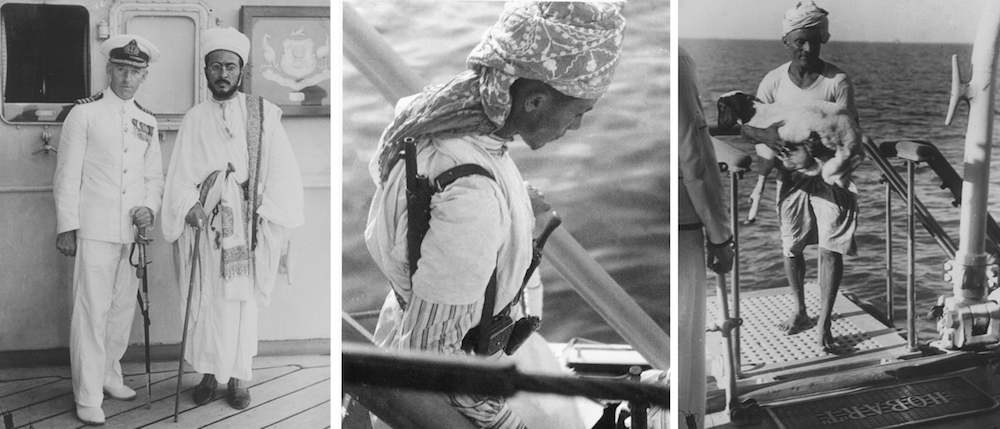
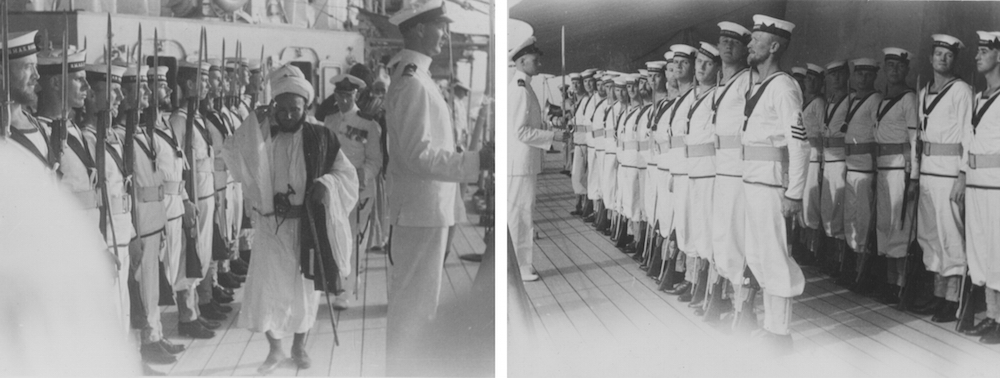
The Prince of Yemen with Captain Howden on the occasion of his visit to HMAS Hobart (I) in April 1940.
Hobart was at Aden when Italy entered the war on 10 June 1940 and her first shots against an enemy were fired two days later when her anti-aircraft guns opened fire on three Italian aircraft during a raid on Aden. Seven days later Hobart returned the compliment when her Walrus aircraft was flown off, carrying out a bombing attack on the Italian wireless station on Centre Peak Island in the Red Sea. There was no opposition and the target was reported as being severely damaged.
Routine patrols and sweeps followed throughout June during which the Walrus gathered useful intelligence during a number of aerial reconnaissance flights. At the end of the month Hobart embarked officers and men of the 2nd Punjabi Regiment in Aden to convey them to Berbera, Somaliland. During the voyage there were some 1300 men on board the cruiser and her upper decks were packed with troops. The soldiers disembarked the following day.
The Allies grip on Somaliland was tenuous and the land position deteriorated rapidly following the collapse of France. With the loss of Djibouti in French Somaliland, Berbera was the only port available to the British for supplying the Allied forces ashore.
On 1 August 1940 Hobart arrived in Berbera, British Somaliland, escorting and landing further reinforcements. She remained there assisting in a general disembarkation while providing protection against any possible attack from the sea. The British however, were heavily outnumbered by three Italian columns advancing overland. On 15 August a general evacuation of the territory from Berbera was ordered.
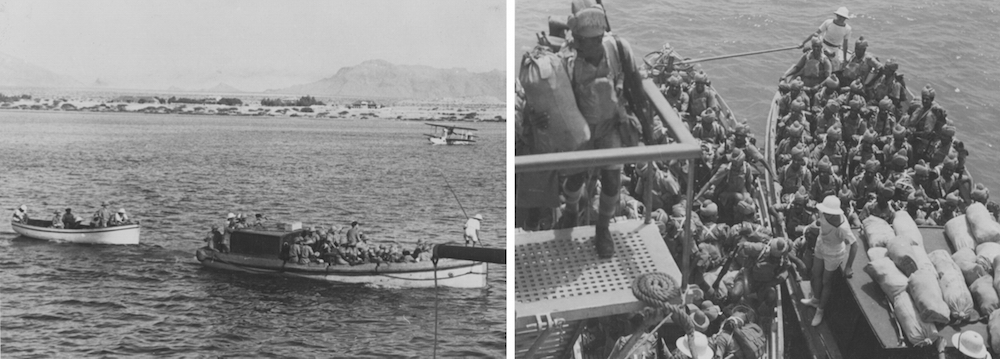
Hobart's boat crews assisting with the evacuation of Allied troops from Berbera.
Hobart assumed the role as the operational headquarters throughout the evacuation and alongside the crews of other ships, her personnel performed a variety of tasks. Shipwrights and joiners constructed a pontoon that complemented inadequate existing piers, one of wood and the other of stone, while her communications division provided ship to shore communications. A sea transport officer, beach and pier master were also apppointed from among her officers while ratings provided security platoons to maintain order in the town throughout the evacuation. Hobart's boats crews continuously ferried troops back and forth while others were provided as crews for the tugs Queen and Zeila.
During the evacuation, the harbour area suffered a number of enemy air attacks while Hobart's Walrus took the fight to the enemy attacking the Italian headquarters at Zeila. After the bombs had been dropped, the Walrus machine gunner, from a height of 250 feet, silenced two enemy machine gun posts, drove a lorry off the road and into a ditch and scored a number of hits on Italian staff cars.

HMAS Hobart (I) under aerial attack during the evacuation of Berbera.
Hobart also landed a quick-firing 3-pounder Hotchkiss gun for service with the Army as an anti-tank gun. A volunteer crew of three seamen from Hobart accompanied the gun: Petty Officer Hugh Jones, Able Seaman Jock Hurren and Able Seaman Hugh Sweeney. They later took part in fighting a rearguard action until over run. The three seamen were later reported ‘missing, believed killed’ but resurfaced unharmed when the British captured Massawa from the Italians in April 1941. All three were subsequently mentioned in dispatches.
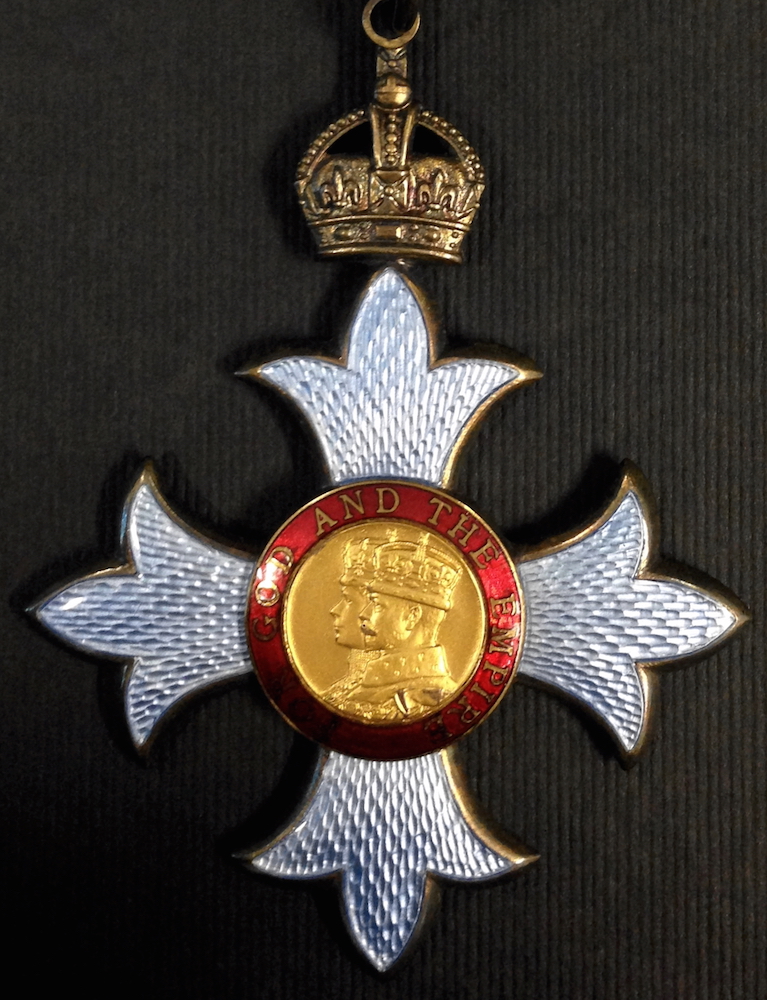
The following honours and awards were made to HMAS Hobart (I) personnel for good services with the Somaliland Force

Captain Harry Howden, CBE, RAN.
To be additional Commander of the Most Excellent Order of the British Empire (Military Division):
| Captain HL Howden, CBE, RAN |
To be an Officer of the Most Excellent Order of the British Empire:
| Lieutenant TK Morrison |
To be a Member of the Most Excellent Order of the British Empire:
| Mr EV Gooch, Commissioned Shipwright |
The Medal of the Order of the British Empire:
| Chief Petty Officer W Grigor |
| Chief Yeoman of Signals VM Griffiths |
| Engineroom Artificer SH Chambers |
| Sick Berth Petty Officer MHS Trulsson |
The following officers and men were mentioned in dispatches:
Commander of the most Excellent Order of the British Empire.
| Lieutenant Commander SH Crawford, RANR (S) |
| Lieutenant TM Synnot, RAN |
| Chief Shipwright A Robinson |
| Engineeroom Artificer J Gordon |
| Petty Officer H Jones |
| Petty Officer R Hancock |
| Petty Officer JH Unsworth |
| Acting Stoker Petty Officer NR Brown |
| Leading Seaman TH Spencer |
| Acting Leading Seaman AE Stripe |
| Acting Leading Seaman GH Smith |
| Acting Leading Seaman JR Drake |
| Able Seaman W Hurren |
| Able Seaman H Sweeney |
| Able Seaman RA Wood |
| Able Seaman VE Lewis |
| Signalman C Martin |
The main lift of troops took place under cover of darkness and the skill and devotion of the men engaged in ferrying the exhausted soldiers was not lost on Captain Howden who later reported:
To them, a great part of the success of the evacuation of Somaliland belongs...
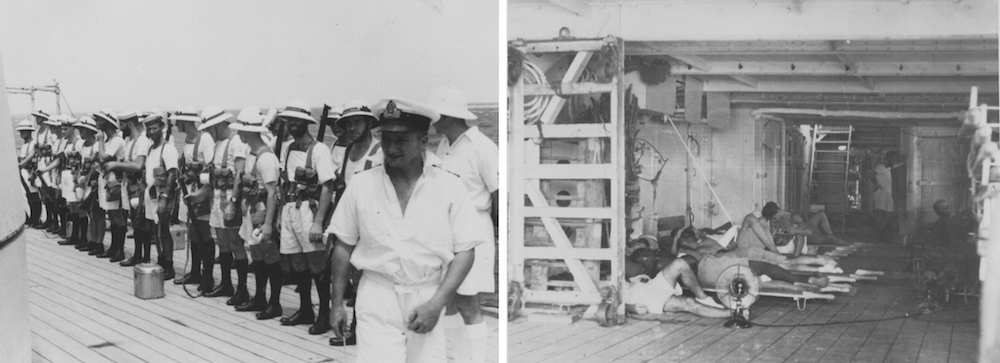
Left: Hobart's landing party mustered on her quarterdeck prior to going ashore. Right: The temporary sick back set up in the shelter deck.
A temporary sick bay was set up on the starboard shelter deck where many of the sick and wounded who had reached the beach were taken. Hobart's medical staff worked around the clock ministering to soldiers from five different nations.
Demolition parties from the cruiser destroyed everything of value to the enemy before Berbera was finally abandoned. Hobart's boats were the last ashore on the final day of the evacuation picking up stragglers. At 07:45 on Monday 19 August 1940, Hobart commenced bombarding Berbera. The bombardment rounded off the work of the demolition parties and an hour later, her task completed, the ship proceeded to Aden leaving British Somaliland under the temporary control of the Italians.
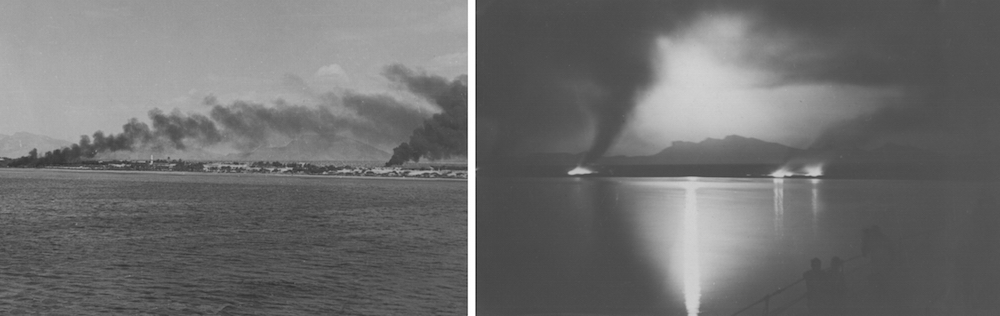
Berbera on fire by day and by night.
On arrival at Aden later the same day the GOC Somali force and his staff were landed and all wounded were discharged ashore with the exception of two severe cases who were detained in Hobart for treatment until 22 and 26 August respectively. On 22 August an advance party of the 2nd Battalion, the Black Watch Regiment, was embarked the remaining joining the following day. Altogether some 20 officers and 661 other ranks were embarked after which the ship put to sea bound for Suez. En route a boxing match between members of Hobart’s crew and the Black Watch was held on the upper deck, which proved a distraction from the events of the previous few weeks.
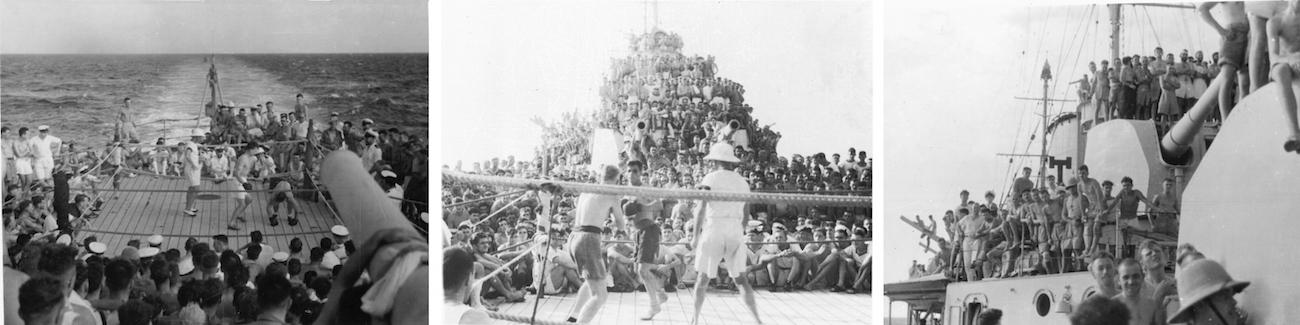
Left and centre: HMAS Hobart (I) held a boxing match against the embarked Black Watch Regiment. Right: The crew enjoy the match which provided a welcome distraction from recent events.
Suez was reached at 07:45 on 26 August and the troops disembarked. Two days later Hobart departed Suez bound for Aden. On the morning of 30 August Hobart came under a determined aerial attack from an Italian SM81 Savoia bomber. The aircraft commenced its bombing run flying a steady course in spite of heavy anti-aircraft fire from the ship. Bombs fell nearby but none hit. Two hours later three more Italian aircraft attacked but again no hits were made.
Hobart continued escort and patrol duties as a unit of the Red Sea Force until October 1940 when it was arranged between the Commander-in-Chief East Indies and the Australian Commonwealth Naval Board that she would return to Australian waters. Following a brief refit at Colombo, Hobart reached Fremantle on 28 December 1940 and arrived back in Sydney on 3 January 1941 where she became the Flagship of Rear Admiral JG Crace, Commanding the Australian Squadron.
1941
During the first half of 1941 Hobart operated chiefly on the Australia station and in New Zealand waters visiting Auckland and Wellington on a number of occasions. At the beginning of June, the cruiser underwent a brief refit in Sydney which saw her aircraft landed and catapult machinery removed in preparation for a deployment to the Mediterranean theatre of operations to relieve HMAS Perth. On 20 June she sailed from Sydney calling at Fremantle, the Seychelles and Aden en route. She arrived at Port Tewfik, at the southern end of the Suez Canal, on 12 July where Captain Howden learned that the canal had been closed due to the presence of enemy sea mines. On the night of 14 July German bombers made a determined effort to close the canal when they attacked the port. The 28,000 ton merchant vessel Georgic, crowded with troops, was hit during the raid, catching fire. Hobart's boats were ordered away and during the hours that followed her crew went alongside the burning troopship rescuing many of those onboard. The situation worsened when the captain of Georgic attempted to beach his stricken ship, colliding with the landing ship Glenearn in the process and setting it alight. Both ships later grounded. Hobart's seamen continued to render assistance rescuing both embarked troops and the ship's crews. Dawn revealed a scene of destruction with both ships locked together on the North Shoal. Flames and smoke still gushed from he troopship although the fire in Glenearn had been extinguished. Later that day a line was passed from Hobart to Glenearn and she was towed clear.
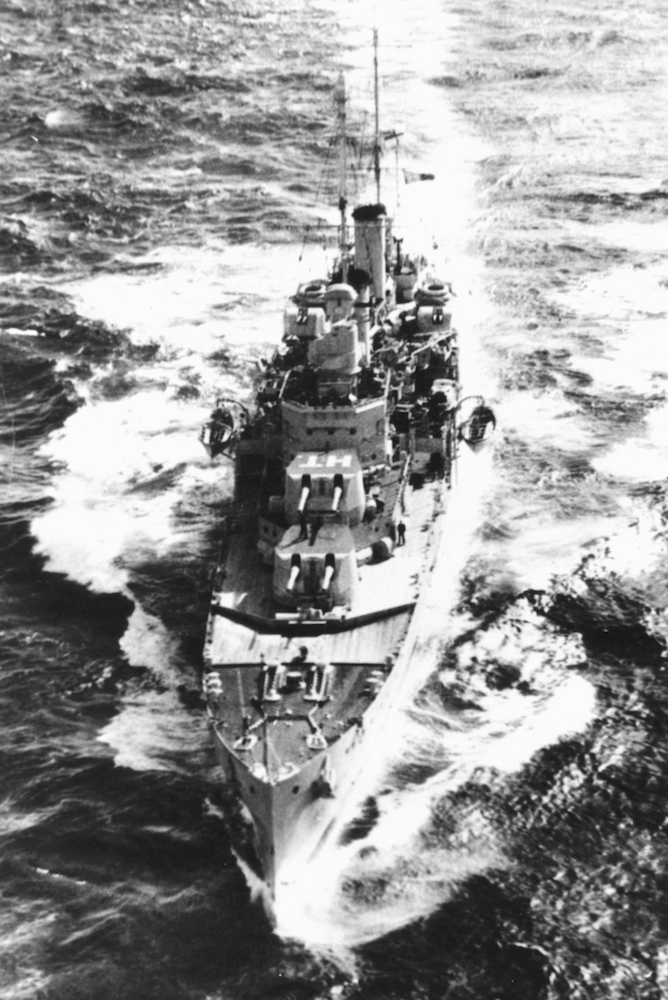
HMAS Hobart (I) at sea participating in the Mediterranean campaign.
On 15 July Hobart was led by the destroyer HMS Kipling into the Suez Canal and after a six-hour transit the three ships reached the Bitter Lakes. On 17 July Hobart berthed at Alexandria, in close proximity to her sister ship HMAS Perth.
During the next five months Hobart operated from Alexandria, Egypt, participating in the Mediterranean campaign as part of the Royal Navy’s 7th Cruiser Squadron. She routinely ferried troops to where they were most needed in support of the campaign in the Western Desert and took part in shore bombardments of both Tobruk and Bardia during October and November 1941. The cruiser was also involved in operations off Cyprus, Malta and Syria as well as participating in a number sweeps with the Royal Navy 1st Battle Squadron in company with HM Ships Queen Elizabeth, Barham and Valiant. Throughout her deployment Hobart was subjected to frequent air attacks both at sea and in Alexandria, however, her luck held and she suffered no major damage.
Hobart sailed on her last operation with the Mediterranean Fleet on 5 December 1941, in company with the Royal Navy cruisers Galatea and Carlisle and supported by five destroyers. Together they escorted the supply ship Breconshire from a position to the south of Crete, safely into Alexandria where they arrived on 7 December, the day the Japanese attacked Pearl Harbor. Shortly afterwards Hobart sailed for Fremantle calling at Aden, Colombo and Batavia en route.
1942
With the entry of Japan into the war, Hobart transferred to Far East waters becoming part of the American, British, Dutch and Australian (ABDA) forces operating in Southeast Asia. She arrived in Malayan waters in January 1942 and it was during her period in these waters that Hobart withstood some of the severest bombing of her career.
On Sunday 1 February 1942 Hobart berthed at Keppel Harbour, Singapore. By then the Japanese army had breached the causeway and a desperate rearguard action was being fought by Allied soldiers. Hobart took on ammunition and stores while her crew commandeered anything of value to deny it to the advancing enemy, this included a small 1939 Austin tourer motor car that Captain Howden brought back to Australia and which later became his pride and joy. Seven air raids were recorded during the day and a considerable number of bombs fell into the harbour. Hobart and HMS Tenedos cleared the harbour at 18:00 on 2 February and shaped a course for Tanjong Priok in the Dutch East Indies. Singapore was clearly lost and its surrender on 15 February came as no surprise. Three hours out of Singapore the ships encountered HMAS Vendetta under the tow of the destroyer Stronghold. After a long, slow tow she eventually made it back to Australia.
On 3 February 1942 Hobart and Tenedos sighted a lone merchant ship under attack from three enemy bombers. Howden ordered both ships to increase speed and close with all guns firing. The initial attack was beaten off but twenty minutes later more aircraft appeared renewing the attack with vigour. The burning merchant ship was identified as the Norah Moller, and many on board had become casualties.
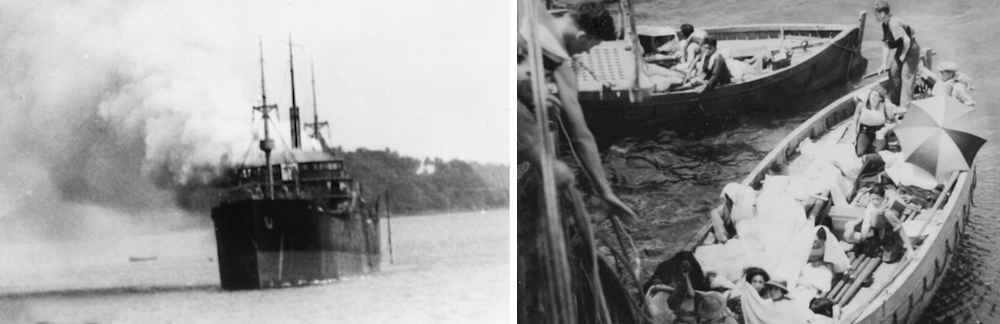
Left: The stricken merchant ship Norah Moller as seen from HMAS Hobart (I). Right: Hobart's boat's crews bringing wounded alongside for medical treatment.
The stricken vessel was subsequently anchored and the wounded and passengers, including women and children, were evacuated to the two warships. The vessel was then abandoned. Four members of her crew were buried at sea and six of the 28 casualties died before Hobart reached Tanjong Priok early on the morning of 4 February.
On another occasion when operating as a unit of a combined Dutch-British-American-Australian (ABDA) striking force, Hobart and the ships around her were attacked thirteen times. Her Commanding Officer, Captain H Howden RAN, wrote:
The bombs fell close enough for me to see the red flash of their burst and to feel the heat of their explosions across my face.
Hobart was fuelling at Tandjong Priok on 25 February 1942 when 27 bombers attacked her and the tanker from which she was fuelling. It was estimated that 60 bombs fell near and around her. She suffered some damage from bomb splinters and some casualties and it was her inability to complete fuelling on this occasion that prevented her from taking part in the disastrous Battle of the Java Sea on 27 February 1942.
Hobart took part in the western ‘extension’ of the Battle of the Coral Sea in May 1942. One of the covering force for the United States aircraft carriers, she was the target of an attack by eight Japanese twin engine torpedo bombers and 19 heavy bombers on 7 May. The naval force was without fighter cover but escaped damage by evasive action, shooting down three of the enemy aircraft.
On 7 August 1942 Hobart was one of the Cruiser Covering Force for the American landings on Guadalcanal and Tulagi in the Solomon Islands. Again, she was successful in evading fierce attacks by Japanese torpedo and high level bombers and inflicted severe damage on the enemy in both shore bombardments and anti-aircraft fire.
Following a refit at Sydney from 8 to 21 October 1942, Hobart rejoined the Australian Task Force (TF74) on Coral Sea patrols.
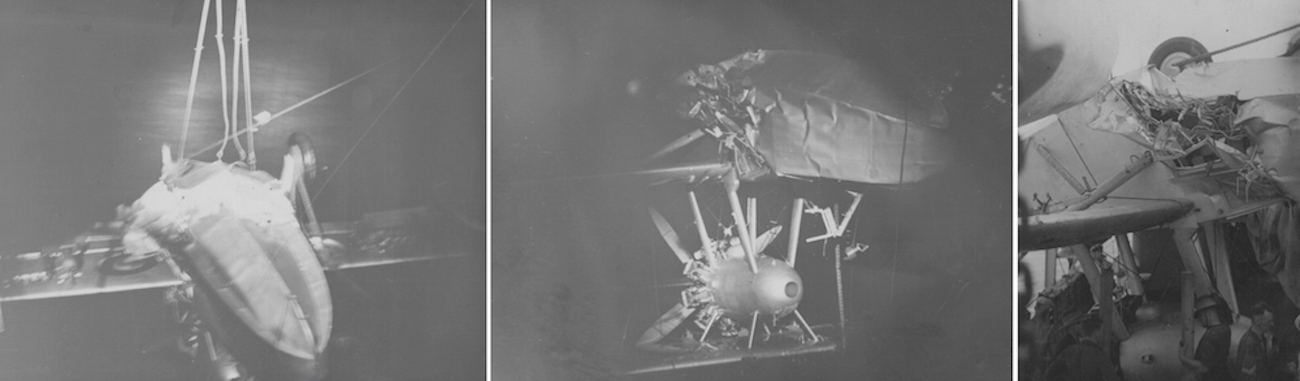
On 20 July 1943, Hobart was torpedoed by a Japanese submarine while en route to Espiritu Santo, Vanuatu, as part of Task Force 74. The torpedo struck aft on the port side causing considerable damage in the vicinity of the wardroom. Thirteen officers and sailors were killed and another seven injured. She made it to Espiritu Santo under her own power the following day where she underwent temporary repairs and was escorted to Sydney by HMA Ships Warramunga and Arunta. She arrived on 26 August for extensive repairs which kept her out of service until December 1944.
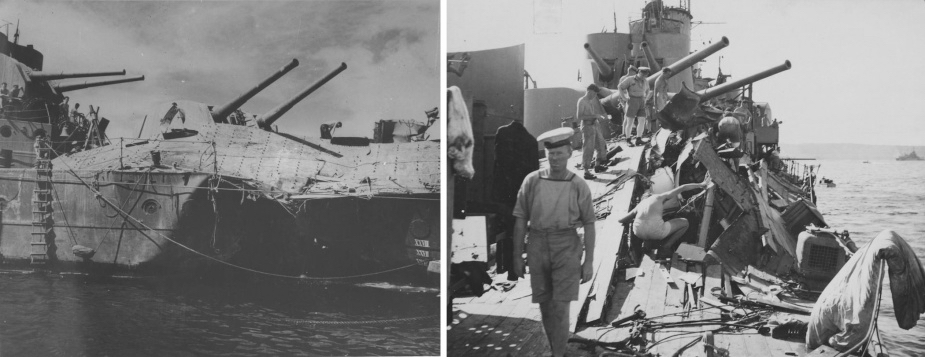
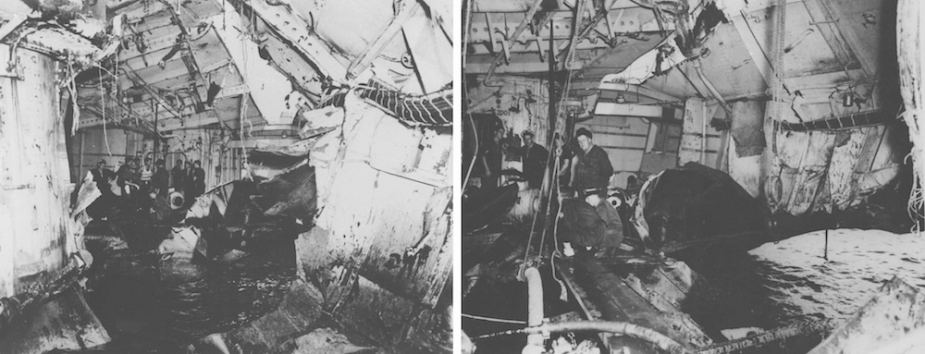
The damage sustained by HMAS Hobart (I) following an attack by an enemy submarine on 20 July 1943.
She was back at sea on 15 December 1944 for sea trials and work up, which was cut short on Christmas Day by a submarine attack on a merchant vessel in the area. Hobart returned to the relative safety of Sydney Harbour and put to sea again on 30 December. She rendezvoused with the British Pacific Fleet at Manus in February 1945 and the following month comprised part of the covering and support group for the Allied landing at Cebu, Philippines, on 26 March.
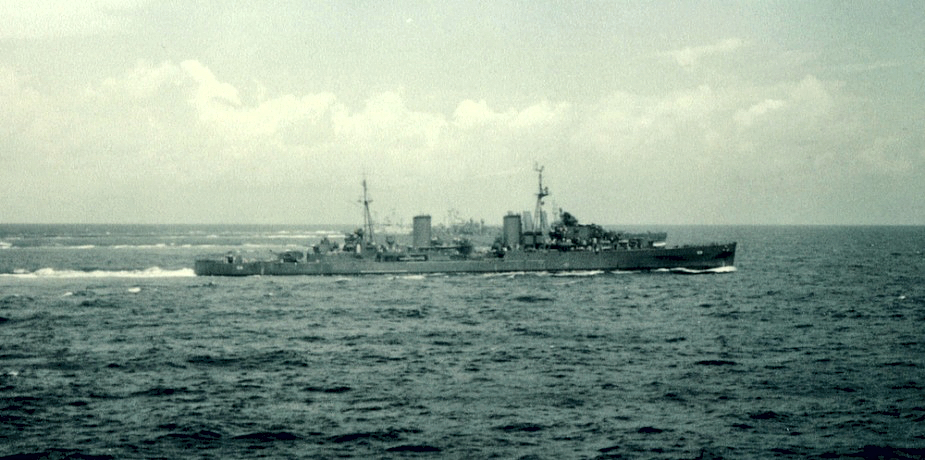
HMAS Hobart (I) exercising with allied cruisers off Subic Bay, August 1945.
On 24 April 1945 Hobart was part of the covering force for the landings at Tarakan in Borneo. On 11 May she supported the landings near Wewak of elements of the Australian 6th Division.
From 7 to 9 June 1945 she was operating off Brunei, Borneo, where cover was provided for minesweeping and preliminary bombardments carried out for the subsequent landing there. Hobart was also in the force which provided cover and bombardment for the landings at Balikpapan early in July. On 31 August she arrived in Tokyo Bay and was among the Australian ships present at the time of the Japanese surrender.
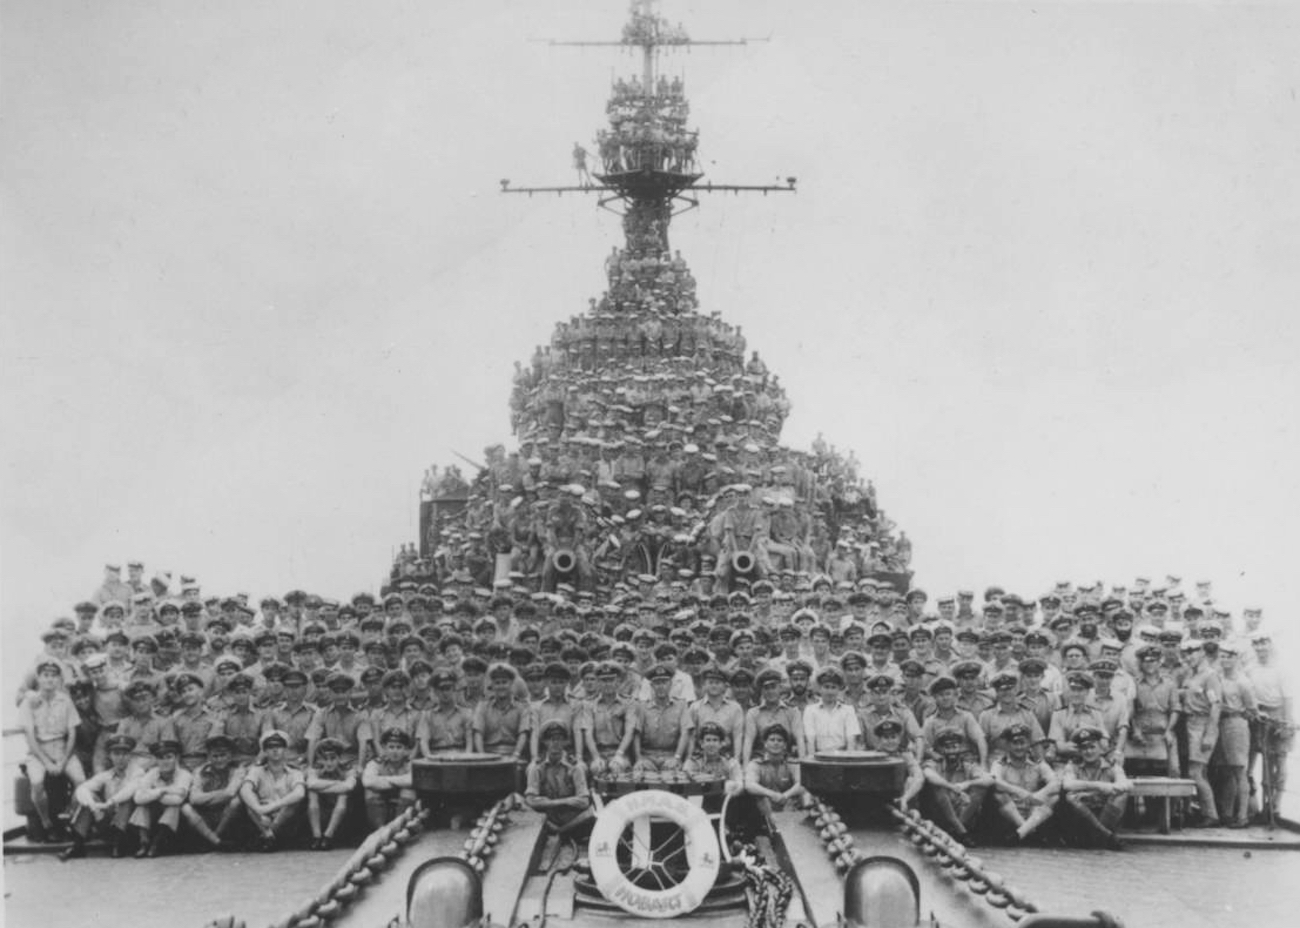
HMAS Hobart (I)'s ship's company in Tokyo Bay, 1945.
In the two years following the end of hostilities, Hobart remained in service as a unit of the Australian Squadron. Three periods were spent in Japanese waters in support of the occupation forces; November 1945 to March 1946; September to November 1946; and April to July 1947.
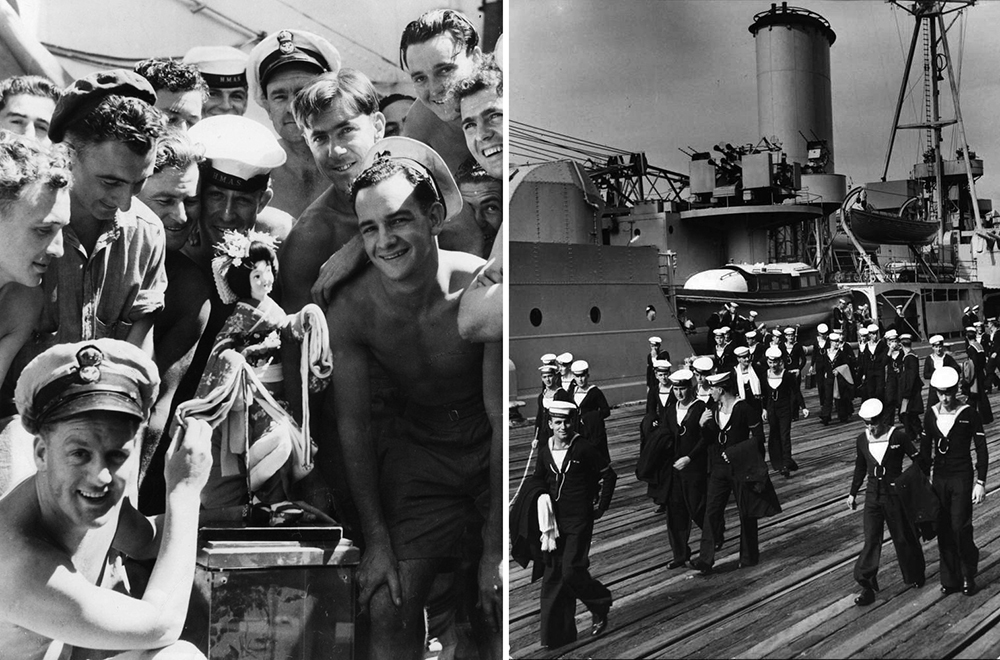
Left: HMAS Hobart (I) ratings ashore in Japan following the cessation of hostilities. Right: Easter leave, 1946.
In August 1947 she returned to Sydney for paying off into Reserve. She paid off on 20 December 1947. From 1953 to 1956 Hobart underwent an extensive refit and modernisation at Newcastle State Dockyard to convert her to a training ship, but was not again brought into seagoing service. On 5 February 1960 it was officially announced that Hobart had been added to the list of obsolete RAN ships for sale as scrap.
On 22 February 1962 Hobart was sold for breaking up to the Japanese firm of Mitsui & Co (Aust) Pty Ltd for £186,886, comprising £170,876 for the ship and £16,010 for spares. The ship left Sydney under tow on 3 March 1962 and arrived at Miyachi Shipyard, Saki, Osaka, on 2 April 1962.
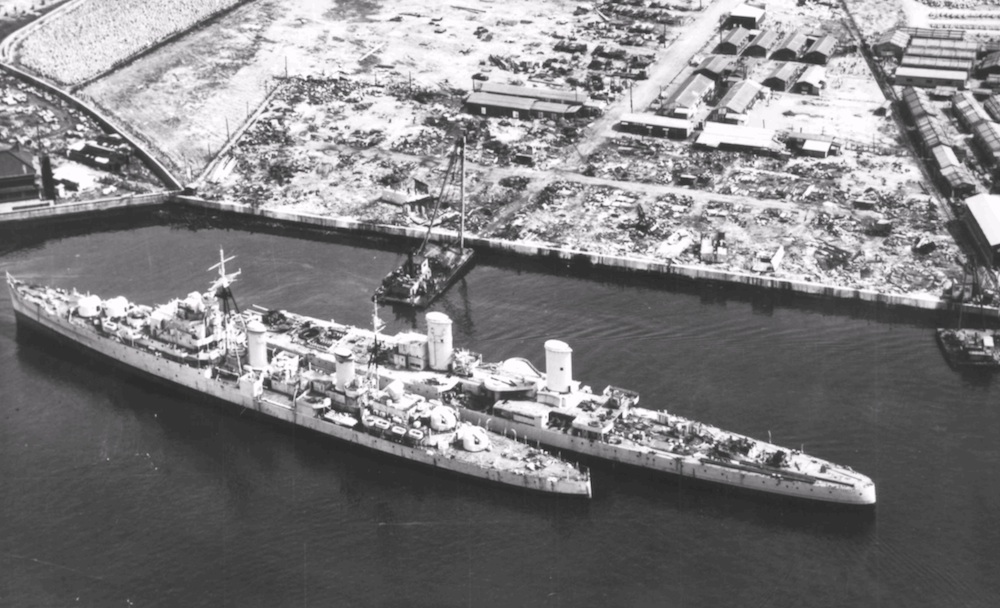
The end of the line for HMAS Hobart (I) and one of the Royal Navy's modified Dido Class cruisers at the breakers yard in Japan.
Commanding Officers of HMAS Hobart (I)
| 28 Sep 1938-27 Aug 1939 | Captain Robert Stewart, RN |
| 28 Aug 1939-07 Jun 1942 | Captain Harry Howden CBE, RAN |
| 08 Jun 1942-17 Oct 1943 | Captain Henry Showers, RAN |
| 18 Oct 1943-07 Nov 1944 | Commander Frederick Cook, DSC, RAN |
| 08 Nov 1944-13 Apr 1946 | Captain Roy Dowling, DSO, RAN |
| 14 Apr 1946-02 Dec 1947 | Captain David Harries, RAN |
| 03 Dec 1947-20 Dec 1947 | Commander Alan Travis, RAN |

Commissioned by the HMAS Hobart Association (WA Div) as part of the Australian War Memorial's Plaque Dedication Program. This plaque was dedicated on 10 November 2011 at a ceremony held at the Australian War Memorial. (AWM PL00206)
