The Peninsula & Orient (P&O) passenger liner SS Berrima was built by Caird & Company of Greenock, Scotland. The 11 137 ton vessel was one of five B Class passenger liners operating on P&O"s emigrant service from the United Kingdom to Australia via the Cape of Good Hope.
Berrima, named after the small village in the southern highlands of New South Wales, was launched on 20 September 1913 and delivered to P&O on 5 December. Berrima sailed from London later that month, on its first voyage, calling at Cape Town, Adelaide and Melbourne before reaching Sydney. It had permanent accommodation for 350 third class passengers, plus room for another 250 passengers in temporary accommodation.

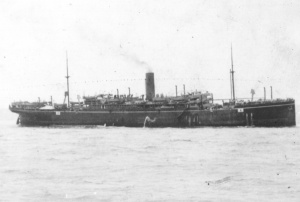
HMAS Berrima, 18 August 1914 (stern view at Cockatoo Island).
Following the outbreak of war in early August 1914, Berrima was requisitioned by the RAN and taken to Cockatoo Island Dockyard on 12 August for refitting. Instead of being converted into a troop transport, as originally planned, the ship underwent a six-day conversion to an armed merchant cruiser and troopship. The modifications included converting cargo holds into accommodation for 1500 personnel, creation of a hospital in the main superstructure and installation of four 4-inch breech loading naval guns and adjacent magazines (two on the forecastle and two on the poop deck).
On 17 August, the ship was commissioned as the auxiliary cruiser HMAS Berrima, under the command of Commander John Bryan Stevenson, RAN. Many of Berrima’s civilian crew, both officers and ratings, were temporarily attached to the Royal Australian Navy and several other Royal Navy and RAN personnel also joined the ship as guns crew.
Berrima left Cockatoo Island, Sydney on 19 August 1914 carrying men of the Australian Naval and Military Expeditionary Force (ANMEF), consisting of 500 RAN Reserve personnel from South Australia, Victoria, New South Wales and Queensland and a hastily recruited battalion of 1000 infantry from New South Wales. The ANMEF was under the command of Colonel William Homes, DSO - a veteran of the South African War and bound for Rabaul in German New Guinea to conduct Australia’s first overseas operation of the war. The operation to capture Rabaul, the seat of Government in German New Guinea, was also the RAN’s first joint and amphibious operation.
It arrived at Moreton Bay early on 21 August and where it anchored before departing later that night. The cruiser HMAS Sydney rendezvoused with Berrima off Sandy Cape on 22 August and from there escorted its northwards. The two ships reached the Great Palm Island, 65 kilometres north-west of Townsville, on 24 August and anchored. There ANMEF personnel were landed to carry out field exercises and rehearsals in preparation for the landing at Rabaul. The force was also required to delay its progress so that it could rendezvous with the battle cruiser HMAS Australia, which was returning from Samoa having escorted New Zealand troops there who had captured the German colony on 29-30 August 1914.
Berrima sailed from the Great Palm Island on the morning of 2 September under the escort of HMA Ships Sydney, Encounter and the submarines AE1 and AE2. The convoy arrived at Port Moresby on the evening of 4 September, where it was met by the destroyers Parramatta, Warrego and Yarra and other support vessels, including the troop transport Kanowna with 500 Queensland soldiers embarked.
On the morning of 7 September 1914 the convoy sailed but it was soon noticed that Kanowna was falling behind, and when it became apparent its stokers were refusing to take the ship to Rabaul, the Kanowna was detached and ordered back to Australia. On 9 September the convoy reached Rossel Island on the eastern tip of New Guinea and rendezvoused with Australia. It was there that Rear Admiral Patey, RN (commanding the Australian squadron) and Colonel Holmes discussed the impending operation for the occupation of Rabaul. Sydney and two destroyers were to be detached and 50 men from the naval contingent under Lieutenant Rowland Bowen, RAN, were subsequently transferred from Berrima to Warrego and Yarra to conduct a dawn landing on 11 September.
The initial landings commenced at Kabakaul and Herbertshöhe at 07:00 on 11 September 1914. German reserve soldiers and Melanesian troops initially offered resistance but then began to fall back. Berrima later arrived under the escort of Australia and at 09.30 steam pinnaces from the battle cruiser swept ahead of the two ships in search of mines in Blanche Bay. When the ‘all clear’ was given the two ships proceeded to anchor. Two companies of naval reservists, under Commander Joseph Beresford, RAN and a military machine gun section were soon landed to support the advancing naval party ashore. Holmes kept the bulk of his military forces in Berrima until the situation ashore became clearer.
As the hospital ship Grantala had not yet arrived at Rabaul it was to Berrima that the wounded from ashore were brought. These included Able Seaman William Williams and the Army Medical Officer Captain Brian Pockley both of whom had been mortally wounded and died later that day. A German soldier, Sergeant Major Mauderer, with a bullet-shattered hand was also brought on board for treatment.
The German wireless station at Bitapaka was captured that evening and nearly 100 German troops (both army reservists and Melanesian auxiliaries) had been killed or captured. At 18:00 on 12 September Berrima went alongside the Nord Deutcher Lloyd wharf at Rabaul and began to disembark the remaining naval reservists and soldiers. Its guns and searchlights were manned as the location of the German East Asian Squadron was still unknown. On 17 September 1914 the German Governor surrendered the colony of German New Guinea to Colonel Holmes.
On 22 September 1914 Berrima departed Rabual bound for Madang to disembark garrison troops and a company of naval reservists. As the location of the German East Asian Squadron was still unknown it was escorted by Australia, Encounter and the French cruiser Montcalm. The convoy reached Madang on 24 September, and after the troops were disembarked the three ships returned to Rabaul on 26 September. Berrima sailed from Rabaul on 4 October, carrying sick and wounded personnel bound for Sydney. It was accompanied by HMA Ships Yarra and Protector and HMS Fantome, with the latter two ships detaching at Townsville on 10 October.
Berrima subsequently arrived in Sydney on 13 October 1914. Despite initial plans to employ its as an armed merchant cruiser it was decommissioned on 20 October 1914. The ship was then converted to a troop transport in November 1914.
In this new role, His Majesty's Australian Transport (HMAT) Berrima (A35) embarked Australian and New Zealand troops and sailed from Albany on 31 December 1914 as part of the second troop convoy of 16 ships to the Middle East. There was no naval escort for this convoy but Berrima towed the submarine HMAS AE2 to the Mediterranean as the submarine had been redeployed to that theatre of war. Berrima continued to operate as a troopship and made a total of three transport voyages from Australia between December 1914 and December 1916.
On 18 February 1917, Berrima was torpedoed in the English Channel, off Portland, by the German submarine U-84 commanded by Kapitänleutnant Walter Roehr. It was badly damaged and four lives were lost. Some of its crew were transferred to the destroyer HMS Forester and Berrima was then towed into Portland Harbour where it was beached (due to the lack of dry-dock facilities), and later repaired. The Australian Government relinquished control of Berrima on 10 October 1917 and it was requisitioned by the British Shipping Controller for use on the Atlantic stores and munitions ferry service.
On 1 February 1920 Berrima was stranded off Margate due to an error by the harbour pilot; it was refloated the next evening. Berrima returned to commercial service on 24 March 1920 and was subsequently employed on the P&O Branch Line. On 26 April 1929, Berrima departed London on its final voyage to Australia, after which P&O shut down the UK to Australia, via Cape Town, route. Berrima was laid up in Britain until 16 July 1930 when it was sold for £29 000 to Japanese shipbreakers Asakichi Kitagawa. It was subsequently scrapped in Osaka later that year.
Specifications
 |
| Builder |
Caird and Company Pty Ltd, Greenock, Scotland |
|---|---|
| Launched |
20 September 1913 |
| Commissioned |
17 August 1914 |
| Decommissioned |
20 October 1914 |
| Fate |
Sold. |
| Dimensions & Displacement | |
| Length | 500 feet 2 inches (152.45 metres) |
| Beam | 62 feet 3 inches (18.97 metres) |
| Draught | 38 feet (12 metres) |
| Performance | |
| Speed | 14 knots (26km/h; 16mph) |
| Propulsion | |
| Machinery | Two 4-cylinder quadruple expansion steam engines connected to twin screws |
| Horsepower | 9000 horsepower (6700 kW) |
| Armament | |
| Guns | 4 x 4-inch breech loading guns |