HMAS AE2
HMAS
AE2
 |
| Class |
E Class |
|---|---|
| Type |
Submarine |
| Pennant |
81 |
| Nickname |
The Silent Anzac |
| Builder |
Vickers Ltd, Barrow-in-Furness, England |
| Laid Down |
10 February 1912 |
| Launched |
18 June 1913 |
| Launched by |
Mr WH Wharton |
| Commissioned |
28 February 1914 |
| Decommissioned |
30 April 1915 |
| Fate |
Lost in action on 30 April 1915 |
| Dimensions & Displacement | |
| Displacement |
|
| Length | 181 feet |
| Beam | 22 feet 6 inches |
| Draught | 22 feet 6 inches |
| Performance | |
| Speed |
|
| Complement | |
| Crew | 35 |
| Propulsion | |
| Machinery | 2 x 8 cylinder diesel engines, battery driven electric motors |
| Horsepower |
|
| Armament | |
| Torpedoes | 4 x 18-inch torpedo tubes |
| Awards | |
| Battle Honours | |
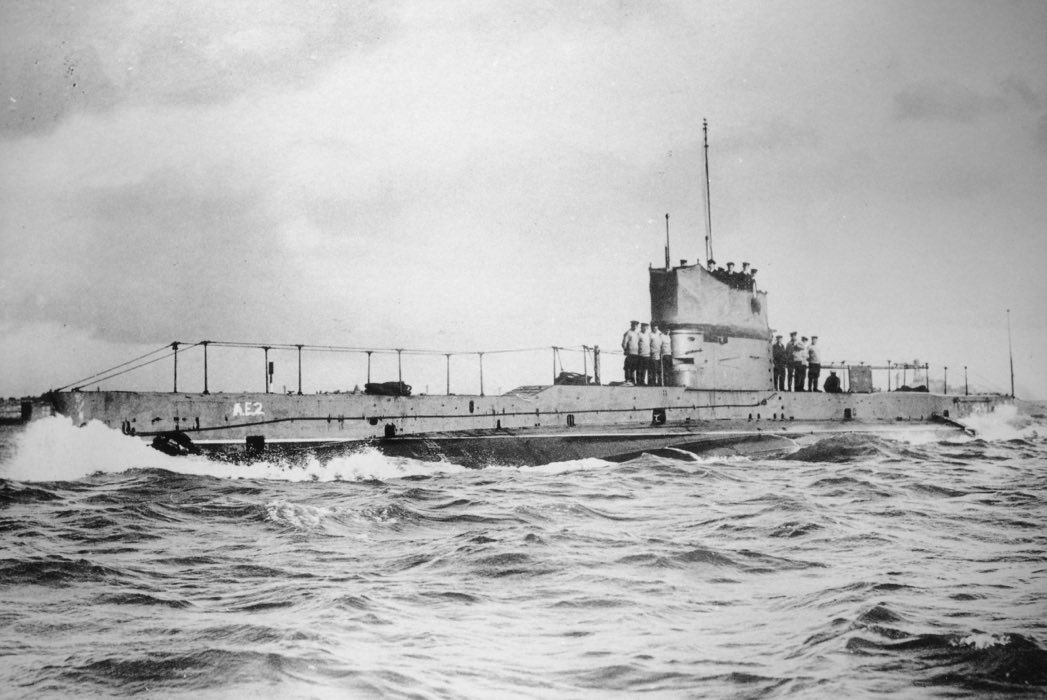
His Majesty’s Australian Submarine AE2 was launched in the yard of Vickers Ltd at Barrow-in-Furness, England on 18 June 1913 by Mr WH Wharton. She commissioned at Portsmouth on 28 February 1914 under the command of Lieutenant Commander Henry Hugh Gordon Dacre Stoker, RN. Her crew of 35 comprised officers and ratings from both the Royal Navy and Royal Australian Navy and she was the second of two E Class submarines built for the fledgling RAN.

AE2 takes to the water for the first time in the Vickers Yard, Barrow-in-Furness, 18 June 1913

AE2 with her crew onboard shortly after commissioning.

The axe used to ceremoniously launch both AE1 and AE2 (Tony Todd collection)
1914

HMA Submarine AE2 arriving at Portsmouth prior to her delivery voyage to Australia.
Accompanied by her sister submarine AE1, (Lieutenant Commander Thomas Besant, RN), the two vessels sailed from England for Australia on 2 March 1914. The voyage was undertaken in three phases. The first phase took place under the escort of the Royal Navy cruiser HMS Eclipse which remained with the submarines until they reached Colombo.
En route, Eclipse alternately took the submarines in tow to reduce wear on their engines. In spite of this precaution, AE2 suffered a serious defect while under her own power when she lost a propeller blade, necessitating repairs in Gibraltar between 6-9 March. With repairs complete, the small convoy continued its passage via Malta, and Port Said before AE2 threw a second propeller blade 20 miles outside of Aden. On this occasion repairs were carried out at sea with the assistance of Eclipse. The submarine was trimmed down by the bows and two anchors and cable from Eclipse were lowered over the front of AE2 to bring the stern of the boat out of the water. With the assistance of divers a replacement propeller was then fitted, the entire evolution taking two days. The three vessels then continued on to Colombo where they arrived on 9 April 1914.
Five days were spent in Colombo allowing the crews of the submarines to get some respite from the cramped and hot conditions in their respective boats. The passage through the Red Sea had been particularly demanding due to intense heat. Often the temperature inside the boats rose above 100 degrees F and in an attempt to cool AE2, Stoker ordered her casing to be painted white in an attempt to reflect the intense sunlight.
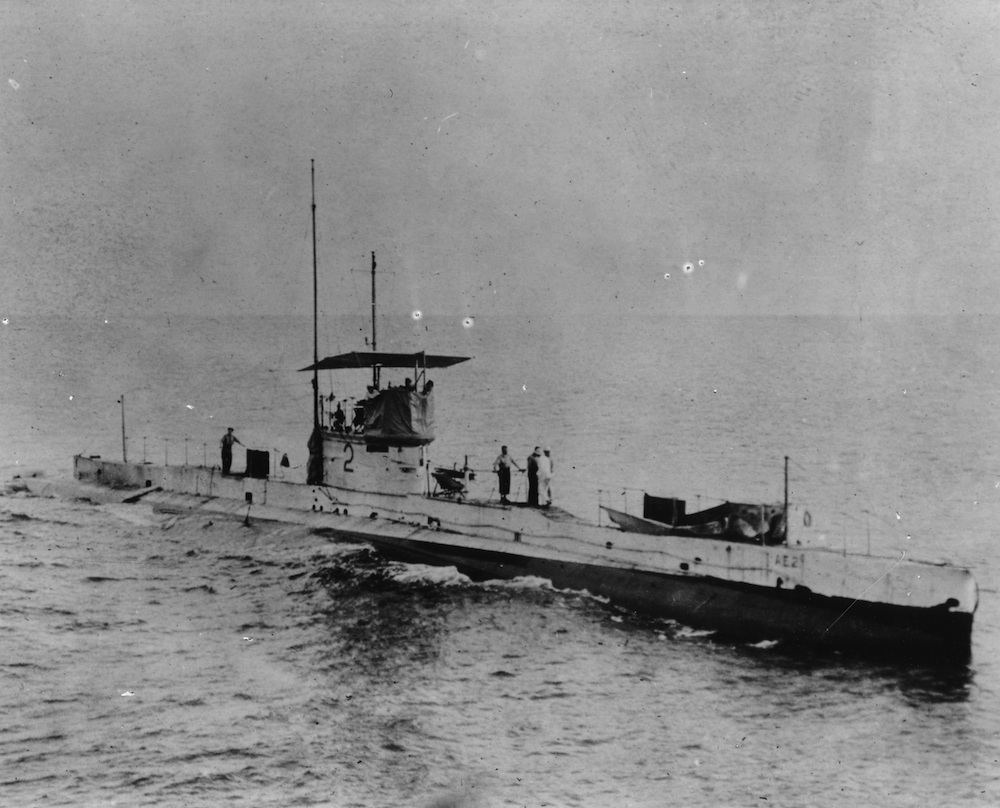
AE2 painted white during her voyage through the Red Sea in the hope that it would reflect the intense sunlight and improve conditions on board. Note also the canvas awnings rigged to provide additional shade.
From Colombo the second phase of the voyage began under the escort of HMS Yarmouth which shepherded AE1 and AE2 to Singapore where they arrived safely on 21 April 1914. In Singapore the submarines were met by the cruiser HMAS Sydney which assumed responsibility for them for the remainder of the voyage to Sydney where they arrived on 24 May, 83 days after leaving Portsmouth. A total of sixty days had been spent at sea and some 13,000 miles covered, a record for submarines at that time.
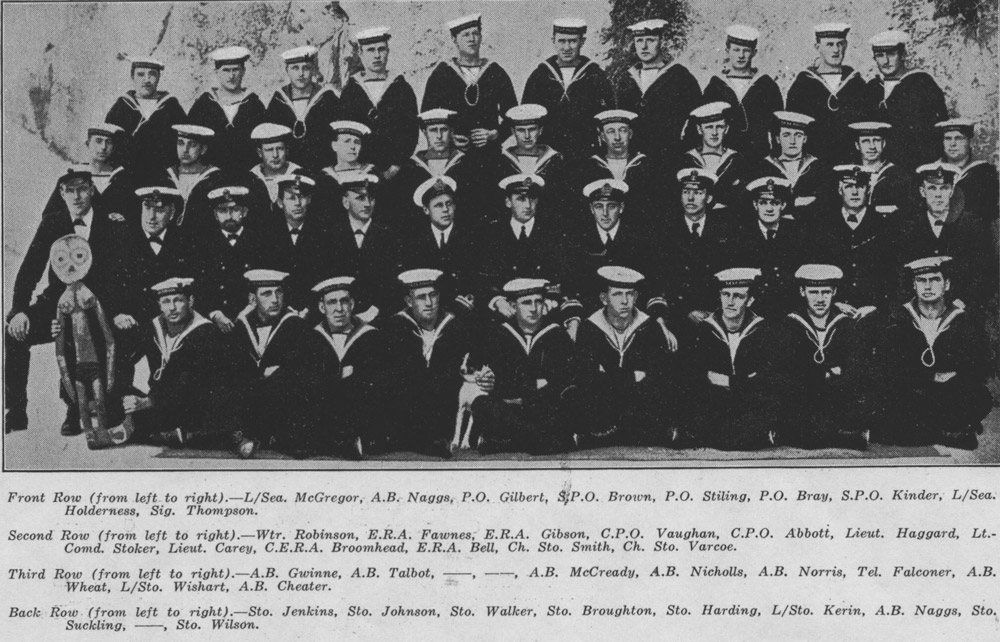
Captain of HMAS AE2, Lieutenant Commander Stoker with his crew.

AE2 nested alongside AE1 at Garden Island, Sydney, 1914. Both boats have their wireless telegraphy masts rigged. AE2’s wind dodger on the conning tower has been removed leaving her helm, voice pipes and periscopes visible.
Service with the ANMEF
Following the outbreak of World War I in August 1914, AE2 and AE1 were ordered to join the Australian Naval and Military Expeditionary Force (ANMEF) assigned to capture the German colonies in New Guinea. Stoker and his crew took part in the seizure of New Britain, culminating in the capture and surrender of Rabaul on 13 September 1914 and the general surrender of the New Guinea territories on 22 September 1914.
A key duty assigned to the two submarines throughout the operation was to guard St George’s Strait, lying between New Britain and New Ireland, and defend the RAN fleet from the approach of any enemy ships. It was during one such patrol on 14 September 1914 that AE1 disappeared with all hands. A search was ordered for the missing submarine using all available ships but after three days it was called off, with no trace of the ill-fated submarine being found.
Operations in Suva
On 4 October 1914 AE2 proceeded to Suva to join Admiral Patey’s force comprising HMA Ships Australia (I), Sydney (I), Encounter, Warrego (I) and the French light cruiser, Montcalm. Patey was under orders to counter any threat posed from the German cruisers Scharnhorst and Gneisenau which had attacked the French Society Islands on 22 September and were still at large. Following three uneventful weeks based at Fiji, AE2’s service in the Pacific came to an end when she was detached on 8 November with orders to return to Sydney, where she duly arrived on 16 November.
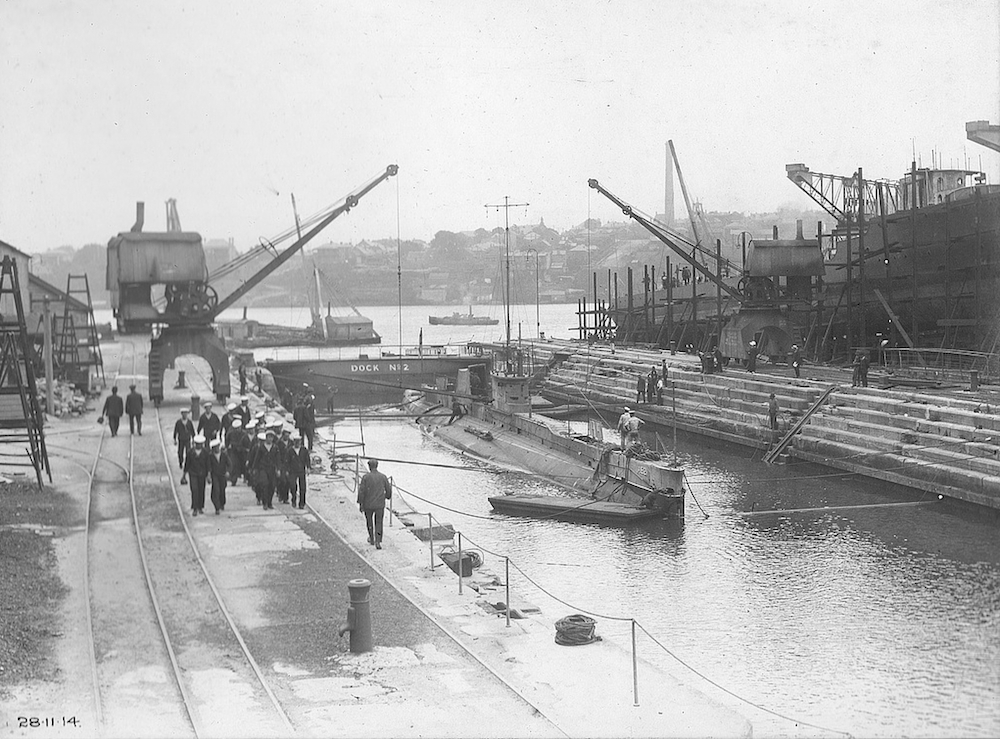
AE2 in Fitzroy Dock, Cockatoo Island, following her deployment as part of the ANMEF.
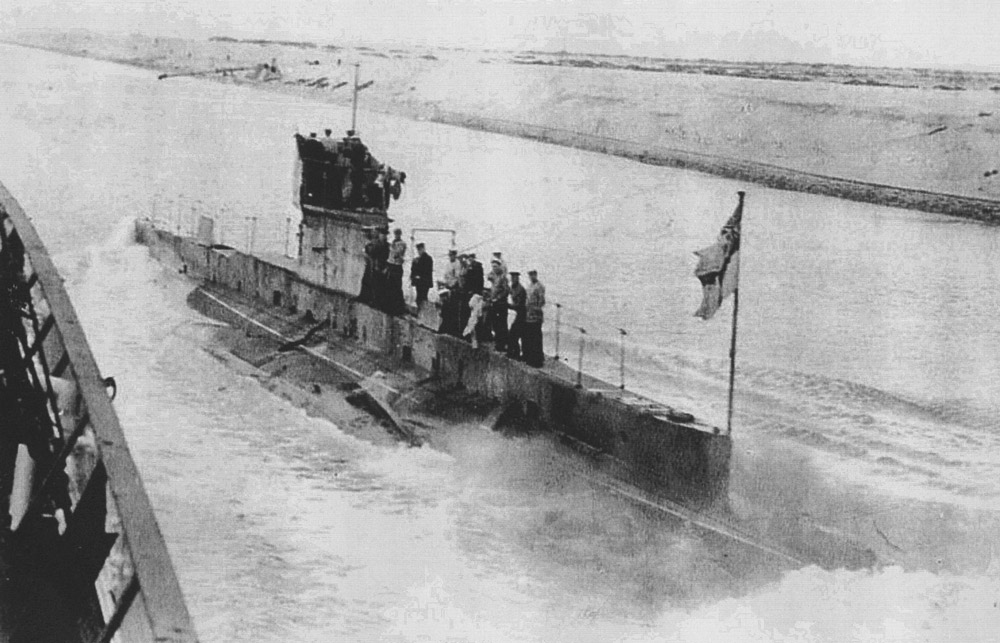
HMAS AE2 passing through Suez Canal in 1915. (Allen C Green collection, state library of Victoria)
Return to the Northern Hemisphere
Following a brief maintenance period, AE2 departed Sydney on 19 December en route for Albany in Western Australia where she joined the second convoy of Australian Imperial Force (AIF) troops assembling in King George’s Sound. The convoy of 17 transports sailed on 31 December for Suez via Colombo. Following the destruction of SMS Emden by HMAS Sydney the previous month, there was no requirement for other escorting warships and whenever possible AE2 was taken in tow to reduce wear on her engines. On 28 January 1915 the convoy arrived in Suez following what was, for the crew of the submarine, a long and uncomfortable passage across the Indian Ocean, through the Gulf of Aden and Red Sea.
Service in the Dardanelles
In February 1915 AE2 joined a Royal Navy squadron based on the island of Tenedos in the Aegean Sea. From there she operated in support of the unfolding Dardanelles campaign.
Prior to 25 April 1915, AE2’s part in operations was minimal, but that changed when Vice Admiral de Robeck, Commander-in-Chief (C-in-C), Eastern Mediterranean Fleet, approved plans presented to him by Stoker to attempt to force a passage through the 35 mile long, heavily fortified Dardanelles Strait and enter the Sea of Marmora (also spelt Marmara). If this could be achieved, enemy shipping transiting between the Bosphorus and the Dardanelles could be prevented from reinforcing and resupplying Turkish troops on the Gallipoli peninsula.

AE2 departing Malta for Tenedos in April 1915 after effecting repairs to her hull.
All previous attempts by Allied submarines to pass through the strait had failed due to an effective sea denial operation mounted by the enemy. Minefields, fixed and mobile gun batteries, searchlight surveillance and patrolling Turkish warships, coupled with natural navigational hazards, had made the Dardanelles seemingly impenetrable. The C-in-C remarked that if Stoker and his crew were successful there would be “no calculating the result it will cause, and it may well be that you will have done more to finish the war than any other act accomplished.”
On the morning of 24 April the attempt began, however, the mission was soon abandoned when one of the submarine’s forward hydroplanes failed, necessitating AE2 returning to Tenedos to effect repairs. With repairs complete, and with a heightened sense of tension among her crew, AE2 set off to try again the following day.
25 April 1915

AE2’s Commanding Officer Lieutenant Commander Lieutenant Commander Henry Hugh Gordon Dacre Stoker.
Lieutenant Commander Stoker takes up the story:
Having proceeded from the anchorage off Tenedos, I lay at the entrance off the Dardanelles until moonset and at about 2:30am on 25th April entered the straits at 8 knots. Weather calm and clear. As the order to run amok in the Narrows precluded all possibility of passing through unseen, I decided to travel on the surface as far as possible.
Throughout AE2’s passage, searchlights continually swept the strait but she avoided detection continuing unmolested until 4:30am when gun batteries opened fire from the northern shore. Stoker immediately dived, beginning an underwater passage through the minefields. Mooring wires tethering the mines continually scraped along AE2’s sides for the next half hour. Twice Stoker surfaced in the minefield to make navigational observations and at 6:00am AE2 was within two miles of the Narrows at Chanak, submerged at periscope depth with the sea flat and calm. Forts on both sides of the Narrows then sighted her and soon opened heavy fire. Meanwhile, Stoker, watching through his periscope, observed a number of ships and quickly determined to attack what he thought to be a small cruiser of the Peik e Shetrek type.
At a range of 300-400 yards I fired the bow torpedo, at the same moment ordering 70 feet in order to avoid a TBD [torpedo boat destroyer] which was attempting to ram on the port side. As the vessel descended the TBD passed overhead close, and the torpedo was heard to hit. As the cruiser, dead ahead, might be expected to sink almost immediately, I altered course a point to starboard to avoid becoming entangled with her. At the time I believed the vessel to be in the centre of the strait. About 4 minutes later I altered back to the original course, and ordered 20 feet. As the vessel was rising she hit bottom and slid up on the bank to a depth of 10 feet, at which depth a considerable portion of the conning tower was above water. Through the periscope I saw that the position was immediately under Fort Anatoli Medjidieh.
The fort opened fire and for some minutes shells fell on all sides until efforts to refloat her succeeded. AE2 then slid back into the safety of deep water. The relief onboard the submarine was palpable but short lived, for AE2 then grounded on the Gallipoli shore, again exposing herself to the enemy.
Through the periscope I judged the position to be immediately under Serina Burnu, and further observed two TBDs, a gunboat, and several small craft standing close off in [the] Strait firing heavily and a cluster of small boats which I judged to be picking up survivors of the cruiser. In this position we remained for 5 minutes.
As my vessel was lying with inclination down by the bows I went full speed ahead. Shortly afterwards she began to move down the bank, gave a slight bump, gathered way and then bumped very heavily. She, however, continued to descend and at 80 feet I dived off the bank. The last bump was calculated to considerably injure the vessel, and probably impaired the fighting efficiency, but as I considered my chief duty was to prove the passage through the Straits to be possible, I decided to continue on course.
In connection with these two groundings, I have to report that the behaviour of the crew was exemplary. In these two highly dangerous situations it was only their cool and intelligent performance of their duties which enabled the vessel to be refloated.
Shortly afterwards AE2 again rose to periscope depth where Stoker established his position as approaching Nagara Point. On all sides he was surrounded by pursuit craft and each time he showed AE2’s periscope the pursuing destroyers turned to ram. Consequently, in an attempt to shake off the enemy, Stoker bottomed the submarine on the Asiatic shore to await developments.
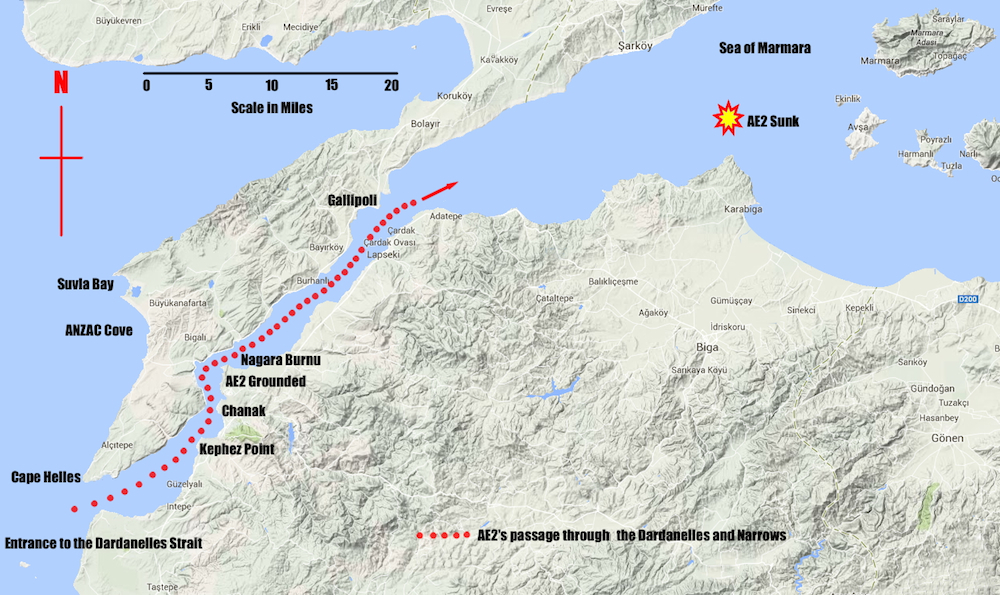
The track of AE2 through the Dardanelles and into the Sea of Marmara (Marmora) where she was later lost.
Throughout 25 April, AE2 lay in 80 feet of water while enemy ships continually searched overhead. Those of her crew who could be spared were ordered to rest but most found sleep impossible. On one occasion the AE2’s casing was struck by a heavy object being trailed along the bottom by one of the vessels above but fortunately it did not snag or critically damage the submarine.
At approximately 9:00pm Stoker blew ballast tanks and surfaced having been submerged for over 16 hours. All signs of shipping had vanished and the opportunity was taken to recharge the submarine's batteries and to send a signal to the Commander-in-Chief notifying him of the successful passage through the ‘Narrows’ and past Nagara Point.
At that time a council of war was taking place in the British flagship HMS Queen Elizabeth as it steamed off the coast of the Gallipoli peninsula. The British Commander-in-Chief, Sir Ian Hamilton, was in conference with his senior staff discussing the progress of the Allied troops ashore.
Moments earlier Hamilton had received a message from Lieutenant General William Birdwood who had reluctantly recommended an immediate evacuation. This was based on advice from Birdwood's two divisional commanders ashore who feared the exhausted troops could not withstand a Turkish counterattack the next day. The situation appeared grave and the matter of re-embarkation required immediate deliberation.
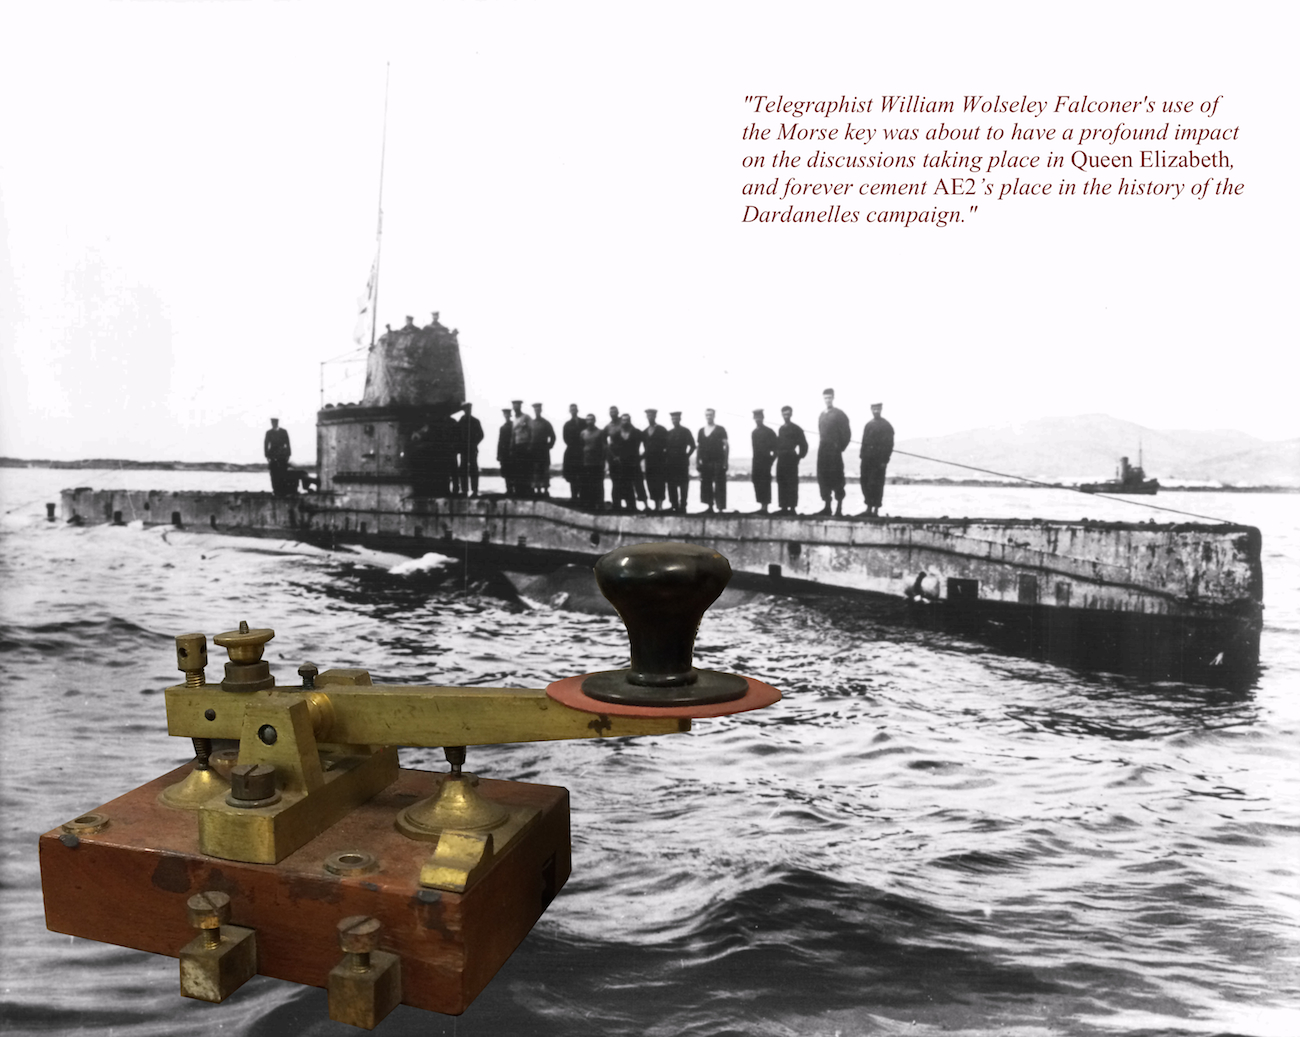
The duty of sending the signal fell to 22-year old Victorian, Telegraphist William Wolseley Falconer. His use of the Morse key was about to have a profound impact on the discussions taking place in Queen Elizabeth, and forever cement AE2’s place in the history of the Dardanelles campaign. The submarine’s wireless had a range of only 30-100 miles, so a guard ship, the destroyer HMS Jed, had been stationed in the Gulf of Saros with a receiving window set between 40 and 50 minutes past the hour.
As Falconer tapped away at his wireless set from within, the submarine’s damp external wire aerial was seen by Stoker to be throwing off purple and blue sparks as the morse message was transmitted. The young telegraphist tried in vain to get an acknowledgement that his signal had been received but after several attempts it was assumed that that the wireless equipment had been damaged and therefore the fleet would remain unaware of their achievement.
Unbeknown to Stoker and Falconer, the message had in fact been received in Jed, pieced together and relayed to Queen Elizabeth at the crucial moment when Hamilton was deliberating with his staff whether or not to order a general evacuation. The council of war was dramatically interrupted when one of Hamilton’s aides handed a copy of Stoker’s signal to Commodore Roger Keyes who announced “Tell them [the troops on the shore] this. It is an omen. An Australian submarine has done the finest feat in submarine history and is going to torpedo all the ships bringing reinforcements, supplies and ammunition into Gallipoli.”
This was a tremendous fillip and in his response to Birdwood, Hamilton wrote “Your news is indeed serious. But there is nothing for it but to dig yourselves right in and stick it out. It would take at least two days to re-embark you, as Admiral Thursby will explain to you. Meanwhile, the Australian submarine has got up through the narrows and has torpedoed a gunboat…Hunter-Weston, despite his heavy losses, will be advancing tomorrow which should divert pressure from you. Make a personal appeal to your men…to make a supreme effort to hold their ground. P.S. You have got through the difficult business, now you have only to dig, dig, dig until you are safe.”
If nothing else AE2’s signal certainly provided morale boosting information at a time when it was most needed. Many believe that it directly influenced the decision made by Hamilton that night, resulting in the Allied forces remaining on the peninsula.
By then, the air inside the submarine was foul and her crew swarmed on deck “eager to breathe the cool night air”. At approximately 11:00 pm, cloud cover shaded the moon, providing AE2 with an additional layer of concealment, and in the early hours of the morning it began to rain reducing visibility further.
26 April 1915
By 3:00am the weather began to clear as Stoker and his crew continued their passage on the surface toward the Sea of Marmora before diving at dawn. As soon as light permitted, Stoker observed through his periscope “two ships approaching, obviously men-of-war, one in front of the other”. Steering a parallel and opposite course to the enemy he approached before firing his port torpedo.
Only after making the attack did Stoker realise he had fired at the smaller leading ship, a cruiser, which successfully evaded his torpedo.
Finding it impossible to bring another torpedo tube to bear on the second ship, which he judged to be a battleship of the Barbarossa Class, a further attempt was abandoned.
“I continued on course through [the] Straits, examined the Gallipoli anchorage, found no ship worthy of attack and so proceeded in the Sea of Marmora, which was entered about 9:00am.”
About 9:30am AE2 sighted four ships, but since only six of her eight torpedoes remained Stoker decided not to fire unless he was certain his target was a troop transport.
With this intention I dived close to the foremost ship - a tramp of about 2000 tons. Passing about 200 yards abeam of her I could see no sign of troops or ammunition; but as I passed under her stern she ran up colours and opened rifle fire at [the] periscope. I then dived over to the next ship and attacked at 400 yards with starboard beam torpedo. The torpedo failed to hit. I was unable to get within range of the other two ships.
The remainder of that day was spent on the surface recharging batteries and making good defects.
Shortly after dark, AE2 was attacked by a small Turkish vessel while again attempting to establish wireless communications with the fleet. The attacks continued whenever the submarine attempted to surface during the night of 26/27 April.

AE2 at sea. The men on her casing are in the process of raising/lowering her W/T mast and aerials.
27-29 April 1915
At dawn on 27 April, while still dived, Stoker sighted a ship escorted by two torpedo boat destroyers. Evading the escort, he manoeuvred into a firing position at 300 yards but this time the torpedo refused to leave the tube, possibly due to a faulty engine. In response, one of the destroyers turned to ram, forcing a hurried dive. Nothing else was sighted that day and in order to give the crew some rest, the night of 27 April was spent on the bottom in Artaki Bay.
In the early hours of the morning of 28 April, in dead calm weather, AE2 attacked another small ship escorted by two small destroyers. Again the torpedo missed its intended target and retaliatory manoeuvres by the Turkish warships precluded a second attempt.
At dawn on 29 April Stoker shaped course towards Gallipoli observing a gunboat patrolling the head of the Strait off Eski Farnar Point.

AE2 on patrol as depicted by, and used with permission of, marine artist John Ford.
Dived under gunboat down Strait, and returned up Strait showing periscope to give the impression that another submarine had come through. TBDs and TBs [torpedo boats] came out in pursuit, and having led them all up towards Sea of Marmora, I dived back and examined Gallipoli anchorage but found nothing to attack.
AE2 then returned to the Sea of Marmora where Stoker later fired on a Turkish gunboat narrowly missing her. Later that afternoon, he rendezvoused with HMS E14 (Lieutenant Commander EC Boyle, RN) the second Allied submarine to successfully pass through the Dardanelles. The two submarines met at 5:00pm off Kara Burnu Point and following a brief conference between the two captains, a subsequent rendezvous was arranged for 10:00am the following day. On the night of 29/30 April, AE2 lay on the bottom, north of Marmora Island.
30 April 1915
Arriving at the rendezvous at 10:00am on 30 April, Stoker sighted a torpedo boat approaching at high speed.
Dived to avoid torpedo boat; while diving sighted smoke in Artaki Bay, so steered south to investigate. About 10:30 the boat’s nose suddenly rose and broke surface about 1 mile from TB Blew water forward but could not get boat to dive. TB firing, got very close, and ship from Artaki bay, a gunboat also firing; flooded a forward tank and boat suddenly took big inclination down by bows and dived rapidly. AE2 was only fitted with 100 foot depth gauges. This depth was quickly reached and passed. Went full speed astern and commenced to blow main ballast. After some interval boat came back to 100ft depth, so re-flooded and went ahead, but boat broke surface stern first.
Within a few seconds the engine room was hit, and holed in three places. Owing to the great inclination down by the bow, it was impossible to see the TB through the periscope and I considered that any attempt to ram would be useless. I therefore blew main ballast and ordered all hands on deck. Assisted by Lieutenant Haggard, I then opened the tanks to flood and went on deck. The boat sank in a few minutes in about 55 fathoms, in approximate position 4 degrees north of Kara Burnu Point at 10:45am. All hands were picked up by the torpedo boat and no lives lost.
Stoker Petty Officer Henry Kinder recalls AE2’s final moments (courtesy Peter Ryan & the Kinder family):
It was obvious that AE2 had received her death blow so as soon as the boat got to the surface the captain gave the order to abandon ship; every man for himself. We now fully realised that AE2’s end had come and if we were lucky enough to get out we would have to take whatever was coming to us from the Turks.
AE2’s conning tower was just above water and the crew could only go out one at a time. It took some minutes for thirty-three men to go up. The wireless operator, the first to go up, didn’t seem to like the look of things as the two gun boats were still firing and shells were falling all around us.
My turn didn’t come till near the last. I spent my last few minutes looking around the boat. The clock said five minutes to twelve. A time, which made me, think of the rabbit pie in the oven. By this time pie and oven would be all mixed up with the engines. I went to my ditty box and got 16/- and a photograph of my wife. I thought the money might come in handy. I was sorry I had paid in a few pounds to the canteen the night before we left.
AE2 looked a proper wreck with everything in disorder. The captain had been collecting ship’s papers and destroying charts. The last thing I noticed was the charge of the gun cotton, which was kept handy under the diving gauges to blow the boat up. This would prevent her from falling into enemy hands. I often wonder (if the boat had remained on the bottom) whether the captain would have been game enough to have used the charge and blown the boat and crew to their final resting place. I think he would have.
At last my turn came. I had kept one eye on the depth gauge to make sure that the boat was not sinking and with one last look around, came up on deck to start a new life in an unknown country. It was like leaving home. The chief engine room artificer and the three officers were still to follow me.
When I got on deck the two gun boats were still firing and the destroyer that had hit us was quite close and blowing her siren for the other boat to cease fire. They were firing fairly wide so there wasn’t much chance of being hit. AE2’s crew had taken to the water and were scattered all over the place. Most of them were wearing life belts in the form of a padded waistcoat. These had been handy to wear in the boat to keep warm.
I stood by the conning tower to warn the captain, (who was still in the boat shutting off the air and opening up the Kingston valves) to make sure that AE2 would sink fast. He just got on deck when she took her final dive. For a few seconds I could see her moving through the water like a big, wounded fish, gradually disappearing from sight. I felt sorry to see AE2 come to such an end but she had died fighting.
Thus AE2’s game of hide and seek was brought to an end, and her Commanding Officer and crew were on their way to spend the next 3½ years in a Turkish prison camp. Four ratings died in captivity the remainder were released following the Armistice in 1918.

Lieutenant Commander Haggard, AE2's Executive Officer with Lieutenant Commander Stoker, AE2's captain, following their release from Turkish captivity. (ANMM)
In June 1998 Mr Selçuk Kolay, director of the Rahmi Koç Museum in Istanbul, discovered AE2’s wreck lying in 72 metres of water. Discussions concerning the long term preservation of AE2 continue between Australian and Turkish
Further reading
- Straws in the Wind, Commander HG Stoker, DSO, RN, London, Herbert Jenkins Ltd, 1925.
- Stoker’s Submarine, Fred & Elizabeth Brenchley, Sydney, Harper Collins, Pty Ltd, 2001.
- In All Respects Ready, Australia’s Navy in World War One, David Stevens, South Melbourne, Oxford University Press, 2014.
- Forty years after penetrating the Dardanelles, Lieutenant Commander Stoker recalled the event in a recorded interview which may be found on the following link: http://anzacsightsound.org/audios/australia-s-submarine-at-gallipoli.

HMA Ships AE1 and AE2 General Arrangement Drawing (Starboard Elevation and Sections). Download original file (15.3 MB).

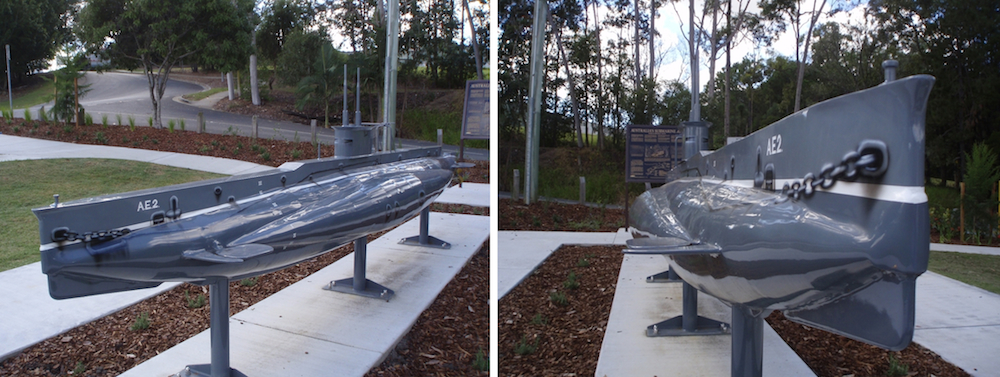
AE2 memorial at the Ruth Whitfield Memorial Park, Kallangur, Queensland. (Abraham-James Collection)
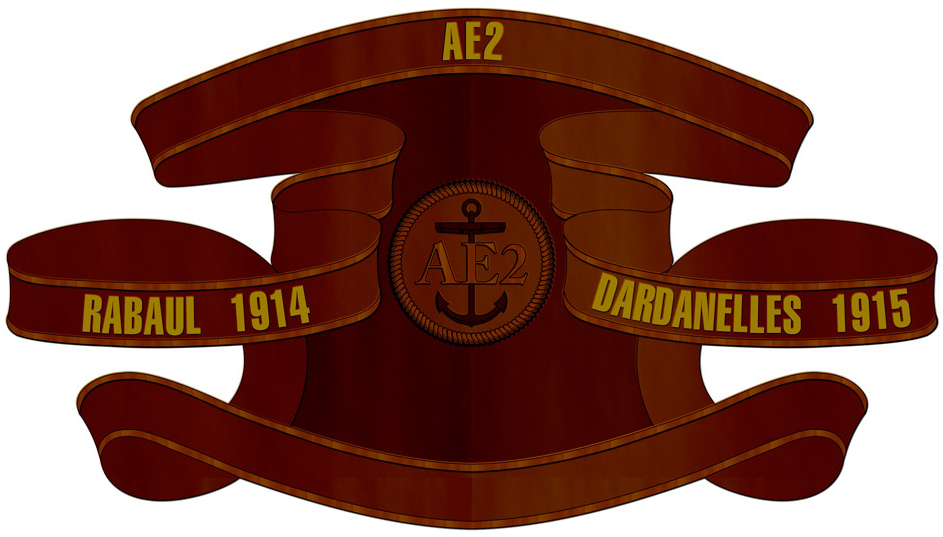
HMAS AE2 Battle Honour Board.

During 2014 the RAN will pause to remember the loss of both AE1 and AE2 and commemorate the men who served in them.

HMAS AE2 memorial plaque.

Seaman Electronic Technician Joshua Nowland (left) and Able Seaman Boatswains Mate Jessie Gaudry (right) take their post as members of the catafalque party onboard HMAS Anzac as the ship commemorates the loss of HMAS AE2 in the Sea of Marmara, in 1915.

Chief of Navy Vice Admiral Tim Barrett, AO, CSC, RAN, with the Turkish Fleet Commander Vice Admiral Veysel Kosele, and guests onboard HMAS Anzac, for a commemorative service to HMAS AE2, lost during World War One, in the Sea of Marmara.
