HMAS J1
HMAS
J1
 |
| Class |
J Class |
|---|---|
| Type |
Submarine |
| Pennant |
J1 |
| Builder |
Portsmouth Naval Dockyard, England |
| Launched |
6 November 1915 |
| Commissioned |
25 March 1919 |
| Decommissioned |
12 July 1922 |
| Dimensions & Displacement | |
| Displacement |
|
| Length | 275 feet 6 1/8th inches |
| Beam | 23 feet 1 1/4 inches |
| Draught | 16 feet |
| Performance | |
| Speed |
|
| Range | 4000 miles at 12 knots |
| Complement | |
| Crew | 5 officers, 40 sailors |
| Propulsion | |
| Machinery |
|
| Horsepower |
|
| Armament | |
| Guns | 1 x 4-inch gun |
| Torpedoes | 6 x 18-inch torpedo tubes - 4 bow, 2 beam |
Towards the end of 1914, early in World War I, disturbing rumours began to circulate that the newest German submarines were capable of a much higher surface speed than British boats, one report giving their speed at about 22 knots. The rumours were sufficiently strong to force serious consideration of the matter by the Admiralty, and at the same time consideration was given to the idea that submarines should have a high enough surface speed to be able to work with the fleet. The reports concerning the speed of the German submarines proved to be spurious, but the idea of a British submarine with a high surface speed gained ground. The immediate result of this concern was the development of the J Class, which were unique with their three shafts. Originally eight boats were planned but this was reduced to six and then increased to seven. As a result of these changes the boats originally intended to be J7 and J8 were renumbered in April 1915 as J3 and J4 respectively.

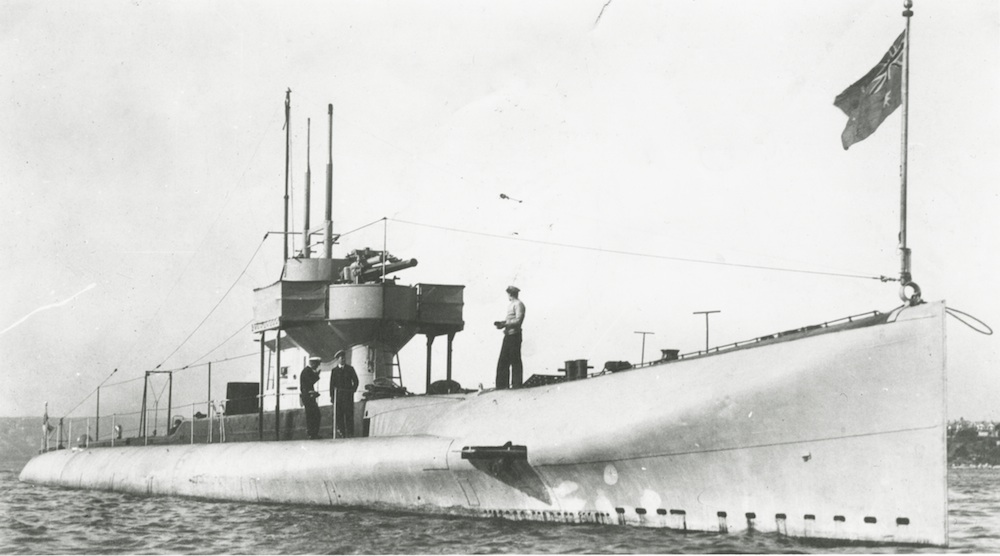
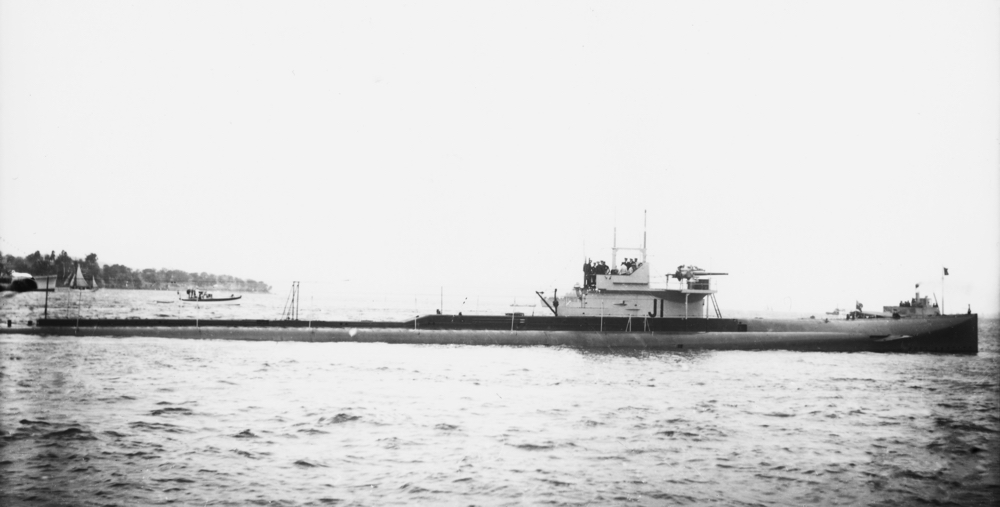
J1 as she appeared when in service in the Royal Navy. In this picture her original 3-inch gun is visible on the forward casing. It was later removed and replaced with a 4-inch gun mounted on the forward end of the conning tower.
HMS J1 commissioned in the Royal Navy on 15 March 1916 under the command of Commander NF Laurence, DSO, RN and was allocated to the 11th Submarine Flotilla based at Blyth, Northumberland.
On 15 July 1916 the Commander-in-Chief, Grand Fleet, was informed that the German High Seas Fleet would probably be sailing that night and would be passing in the vicinity of Horn Reefs. He immediately cancelled exercises designed to test lessons learned at the recent Battle of Jutland and took steps to bring the German Fleet to battle again. As part of these dispositions J1, in company with three G Class submarines, left Blyth to patrol off the Horn Reefs. The alarm subsided, the Grand Fleet returned to exercise, and the submarines reached their patrol areas where they remained for three days. They saw nothing but a few aircraft and two surfaced U-boats which they were unable to attack.
On 18 August 1916 a German signal was intercepted which made it clear that the German High Seas Fleet would be putting to sea that night. Again the several submarine flotillas were involved in the British counter measures. By midnight 26 submarines were on the move including J1, J3, J5 and J6 sent to patrol areas off the Tyne. In the event only E23 saw anything of the Germans.
During the evening of 4 November two German submarines, U-20 and U-30, had grounded in thick fog off Bovbjerg Light on the west coast of Denmark and the 4th Destroyer Flotilla was ordered to proceed to render assistance. The battle cruisers Seydlitz and Moltke with additional destroyers were ordered to the area of the Horn Reefs in support and four battleships of the 3rd Battle Squadron (König, Grosser Kurfürst, Kronprinz and Markgraf) also put to sea. These events were unknown to Commander Laurence in J1 who had sailed from Blyth to patrol off the Horn Reefs. He had dived at dawn on 5 November and was patrolling submerged in a circle of 30 miles radius centred on position 55°56´N, 06°50´E.
From the submarine point of view the weather was bad; visibility was only about two miles and a heavy swell made depth keeping at periscope depth difficult except by excessive use of speed. In this respect the J Class were difficult to control at periscope depth in any sea owing to the large expanse of flat upper deck. This was modified and improved later.
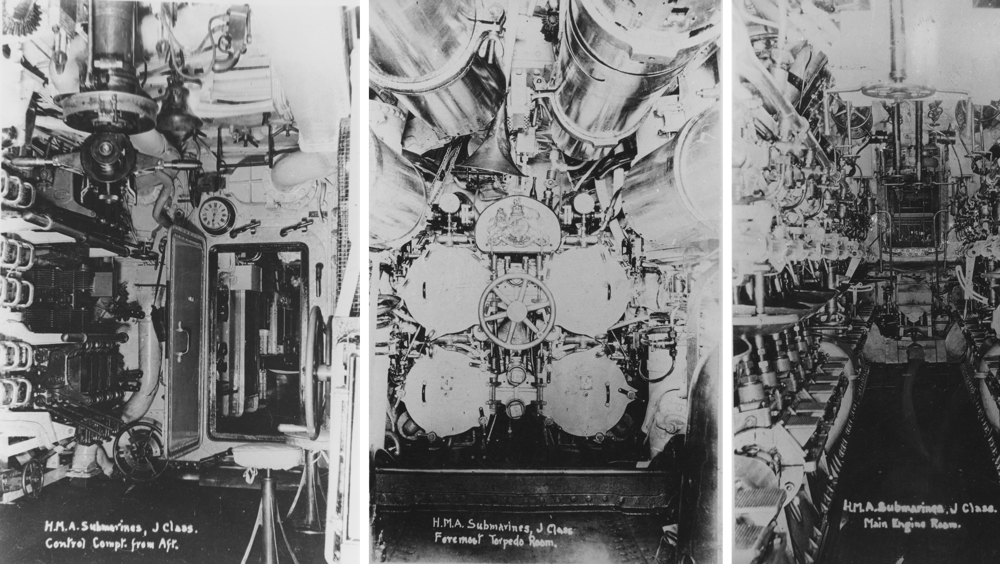
Conditions in the J Class were understandably cramped as can be seen in the above imagery.
In order to economise in battery power and to avoid breaking surface constantly he was patrolling at a depth of 70 feet, rising occasionally to 25 feet to carry out a periscope search. At 11:50 he was about 30 miles south west of the Horn Reefs, and coming to periscope depth he sighted four enemy battleships astern, looming only about two miles away in the poor visibility. Going deep to avoid breaking surface he turned to get into an attacking position. Coming to periscope depth again he saw that the battleships were ahead and turning together to reverse course to the south. At this stage J1 broke surface and it was necessary to go full ahead to regain control, but she remained unseen. At 12:08 four Mk VII torpedoes were fired with a five degree spread at the third ship in the line, Laurence firing as J1 went deep still unable to keep depth in the heavy seas. Two explosions were heard. Surfacing at 14:30 there was nothing in sight and J1 returned to Blyth on 7 November.
The first torpedo hit Grosser Kurfürst aft, damaging her rudders and causing her to take in some 300 tons of water. Kronprinz was hit on the port bow. Both ships reached harbour under their own steam, but required several months in dock. Commander Laurence was awarded a Bar to his DSO, the original award having been made for his exploit in torpedoing Moltke in the Baltic on 19 August 1915.
At 13:30 on 19 March 1917, in position 56°N, 00°32´W, while en route to patrol off Utsire, J1 fired a torpedo at an enemy submarine and missed. An hour later she sighted some British minesweepers screened by the destroyers Rival and Orpheus, and reported the presence of the enemy submarine to Rival. The destroyers had been in sight for nearly an hour when Orpheus suddenly closed at high speed and fired four rounds at short range at J1, narrowly missing the bridge. It transpired that she had not seen the interchange of signals between Rival and J1, had not been aware of the presence of a friendly submarine, and approaching at high speed from leeward had not seen the White Ensign flown by J1.
J1 made further unsuccessful attacks on enemy submarines on 8 and 9 May 1917.
In June 1917 it was decided to conduct a large scale operation using both destroyers and submarines to flush out enemy submarines either leaving for patrol or returning to their bases from the Atlantic. Known as Operation BB, it was planned to force enemy submarines to dive through certain areas heavily patrolled by destroyers so that they would be on the surface while passing through adjacent areas patrolled by British submarines. The British submarines employed included J1, J2, J4 and J5. During the ten days, 15 to 24 June, 19 German submarines passed in or out of the North Sea; 12 homeward bound and seven outward bound. There were 26 sightings and 11 attacks made, eight by destroyers and three by submarines.
On 20 June at 14:45 in position 58°N, 01°36´E, J1 saw an enemy submarine come to the surface three miles away and fired one torpedo at 4500 yards. Three more were fired but by then the range opened again to 5000 yards and all missed. J1 then surfaced and gave chase at full speed opening fire with her gun. She claimed two hits before the enemy was lost in poor visibility.
On 28 July 1917, at 18:15 when on patrol off the Danish coast near the Lodbjerg Light, J1 sighted a submarine and fired four torpedoes, all of which missed. The enemy was probably U-45.
Between 1 December 1917 and 15 May 1918, J1 was based at Gibraltar and was at sea for 103 days out of 166, including 665 hours dived. On one occasion a three week patrol was carried out. Anti U-boat patrols were carried out near the shipping route along the Spanish coast or well out in the Atlantic towards the Canary Islands.
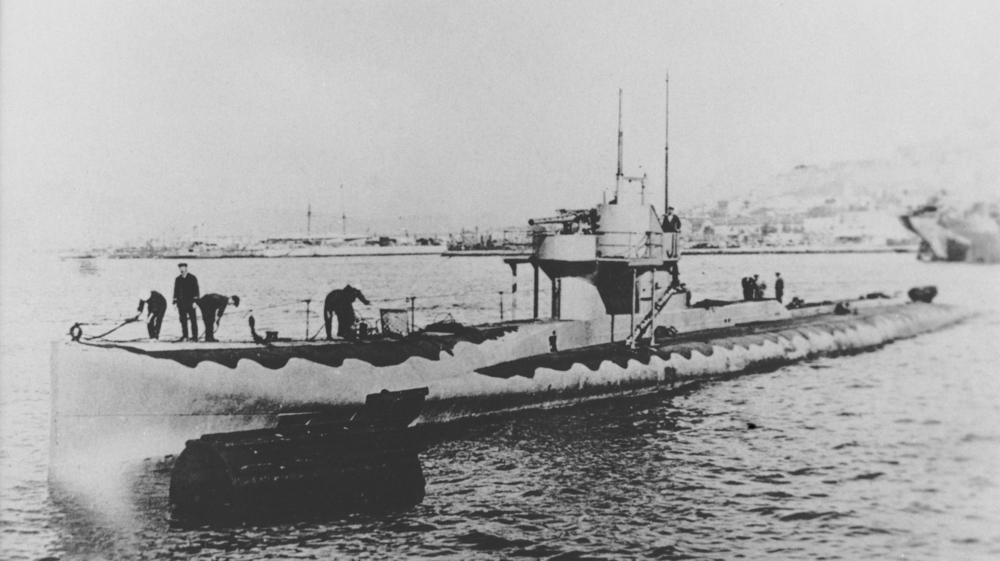
HMS J1, circa 1917, while on service in the Mediterranean.
While escorting a convoy near Gibraltar on 31 July 1918, HMS Kennett was ordered to proceed to the assistance of J1 which had broken down and was lying stopped. Kennett received this information from a seaplane, though it is not clear whether the seaplane landed to pass over the information or merely dropped a message nearby. Kennett was unable to assist and J1 had to be towed back to Gibraltar.
On 9 November 1918 while on patrol off Gibraltar, J1 attacked an enemy submarine. The target may have been UB-51. Having fired a salvo of torpedoes, and missed, J1 then surfaced and opened fire with her gun and the enemy boat dived. She then closed the spot and dropped depth charges on the estimated position of the enemy. Although unsuccessful the attack is of interest since it involved an unusual form of attack by one submarine on another. The depth charges were fitted as the result of an idea by J1's Commanding Officer, Lieutenant Commander RL Ramsay RN, who had envisaged four ‘200 lb naval bomb stick throwers’ abaft the conning tower. In the event two chutes were fitted internally just forward of the steering gear. About twenty charges were carried. The equipment was manned by Stokers under the Chief Stoker, orders being passed from the bridge by means of a special telegraph. The charges were lowered on strops into the chutes, the lid was then clamped down and the firer stood by for orders. When ordered a lever was pulled and the charges dropped out. The boat had to be going at full speed at the time to avoid damage to herself.
Following the conclusion of hostilities in World War I, the Admiralty in 1918 presented the six remaining boats of the J Class to the Australian Government - J6 had been sunk in error in 1918 by a British ship. All the submarines commissioned into the Royal Australian Navy at Portsmouth on 25 March 1919, as tenders to the submarine depot ship HMAS Platypus, J7 being the senior boat. The commanding officer of J1 was Lieutenant Ronald A Trevor RN.
The beam tubes were removed from all six J Class submarines before they sailed for Australia. The tubes were despatched separately to Garden Island. The reasons given for the removal were that the beam tubes were not a success and that increased accommodation was required.
On 9 April 1919 Platypus and the submarines, escorted by the light cruiser HMAS Sydney, sailed from Portsmouth for Australia, their first two ports of call being Gibraltar and Valetta.
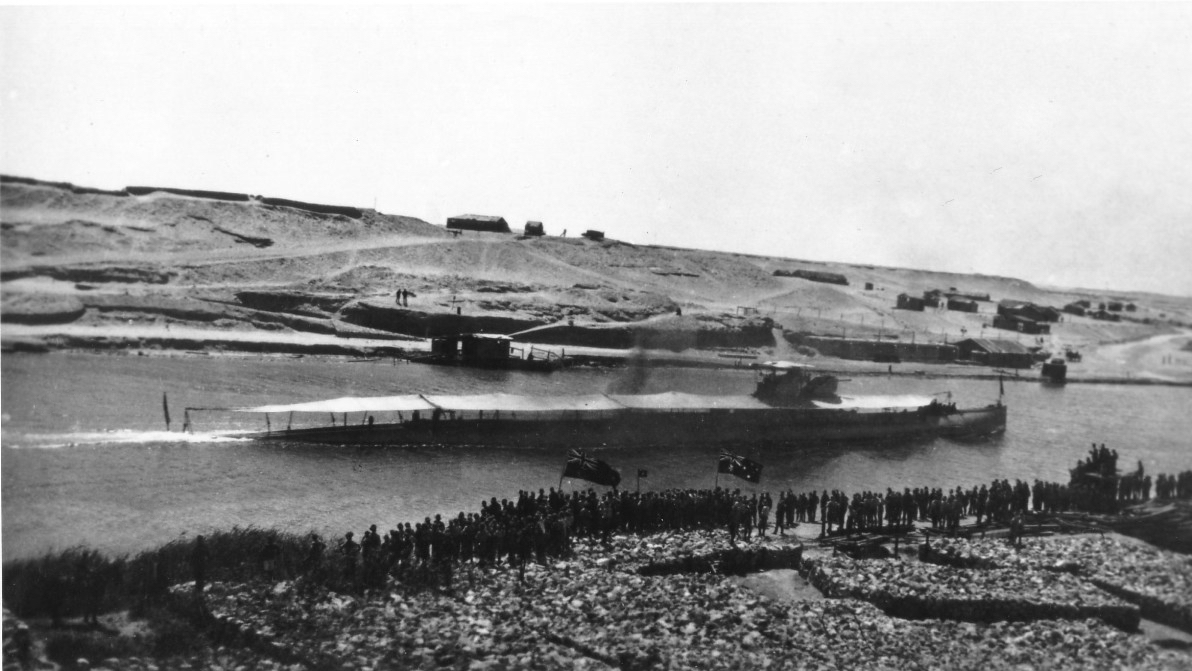
Australian troops cheer J1 through the Suez Canal, circa 1919.
On the night of 28 April, the night before the vessels arrived at Port Said, J3’s starboard main engine shaft snapped. Thus handicapped she could not keep up with the others and consequently on departure for Aden on 30 April, J3 was in tow of Sydney.
The vessels arrived at Aden on 5 May. On the same day the light cruiser HMAS Brisbane, which had left Portsmouth on 17 April, also arrived. On 7 May all the vessels sailed for Colombo. Brisbane took over the tow of J3 while Sydney took J5 in tow as that boat had also developed engine trouble. Three days after arrival at Colombo on 15 May, Brisbane sailed with J5 in tow, taking her all the way to Sydney, where they arrived on 27 June.
J3 was taken in hand at Colombo for repairs. On 31 May Sydney, J1, J2, J4 and J7 sailed for Singapore, followed on 2 June by Platypus and J3. The vessels were reunited at Singapore from where all except Sydney sailed on 18 June. Sydney sailed for Australia a few days later but did not rejoin the other vessels. On 29 June Platypus and the five submarines arrived at Thursday Island, although J7 was three hours late because of trouble with her engine lubricating system. The last call before Sydney was Brisbane, Sydney being reached on 15 July.
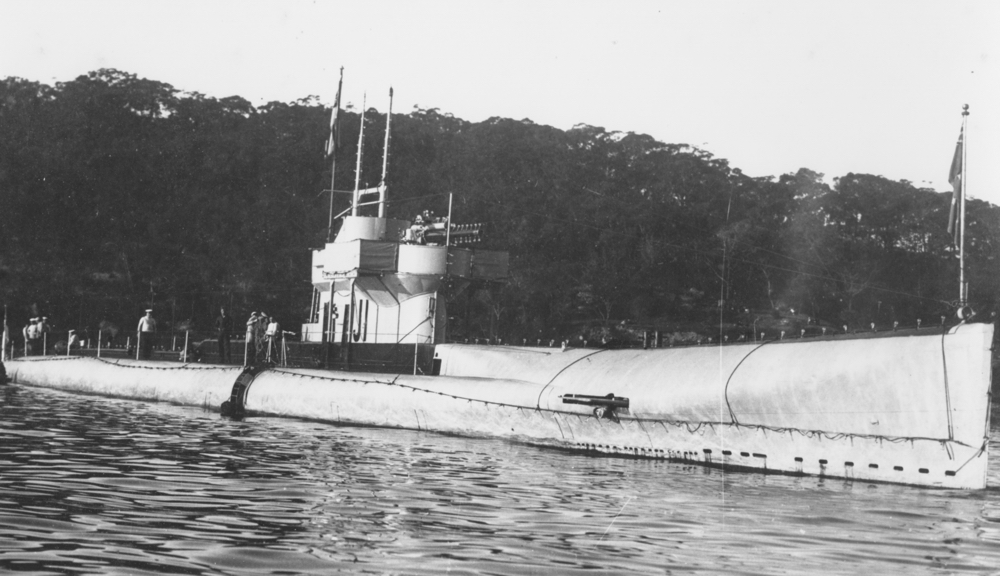
J1 in Sydney Harbour, circa 1920.

Having arrived in poor condition, the submarines were taken in hand at Garden Island Dockyard for refitting. After her refit was completed J1, in company with J4 and Platypus, sailed on 16 February 1920 for the submarine base at Geelong, Victoria.
J1 in Australian waters, circa 1920.
After uneventful service, little of which was spent at sea, J1 and her five sisters paid off into Reserve at Westernport on 12 July 1922. The boats had become victims of the worsening economic conditions of the time, coupled with their high cost of maintenance.
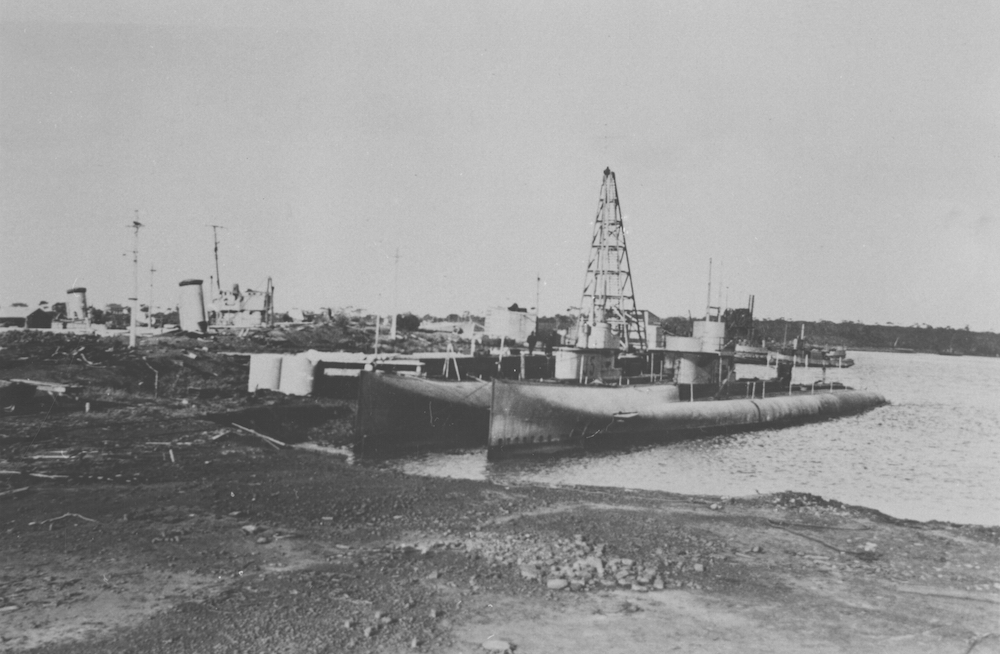
Two of the J Class submarines in Westernport, Victoria, circa 1922.
On 26 February 1924 J1 was sold to the Melbourne Salvage Syndicate. The hull was sunk three miles off Barwon Heads on 26 May 1926.
J1’s ship’s bell, along with the bells of her sister submarines, was declared for disposal per Commonwealth Naval Order 51 of 1932. J1’s bell was quite unique as in addition to having the name of the submarine and its commissioning year engraved on it, ‘J.1 Portsmouth 1916’, around its rim was the following inscription:
Ha! Ha! Ha!, He! He! He!, I can see you! But you can’t see me!
On 24 September 1932 J1’s bell was presented to Launceston Grammar School, Tasmania, after Captain Cyril Benson, DSO, RN, a former Second Member of the Naval Board and captain-super-intendant of training at Flinders Naval Depot learnt that a bell previously used by the school had fallen into disrepair and was in need of replacing. It was his hope that:
The bell, the fierce adventures through which it has passed, the courage, loyalty and devotion which it has witnessed and of which it is a symbol, may prove a continuing source of inspiration to the boys of the school.
