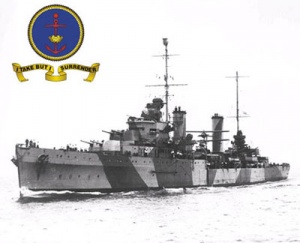
HMAS Sydney (II) was launched on 22 September 1934. It was laid down as HMS Phaeton in the shipyard of Swan, Hunter and Wigham Richardson, at Wallsend-on-Tyne in England in 1933.

HMAS Sydney (II)
Sydney was one of 3 British modified Leander class light cruisers bought by the Royal Australian Navy (RAN). The others were HMA Ships Perth and Hobart. They were known as Perth class light cruisers.
Sydney was completed on 24 September 1935. Former crew member Lieutenant Commander John Ross recalled:
It was an exciting and proud moment for us as we watched this brand-new ship - the last word in cruiser design - come gliding in, its new paintwork shining and its deck snow-white in the morning sunlight.
Sydney had an overall length of 555 feet, a beam of 56 feet 8 inches and a standard displacement of 7250 tonnes. Its main armament were 8 6-inch Mk XXIII guns, housed in four Mark XXI twin turrets. The two forward turrets were ‘A’ and ‘B’ and the two after turrets were ‘X’ and ‘Y.’
Its secondary armament were 4 4-inch quick firing Mark V anti-aircraft guns. It also had 8 21-inch above-water torpedo tubes arranged in quadruple mountings. These mountings held Mark IX torpedoes, each of which carried a 750-lb warhead. Its close-range weapons included 12 0.5-inch Vickers machine guns, sited on 3 Mk II quadruple mountings.
Sydney's journey to Australia was interrupted by Italy's invasion of Abyssinia. Sanctions were imposed on Italy and Sydney was ordered to Gibraltar to reinforce the Second Cruiser Squadron of the Royal Navy (RN).
In March 1936 Sydney joined the heavy cruiser HMAS Australia in Alexandria as part of the First Cruiser Squadron. The 2 Australian vessels took part in many fleet exercises over the following 4 months.
The Second World War was declared on 3 September 1939. Sydney had already taken up its war station at Fremantle. There it received a draft of an additional 135 sailors and several officers to boost its complement to a war footing of 645. Sydney conducted gunnery and torpedo exercises off the Western Australian coast and began patrol and escort duties. For the rest of 1939, and the first few months of 1940, Sydney conducted patrol and escort work in the Indian Ocean.
The Mediterranean
On 1 May, Sydney was ordered to proceed to Columbo. From there, the vessel was directed to Alexandria where it joined the RN Mediterranean Fleet on 26 May.
In early June 1940, Sydney participated in a series of exercises as part of the Seventh Cruiser Squadron. On 10 June, with France about to fall and with Britain’s future looking precarious, Italy entered the war on the side of Germany.
Within hours of Italy’s war declaration on 11 June, the British Fleet, under the command of Admiral Sir Andrew Cunningham RN, sailed on its first patrol sweep. The fleet returned to Alexandria 2 days later. It had to make a cautious entry due to minefields which had been laid by enemy submarines off the harbour entrance.
Throughout June Sydney participated in patrols. It also took part in a major shore bombardment of Bardia later in the month. During this bombardment Sydney’s amphibian Seagull aircraft helped coordinate the cruiser’s fire. The Royal Australian Air Force (RAAF) and RAN aircrew had no sooner begun their task when they were set upon by fighters which seemed intent on shooting them down. They put up a defence before the aggressors broke off their attack leaving the Seagull full of holes and barely airworthy. Its pilot, Flight Lieutenant TM Price RAAF, force landed at a British airfield some miles away. The plane was so badly damaged that it was written off. Price was awarded the Distinguished Flying Cross for his performance.
On 28 June Sydney was involved in the pursuit of 3 enemy destroyers detected by aerial reconnaissance. Sydney impaired one of them, Espero. As Sydney approached the Italian vessel it opened fire with guns and torpedoes in a last act of defiance. Sydney’s response was swift and final with its 6-inch guns soon reducing the destroyer to a burning wreck. Espero healed over and sank.
On 30 June the Seventh Cruiser Squadron came under several aerial attacks from Italian bombers during its return passage to Alexandria but was undamaged.
The fleet sailed from Alexandria late in the evening of 7 July and the following day came under intense air attack from the Italian air force. During one of these raids the cruiser HMS Gloucester was hit by a bomb which killed its captain and 17 others.
Later that evening a reconnaissance aircraft reported sighting 2 enemy battleships steering south about a hundred miles north-west of Benghazi. These capital ships were supported by 6 cruisers and 7 destroyers and were later observed to alter course to the north.
Cunningham decided to manoeuvre his force between the enemy fleet and their base at Taranto to try and cut them off and bring them into action. The next day planes from the aircraft carrier HMS Eagle relocated the Italian ships and Cunningham’s fleet closed them. At 3 pm HMS Neptune, part of the vanguard of cruisers which included Sydney, saw 4 Italian cruisers. Shortly after, the entire enemy fleet came into view. It included 2 battleships, 12 cruisers and several destroyers. The vanguard was outnumbered, and found itself in action when the Italian heavy cruisers opened fire on them at 3.14 pm.
Cunningham, in HMS Warspite, helped the cruisers. The battleship’s fire forced the enemy to retire under the cover of smoke. By then, battleships HMS Malaya and Royal Sovereign were approaching, as were the British destroyers which were concentrating for an attack.
Shortly before 4 pm, at a 13 mile range, Warspite opened fire on the 2 enemy battleships and succeeded in straddling them. The Italian flagship, Guilio Cesare, was hit by a 15-inch shell from Warspite. This caused the Italians to turn away under a dense screen of smoke.
Meanwhile, the Allied cruisers had rejoined the action and were attempting to close the enemy destroyers. By 4.40 pm, however, the engagement was almost over. Sydney had survived unscathed with no casualties and only a few of its signal halyards shot away. During the action it used over 400 rounds of its 6-inch ammunition. By the time it returned to Alexandria it had used all its 4-inch anti-aircraft ammunition beating off air attacks.
These attacks came as the Battle Fleet chased the Italians to within 25 miles of the coast of Calabria before breaking off the pursuit and altering course for a position south of Malta. The fleet continued to be harassed from the air as it made its way back to Alexandria where it arrived on 13 July. There Sydney docked briefly for hull maintenance and to take on ammunition before its next patrol.
Battle of Cape Spada
On 18 July, Sydney sailed from Alexandria with the destroyer HMS Havock bound for the Gulf of Athens. They had orders to support Commander H St L Nicolson’s destroyer flotilla consisting of HMS Hyperion, Hero, Hasty and Ilex in the Aegean Sea. Nicolson was to intercept any Italian shipping attempting passage to or from the Dodecanese. He was also to carry out an anti-submarine sweep from east to west along the north coast of the island of Crete.
Collins, realising that Nicolson’s westward sweep might expose him to enemy attack in the restricted waters of the Aegean, adjusted his course and speed so that he was better placed to provide support if required.
On 19 July, Nicolson sighted 2 enemy Condottieri class cruisers which soon opened fire on his destroyers. Nicolson had little choice other than to retreat. He did not know that Sydney and Havock were closing his position. Nicolson made an enemy contact report and withdrew towards what he believed to be a far distant Sydney.
Sydney was hundreds of miles closer than anyone realised. It maintained strict communications silence so as not to alert the enemy to its position. At 8.20 am the 2 Italian cruisers were sighted and 8minutes later, Sydney hoisted its battle ensigns and opened fire at a range of approximately 10 miles. Both the enemy and the British destroyers were surprised by the sudden appearance of Sydney. Before long, Sydney hit one of the enemy cruisers, the Giovanni Delle Bande Nere.
By then Nicolson’s destroyers were in wireless contact with Sydney and the 2groups joined forces north of Cape Spada. Sydney had hit both enemy cruisers. It became apparent that the cruisers were attempting to retreat towards the Antikythera Channel under cover of smoke. The enemy gunfire became sporadic and one of the cruisers, Bartolomeo Colleoni, was seen to be on fire and losing headway, before coming to a complete stop.
Two of Nicolson’s destroyers, Hyperion and Ilex, were ordered to finish it off and pick up survivors. They were later relieved by Havock which stayed in the area until it came under the threat of enemy air attack. The destroyers 550 Italians, including its Captain, were rescued by the destroyers.
Meanwhile, Sydney continued to chase the remaining cruiser, the Giovanni Delle Bande Nere. At 10.25 am Sydney broke off the pursuit. It was low on ammunition and coming within range of Italian bomber aircraft. During the action Sydney sustained one hit to its forward funnel which caused only minor damage and no casualties.
The Italian air force was soon on the scene and doing its best to sink Sydney. These attacks continued throughout the afternoon and Havock was damaged, although not seriously. At 11 am on 20 July Sydney entered Alexandria harbour. The Commander-in-Chief, Admiral Cunningham, boarded Sydney from his barge to personally congratulate commanding Officer Captain J A Collins and his crew. Admiral Cunningham recalled:
For this fine, brisk action which showed the high efficiency and magnificent fighting qualities of the Royal Australian Navy, Captain Collins was immediately awarded the Companion of the Bath, by His Majesty, a well-deserved honour.
His report to the Admiralty concerning the action was similarly flattering, recording:
The credit for this successful and gallant action belongs mainly to Captain JA Collins, C.B., RAN, who by his quick appreciation of the situation, offensive spirit and resolute handling of HMAS Sydney, achieved a victory over a superior force which has had important strategical effects. It is significant that, so far as is known, no Italian surface forces have returned into or near the Aegean since this action was fought.
For the rest of 1940, Sydney took part in further patrols, anti-submarine sweeps, convoy escort duties and shore bombardments in the Mediterranean and Adriatic. In January 1941 it was ordered to return to Australia. Admiral Cunningham expressed his regret over its departure but hoped that ‘your countrymen will give you the reception you deserve.’
On Tuesday 11 February, the Premier of New South Wales Mr Mair and the City of Sydney Lord Mayor, Alderman Crick came on board the cruiser to present a plaque to the ship commemorating its victory over the Bartolomeo Colleoni on behalf of the citizens of Sydney. The plaque had two large medallions mounted on oak. It was attached to the gun housing of ‘Y’ turret below the sighting ports. After the unveiling of the plaque, the crew marched through the streets of Sydney to a reception at the Town Hall.
The Australia Station
On 28 February, Sydney sailed to Fremantle where it began a period of routine convoy escort duties off the Western Australian coast. In April it returned to the eastern seaboard and escorted the troopship Queen Mary to Jervis Bay. It then went to Singapore to carry the First Naval Member to an Allied conference. While in Singapore it was decided that Captain Collins would be appointed the Australian Naval Representative to the Commander-in-Chief China (based in Singapore) Vice Admiral (Sir) Geoffrey Layton.
On 15 May 1941, Captain Collins handed over command of Sydney to Captain Joseph Burnett RAN. Captain Collins reflected:
To me there has never been before nor will there ever be again, a ship quite to compare with the cruiser Sydney of the Second World War.
Loss of HMAS Sydney
Sydney sailed from Fremantle on Armistice Day, 11 November, 1941 to escort the troopship Zealandia to Sunda Strait where it was to be relieved by the British cruiser HMS Durban for the last leg of the voyage to Singapore. The voyage was without incident and at noon on the 17 November Zealandia was turned over to Durban and Sydney then proceeded back to Fremantle where it was expected to arrive on the afternoon of 20 November 1941.
Sydney did not arrive as expected. The District Naval Officer, Western Australia, reported to the Naval Board at 11 am the following day that Sydney was overdue. This did not immediately concern the Naval Board as they had been advised that Zealandia had arrived later than anticipated and it was assumed that Sydney too had been delayed. There was also the possibility that it might have diverted for another purpose and had not broken radio silence. When, however, it had not returned by 23 November, it was instructed by the Naval Board to report by signal. There was no reply.
The reconstruction of events leading up to Sydney’s disappearance relies primarily on information gathered from interrogations of German survivors from the raider HSK Kormoran which Sydney engaged on the afternoon of 19 November 1941. The following is an account of Sydney’s final action and subsequent loss based on surviving records and the findings of a Chief of Defence Force inquiry concerning the loss of Sydney released in July 2009. Times are in G time zone (UTC+7) as recorded by the Germans.
Returning from its convoy duties to Java, Sydney was proceeding south along the north-west coast of Western Australia when it sighted what appeared to be a merchant vessel at about 4 pm on 19 November 1941, 130 miles west of Shark Bay. The ship was the German Navy’s largest auxiliary cruiser, Kormoran, disguised as the Dutch merchant ship MV Straat Malakka Kormoran.
Sydney challenged the vessel using its searchlight while at the same time closing the range between the 2 ships. Merchant vessels were known to be less efficient at visual signalling and the Germans exploited this knowledge through their actions on their flag deck and by their slow response to Sydney’s visual challenges. At 5 pm, to further the deception, Kormoran broadcast a ‘suspicious ship’ message, feigning a cry for help in the name of Straat Malakka.
Sydney’s efforts to establish the identity of the vessel resulted in its closing the range to a point where it no longer had the advantage of its superior armament. At approximately 5.15 pm Sydney had drawn almost abeam of Kormoran to starboard, less than a mile distant. Both ships were steering west-south-west at about 15 knots. Still wary, the Australian cruiser kept its main armament trained on the ship. Its amphibious aircraft was on the catapult with its engine running. It then signalled, both by flags and flashing light: ‘Where bound?’ Kormoran replied ‘Batavia.’ The crucial moment then came when Sydney hoisted a two flag signal consisting of the letters ‘IK’ which the raider could not interpret. They were in fact the two centre letters of the Straat Malakka’s four letter secret identification signal (IIKP). With no reply forthcoming Sydney signalled in plain language ‘Show your secret sign.’
Finally, when concealment of his vessel’s true identity was no longer possible, Kormoran struck the Dutch colours and hoisted the German naval ensign. Kormoran opened fire at approximately 5.30 pm.
It is likely that the raider’s first salvo destroyed Sydney’s bridge, with the result that its primary control was immediately put out of action. Sydney’s own guns opened fire at the same time as a full salvo that passed over Kormoran without inflicting damage. Kormoran again scored hits on Sydney with two salvos again hitting its bridge and midships section. According to the Germans, all of Kormoran attacked Sydney with all its armaments, concentrating on its bridge, torpedo tubes and anti-aircraft batteries.
For a few seconds after its initial salvo Sydney did not reply. It appears that its forward A and B turrets were put out of action leaving only its after turrets X and Y to respond. The Germans reported that Sydney’s X turret opened fast and accurate fire, hitting Kormoran in the funnel and engine room. Y turret fired only two or three salvos, all of which went over. At about this time one of the raider’s two torpedoes struck Sydney under A and B turrets. The other passed close ahead of the stricken ship, which was subjected to enfilading fire.
With its bow low in the water, Sydney turned sharply towards Kormoran as though attempting to ram. As it did so, the top of B turret was blown off and flew overboard. The cruiser then passed under Kormoran’s stern, heading to the southward and losing way. Kormoran, maintaining its course and speed, was now on fire in the engine room where hits by Sydney’s X turret had caused severe damage. Smoke from the fire hid Sydney from Kormoran’s bridge but the raider continued to engage with its after guns as the range opened to approximately 4400 yards.
At about 5.45pm Sydney fired a torpedo when Kormoran’ was turning to port to bring its broadside to bear. However, Kormoran’s engines began to fail. The torpedo track was sighted and it was subsequently avoided. Simultaneously the raider’s engines broke down completely.
Sydney, on fire from the bridge to the after funnel, steamed slowly to the south. It returned only sporadic fire from its secondary armament. Although by now the range had opened to 6600 yards Sydney continued to receive steady hits from Kormoran’s port broadside. At 6 pm, at a range of 7700 yards, Kormoran fired one torpedo that missed Sydney’s stern.
Kormoran fired its last shot at 6.25 pm at a range of about 11 000 yards. The Germans claim to have fired approximately 450 rounds from its main armament and hundreds from its anti-aircraft batteries. Sydney disappeared from view and was last seen by the Germans about 10 miles off, heading approximately south south-east. From then until about 10 pm, all that was seen was a distant glare then occasional flickerings until midnight at which time all trace of Sydney disappeared.
Of Sydney’s total complement of 42 officers and 603 sailors, none survived. This number included six members of the RAAF and four civilian canteen staff. The only significant material evidence recovered from Sydney was an Australian naval type Carley life float recovered eight days after the action by Heros and an Australian naval pattern lifebelt recovered by HMAS Wyrallah. The Carley float found by Heros is now preserved in the Australian War Memorial in Canberra.
Specifications
 |
| Class |
Modified Leander Class |
|---|---|
| Type |
Light Cruiser |
| Pennant |
D48 |
| Builder |
Swan, Hunter and Wigham Richardson Ltd, Wallsend on Tyne, England |
| Laid Down |
8 July 1933 |
| Launched |
22 September 1934 |
| Commissioned |
24 September 1935 |
| Fate |
Lost in action on 19 November 1941 |
| Dimensions & Displacement | |
| Displacement | 7250 tons standard |
| Length | 555 feet overall |
| Beam | 56 feet 8 inches |
| Performance | |
| Speed | 32.5 knots |
| Complement | |
| Crew | 645 |
| Propulsion | |
| Horsepower | 72,000 |
| Armament | |
| Guns |
|
| Torpedoes | 8 x 21 inch torpedo tubes ( in 2 quadruple mounts) |
| Awards | |
| Inherited Battle Honours |
|
| Battle Honours |
|